 Happy New Year! I hope 2023 is a brilliant year for you full of good health and happiness. The start of a brand new year always feels like a good time to reflect on the past year and think about what changes we can make for the new one. I began by thinking I didn't really achieve much last year because I thought about all of the things I didn't do. My list of goals, none of which I completed. All of the things I started but didn't finish. I had to remind myself that it was a tough year personally in many ways, my health wasn't at it's best. But hopefully I am through the worst of that now and I can move forward. When I looked back on what I did make, I was pleasantly surprised that I did work on some nice projects last year! I also taught some lovely workshops at the festival of quilts and the knitting and stitching show, meeting so many lovely people at both. So overall last year ended up being better than I initially thought!  A major highlight of the past year was the quilt as you go community project. I started a quilt as you go quilt and after sharing it on Youtube, I asked others to join in and to send info and photos of their projects in so I could share on the channel. The response was fantastic and I really enjoyed seeing what everyone was making. If you'd like to see too, I will leave the video below so you can watch, it's so inspiring I know you'll enjoy it too. In 2022 I launched my Stitch School and I am really proud of it. So far there are two workshops on there, one that is an add on to the Hexagon Sewing Case pattern and one that is a stand alone mini workshop for the Flower Power Pincushion. I have lots in the works for more workshops in 2023 and I am looking forward to sharing that with you in due course.  Thank you so much for all of the support you have shown me over the past 12 months. Whether that is through following on Instagram or Youtube, buying my patterns and workshops, or purchasing items from my shop, it all means so much to me and I have a lot to be grateful for. Wishing you a wonderful 2023 full of lots of creativity.
Emma
5 Comments
 One thing I love is working with scraps, especially if they are tiny! It feels so good to make something useful from fabric that would otherwise be thrown away. I don't actually throw any scraps away anymore. I tend to use scraps in my projects more than new fabric! But in my most recent video on Youtube, I challenged myself to use as many small scraps as I could and this is what I came up with. I hope you enjoy it and I hope you make one too!  Hello Friends, how are you doing? I hope that wherever you are in the world that you are doing ok during the difficult times we have been facing. In the UK we are in our third lockdown and I have found this Winter lockdown to be difficult if I am honest. But I have tried to stay as positive as I can and sewing has really helped me to do that. I have just let myself make whatever I feel like and that has been really freeing and enjoyable. 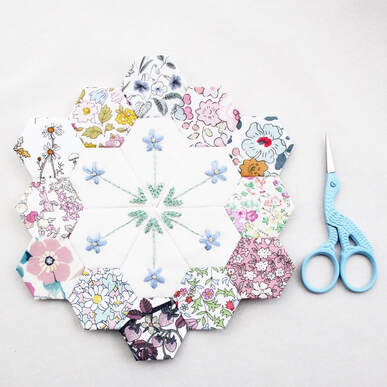 Over the last 12 months, I have really learnt how important sewing is to my mental health and well-being. If I haven't managed to fit a bit of stitching into my day, I don't feel as calm, relaxed and happy. Stitching allows me to forget about any worries and gives me something positive to focus on. This week on my Youtube channel, I shared a video about the projects I have been working on during this lockdown and what it is about these projects in particular, that is helping me to cope with lockdown. You can find the video below. I have also linked a video below that I made in September, which describes how slow stitching helps me deal with stress and anxiety. I hope you enjoy watching these videos, thank you so much and take good care of yourself. 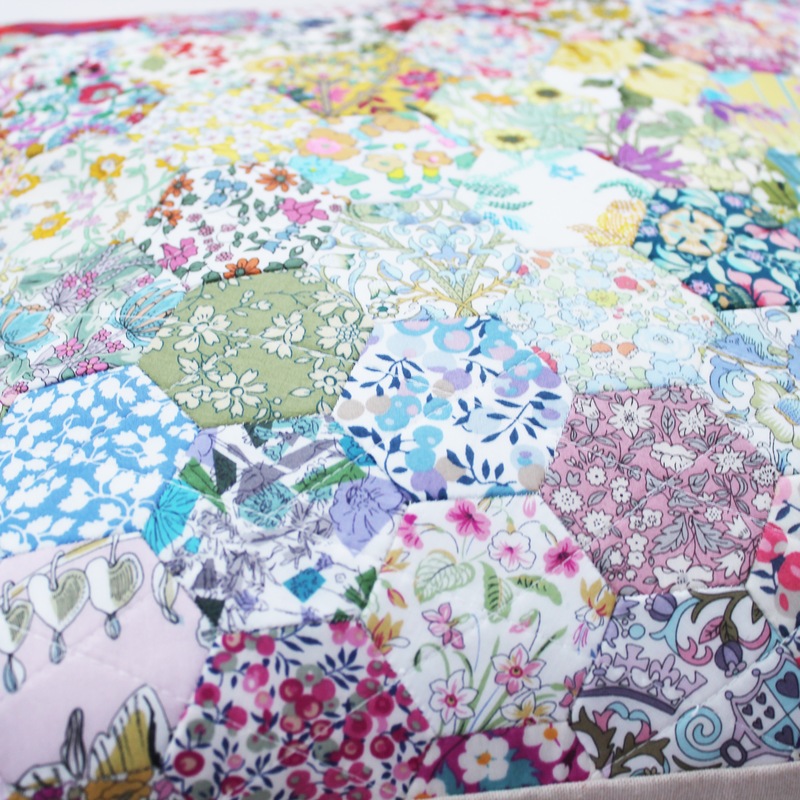 This week's Youtube video (well it should have been last week's but I am behind on all of my plans already!) is a little tutorial for how to make a hexagon cushion. This cushion is really easy to make for the following reasons: 1. I used pre-cut 1 1/4" hexagons from Ava and Neve for most of the hexagons, I only cut a few out myself. This really speeds up the process. The Liberty fabrics are so pretty and I love the overall "busy look" they created. I usually use solids to break up prints in what I make but I wanted to create a different look here. I also tried to create a bit of a rainbow gradient but not too obvious. 2. I used 1 inch Hexiform hexagons which were pre-cut too. Using pre-cut shapes and fabrics made it really quick to baste the shapes to get to the sewing part faster. 3. I glue based the shapes which is another really quick and easy method. 4. You can make the cushion any size you want, just lay out your hexagons to the desired size, remembering you will lose 1/4" in your seam allowance at the end. As a guide, my finished cushion is 14 1/2" x 12 1/2" and I made it from 7 rows of full 1 inch hexagons, 10 hexagons in each row. I also added 5 half hexagons to the top and 5 to the bottom. So that's a total of 70 x 1" hexagons and 10 x 1" half hexagons. 5. Hexiform is designed to be left in so this speeds the process up further as removing papers can take time. 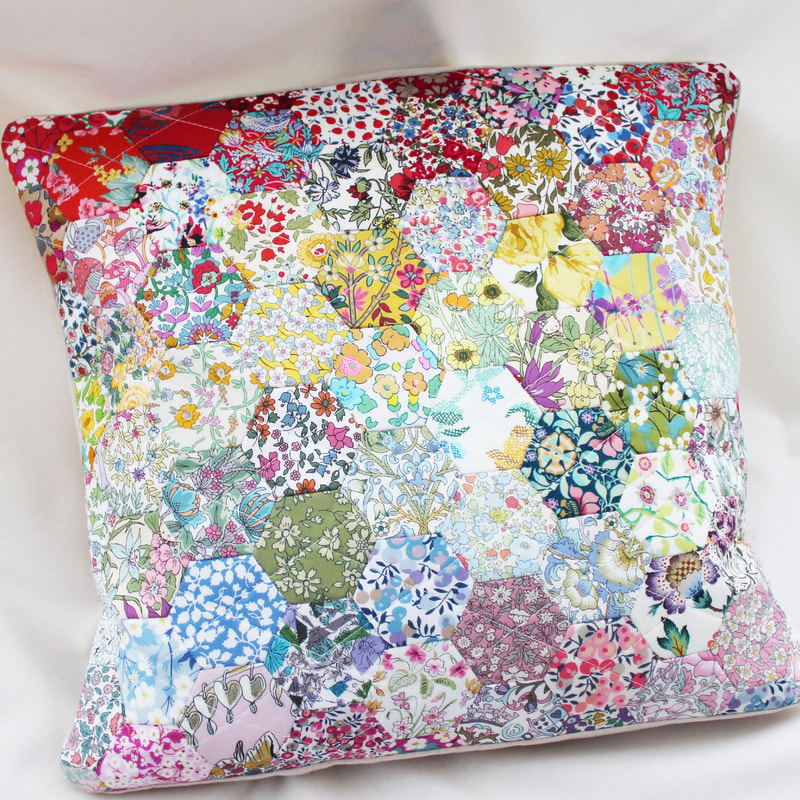 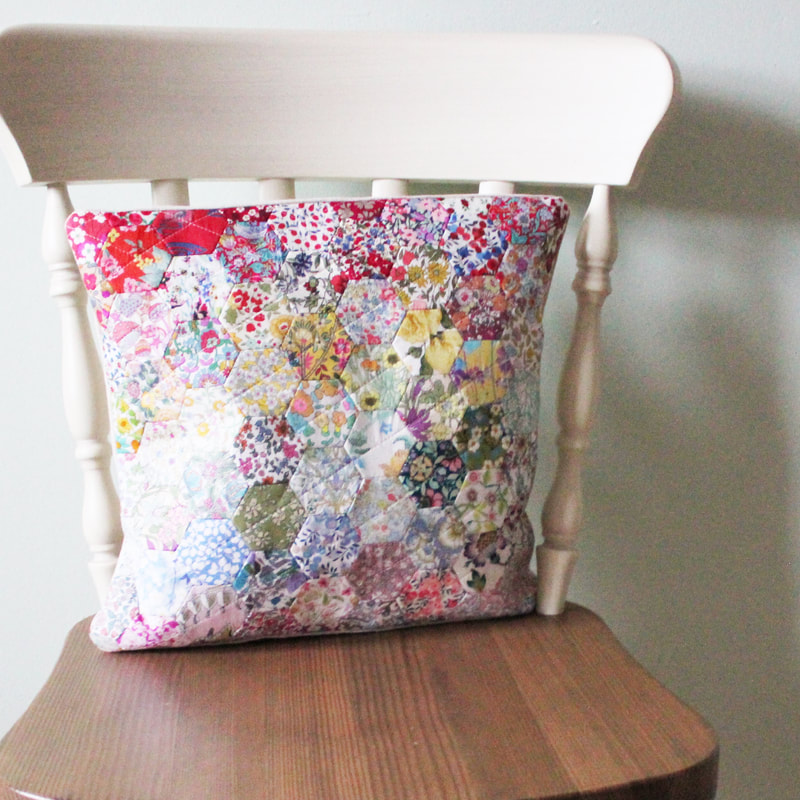 Having said all of that, it still took hours to sew it all together by hand so it was not a quick project for me. It was extremely enjoyable and relaxing to make and I am really happy with my finished cushion. I have lots of plans for more EPP cushions and I might have started two more already!
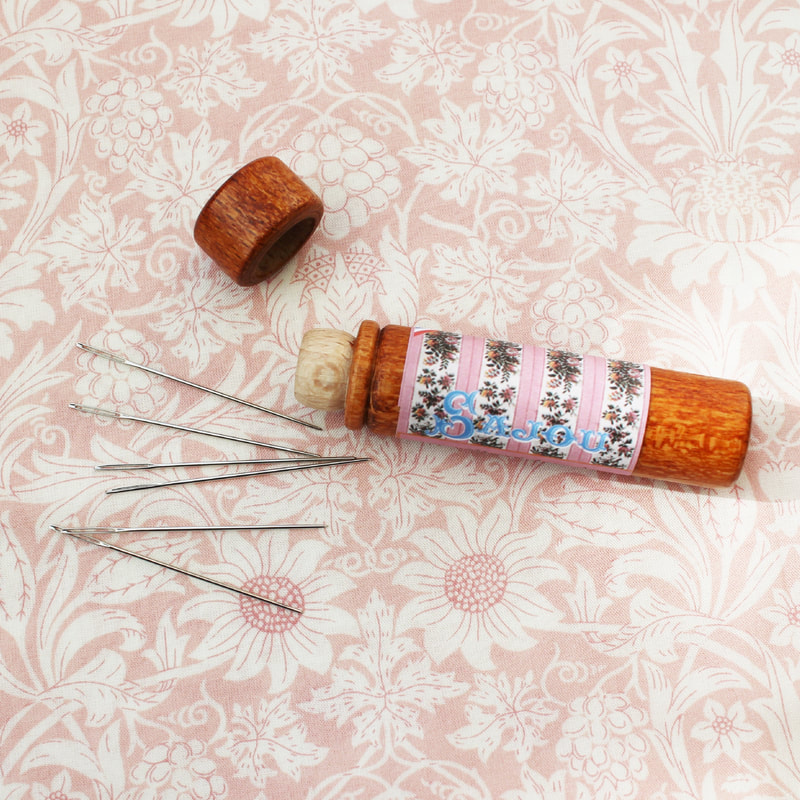
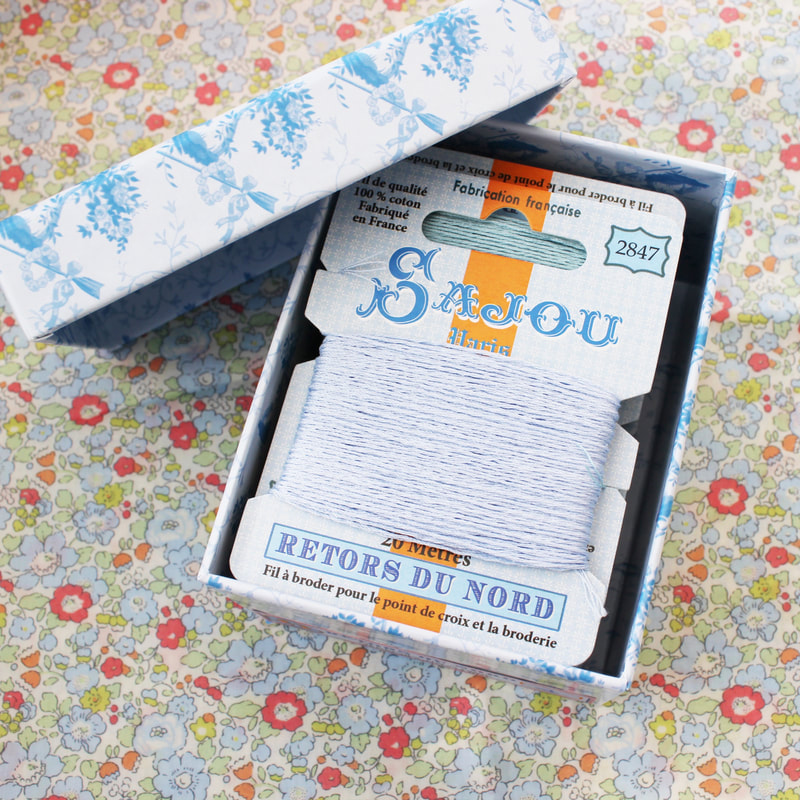
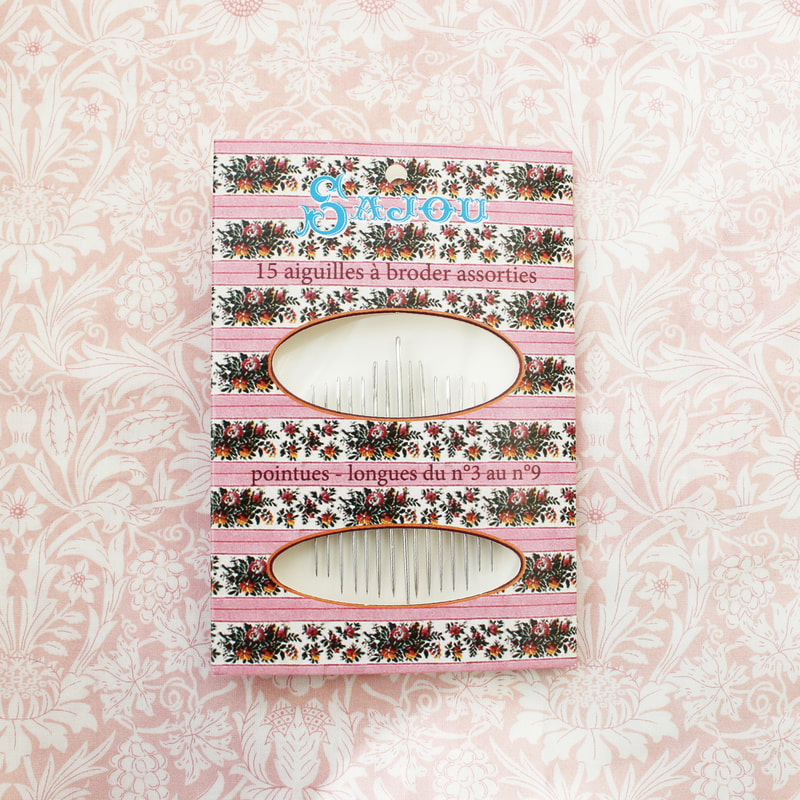
Thanks for checking out my video, have a lovely day. 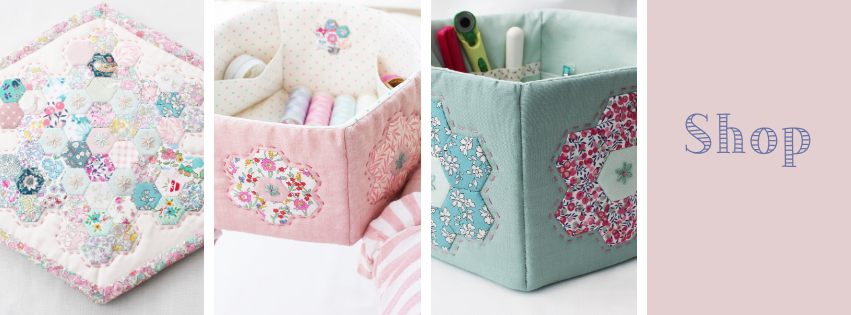 I'm really excited, and equally nervous to share that I am going to be adding more things to my shop on a regular basis! If you've read my newsletter or seen my latest Youtube video, you will have heard that as a family we have decided that it might be a good idea for me to try to sell a few extra things along side my patterns, rather than go back to my teaching job. So I have been working hard to find lovely, high quality items for my shop. 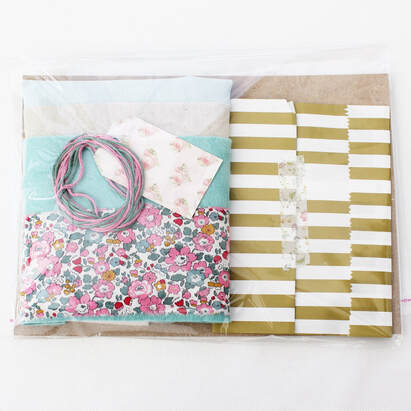 Needle Book Kit First up, I am going to offer kits for all of my patterns. So far, I just have hexagon needle book kits available. I'm hoping that next month I will have the hexagon storage basket kits available and that it will continue to grow from there. The kits contain everything you need to make the item and are really good quality materials. Of course there is some Liberty Tana Lawn in there too! 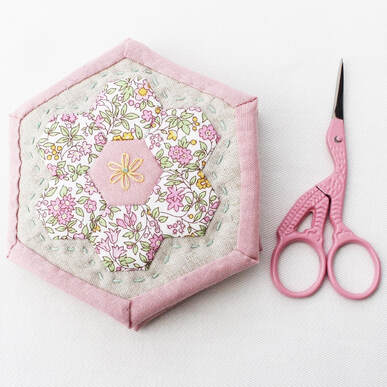 I absolutely love the French brand Sajou. Their products are beautifully made in France and have a vintage style to them. So I was delighted to become a stockist. Currently I have some of their needles and also their embroidery and gloving threads available. The gloving thread is a fine but stiff waxed thread that is strong and excellent for English paper piecing. I love the Sajou Retors du Nord embroidery thread so much! The colours are so pretty and the thread has a gorgeous lustre to it. It glides through the fabric and is just perfect for all hand embroidery. It is colourfast only up to 40c so shouldn't be used on any items that need regular hot washes.
I also have some of the beautiful Sajou sewing boxes and I have filled them with Liberty charm squares, needles, threads, bobbins and some pretty scissors. These boxes are such a treat for anyone who loves tiny patchwork! 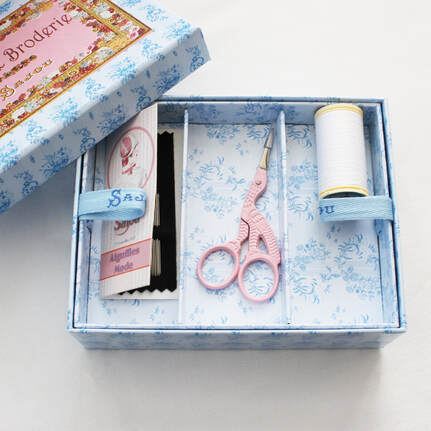 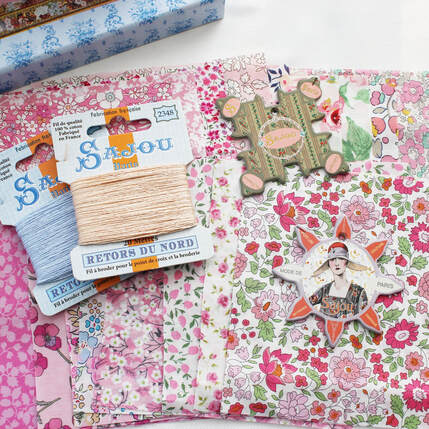 I have lots of plans for more things that will be coming to the shop, so I really hope that you like what I have. Thank you to everyone who has made a purchase already, the response has been amazing.
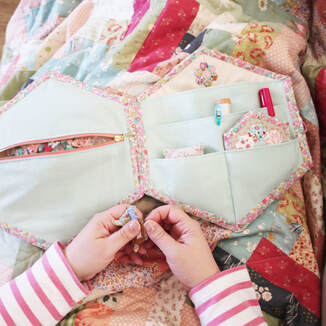
Take care, until next time, happy sewing  Hello! Today I am here with a little tutorial for how to make this tiny sewing case which is perfect for carrying around tiny stitching projects. The case has the little house block appliquéd onto it. You will find the templates for the house and the video showing how to make it here. To make the tiny sewing case, you will need:
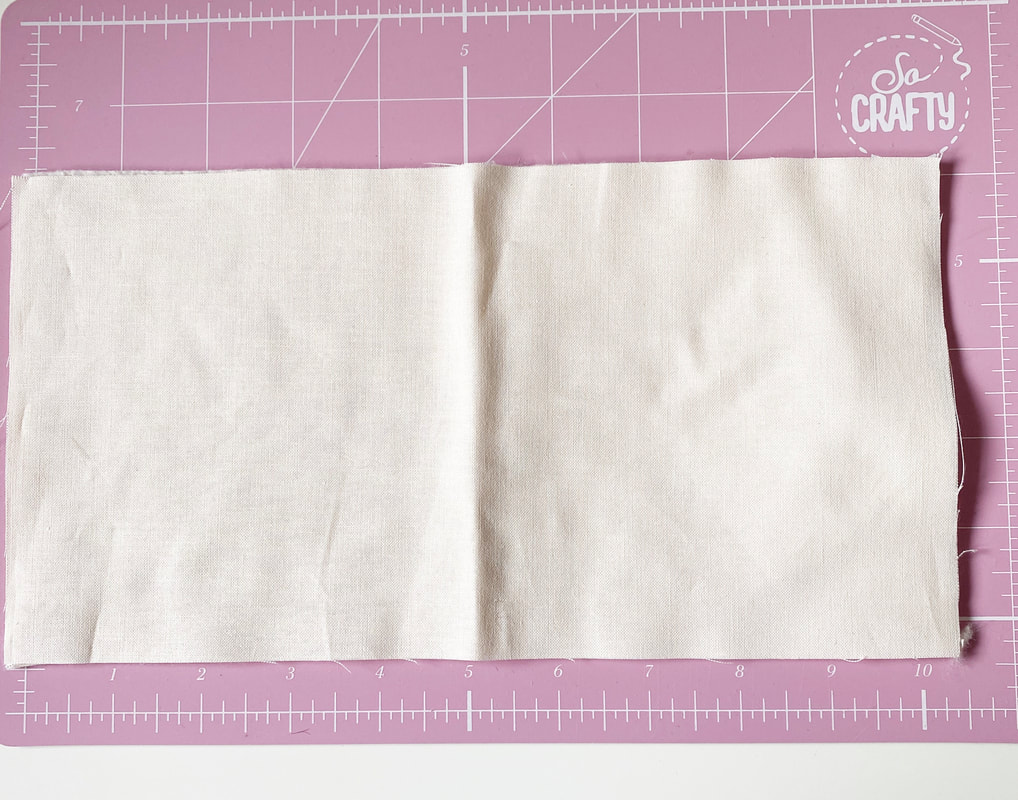 1. Take one of your pieces of cotton that measures 10 1/2" wide by 5 1/2" tall and find the centre by creasing it. 2. Applique your little house block to the right hand side. 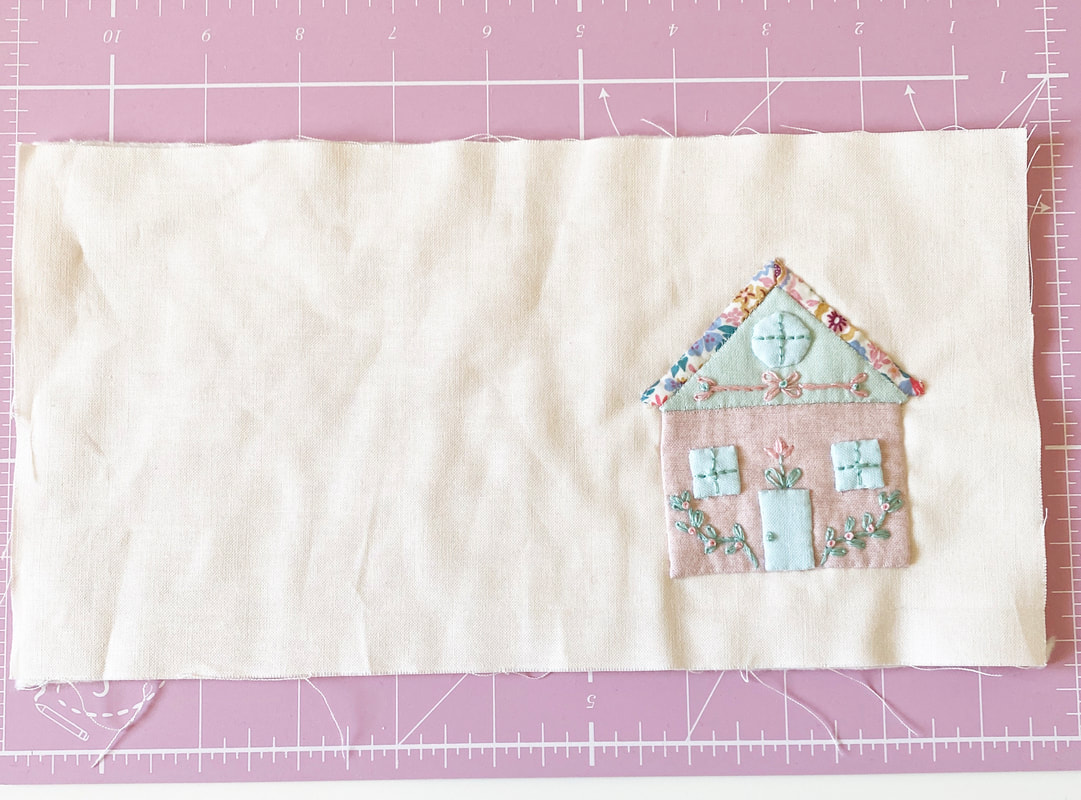 3. Create a quilt sandwich by placing your other piece of cotton measuring 10 1/2" wide by 5 1/2" tall right side down, place the foam on top and then your piece with the house on top of that. Pin in place and sew all the way around the edge using a 1/4" seam allowance to secure the layers. 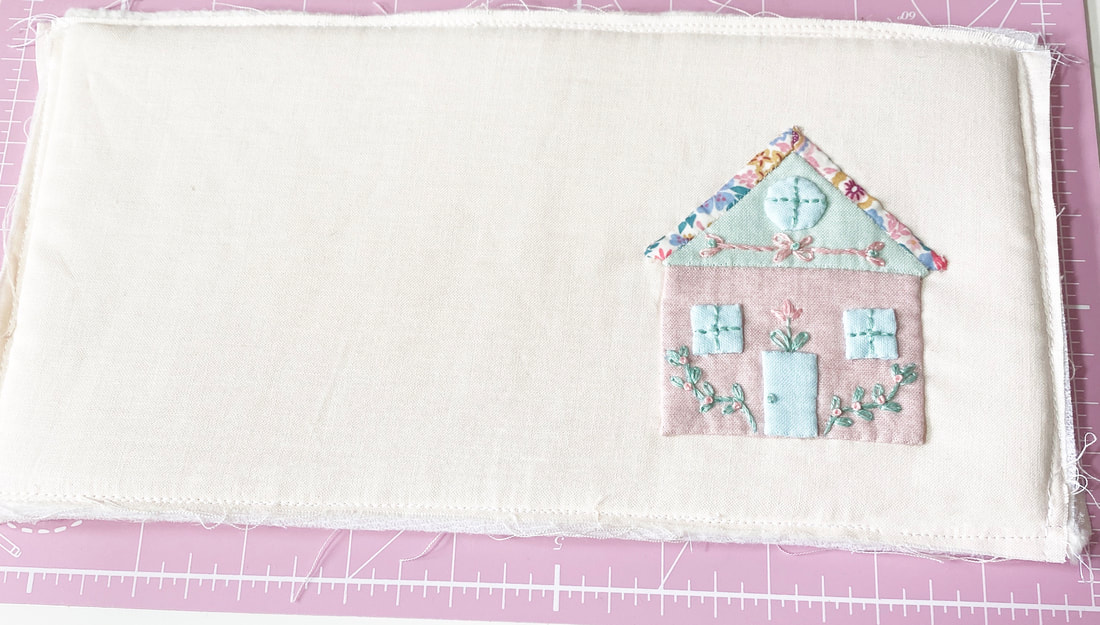 4. Next construct your pocket. Iron the interfacing to one of your pocket pieces. Place the two pieces of pocket fabric wrong sides together, pin and sew all of the way around the edge with 1/4" seam allowance. 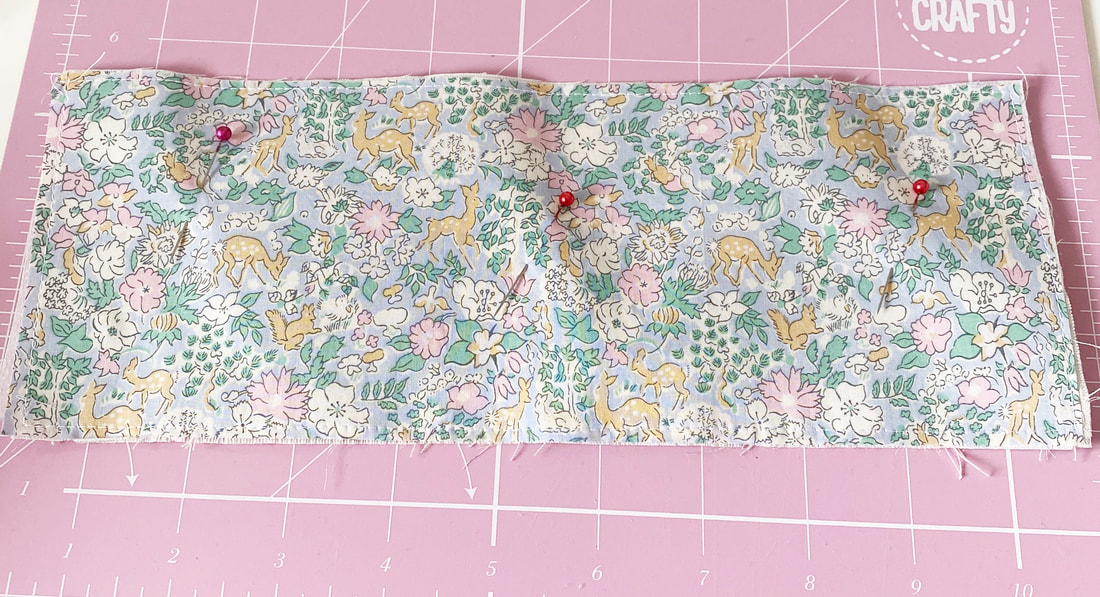 5. Press your pocket binding piece in half length ways with the wrong sides facing each other. Line up the raw edge with the raw edge of the top of your pocket piece. Pin in place and sew with 1/4" seam allowance. 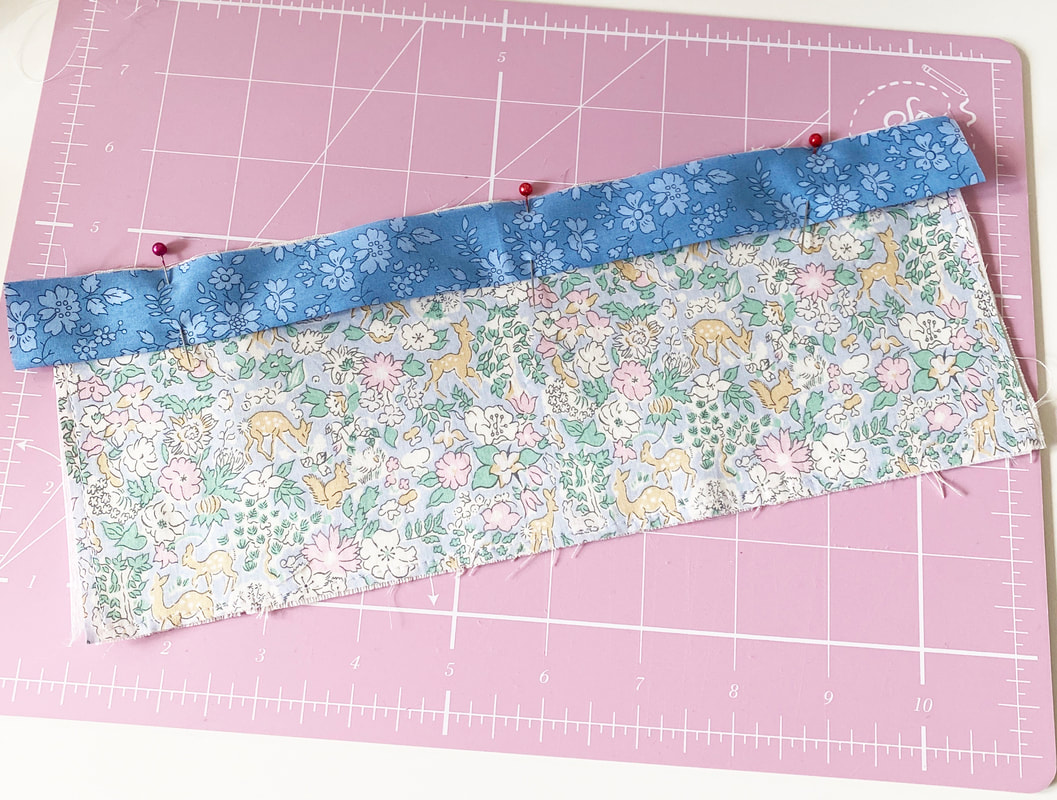 6. Fold the binding to the back and sew in place with 1/4" seam allowance or by hand if you prefer. 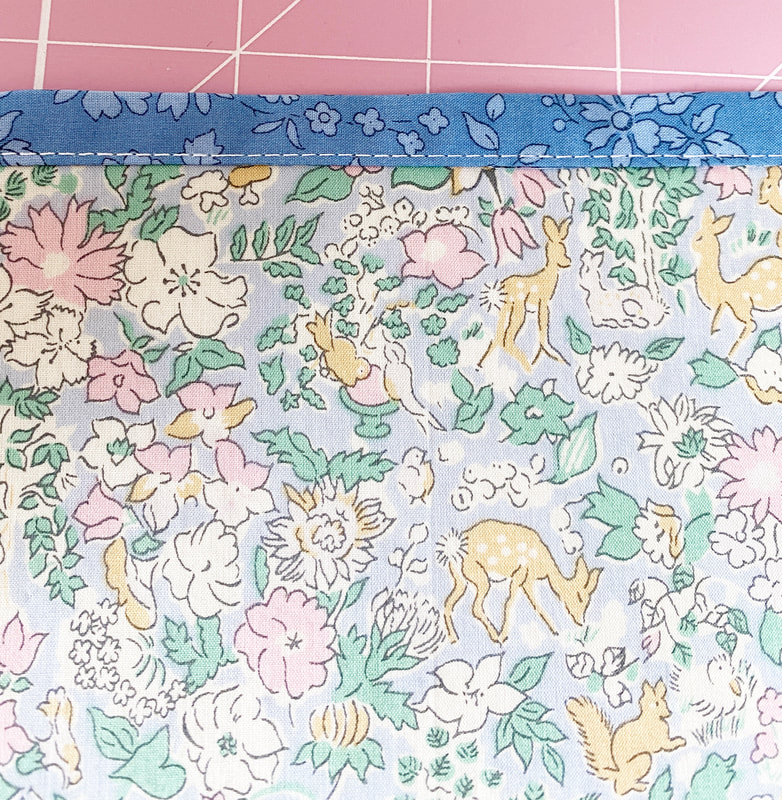 7. Place your exterior piece with the house on face down and put your pocket on top with the right side of the pocket facing up. Align the pocket with the bottom edge. Secure the pocket in place by sewing a 1/4" seam around three sides 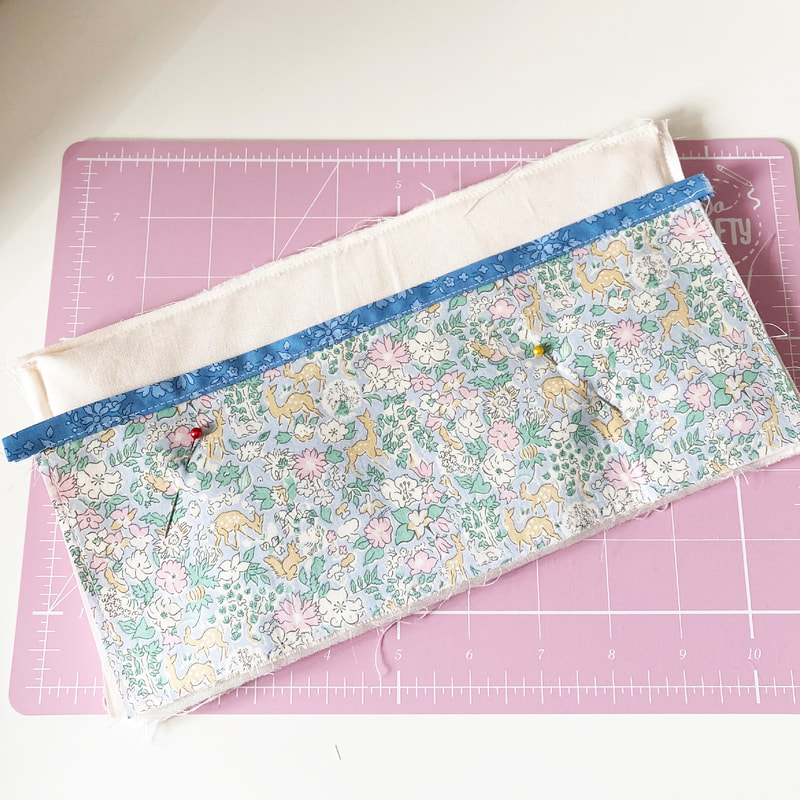 8. Measure 5 1/4" in from one side to find the middle and stitch down the middle of the pocket to split it into two pockets. Tip - I used a Hera marking tool made by Clover to mark the central line to give me an accurate sewing guide. This is a great tool because it makes a crease in the fabric which is not permanent so you don't risk ruining the fabric. 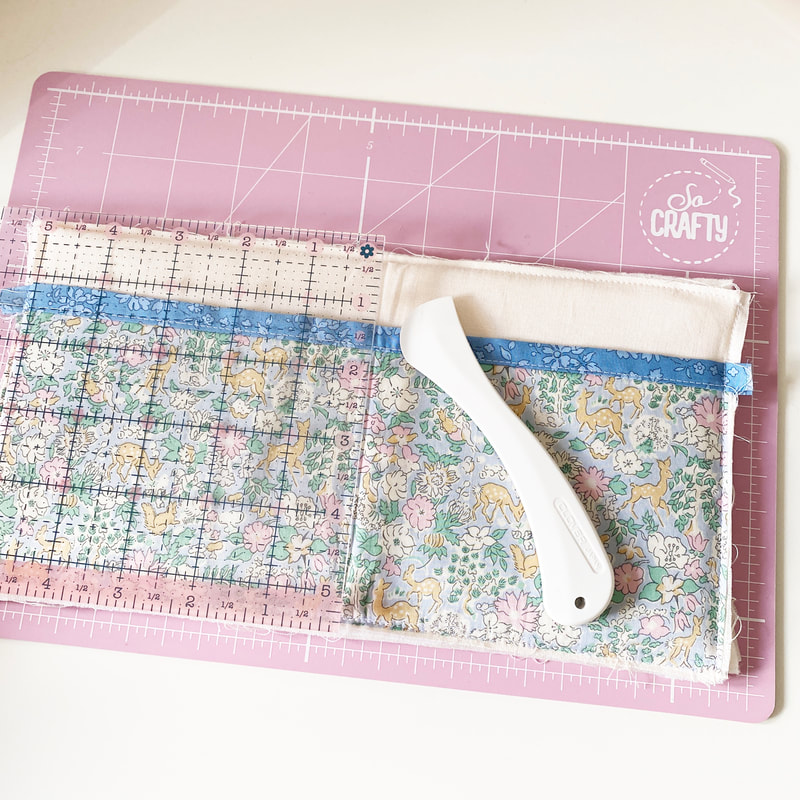 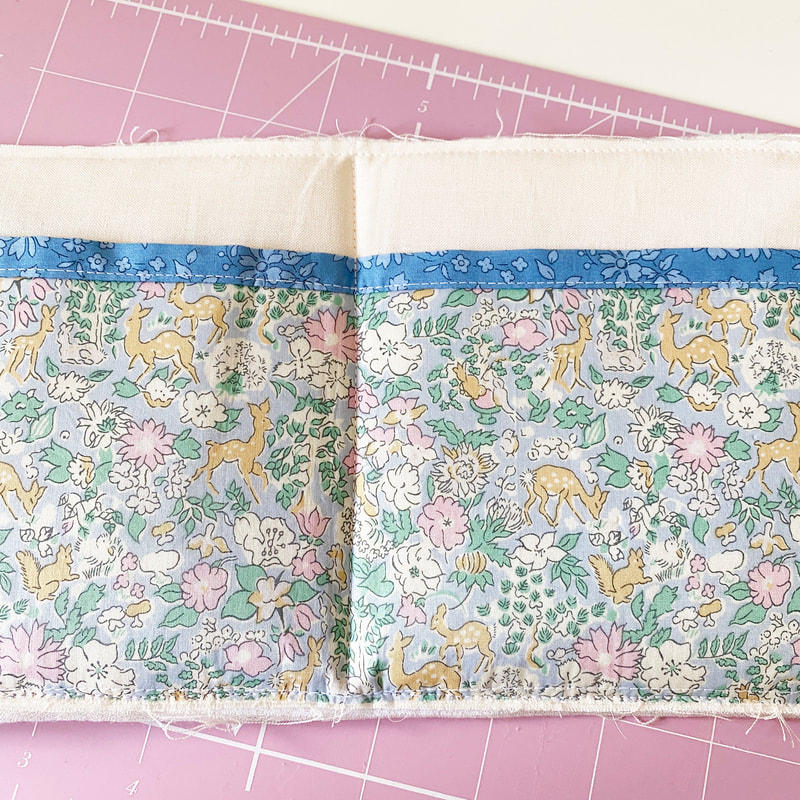 9. Next fold your felt in half width ways and open again to find the centre and place it on top of the centre line you just sewed down the middle of your case. Make sure the felt is equidistant from the top and the bottom. Sew down this line to secure it in place. 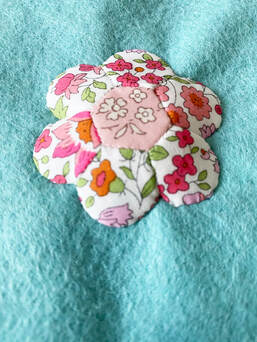 10. I appliqued an EPP flower to the front of my felt and stuffed it with toy filling before sewing all of the way round so that the flower can be used as a needle stop. You could do this with a hexagon flower if you prefer. 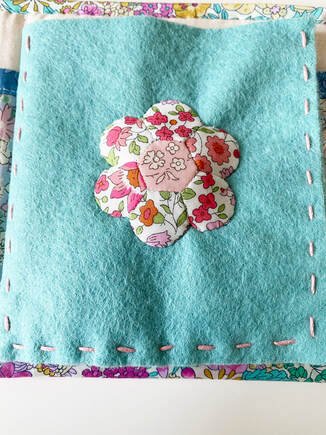 11. Line up both parts of your felt pocket and add a running stitch around three sides to keep the two pieces together and to form a pocket. 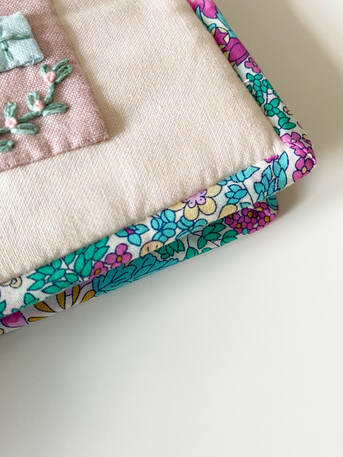 12. Apply bias binding around the entire edge of the case. Finally add a snap fastener of closure of your choice and the case is complete! 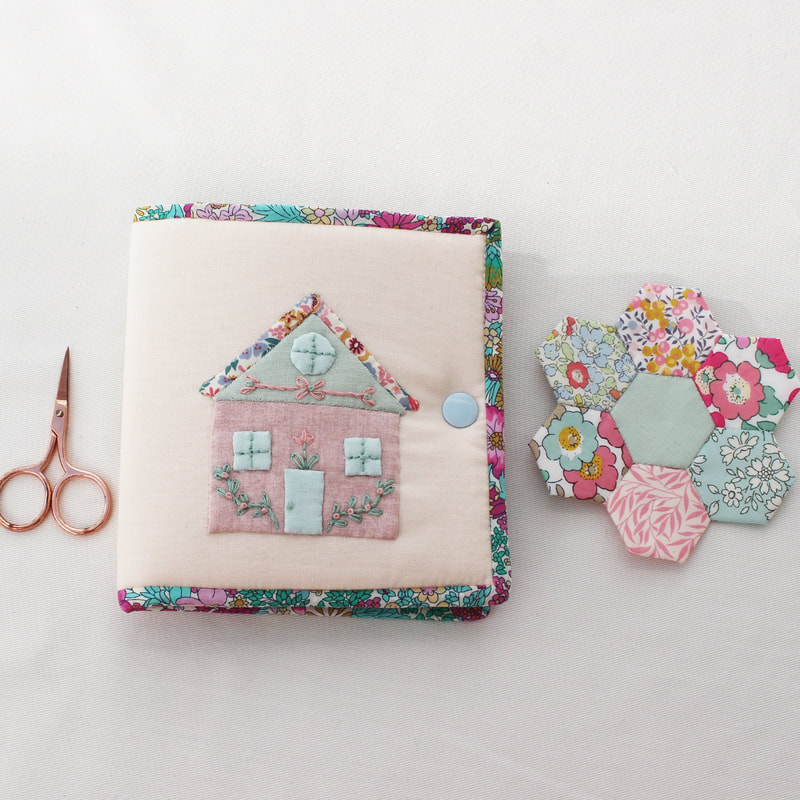 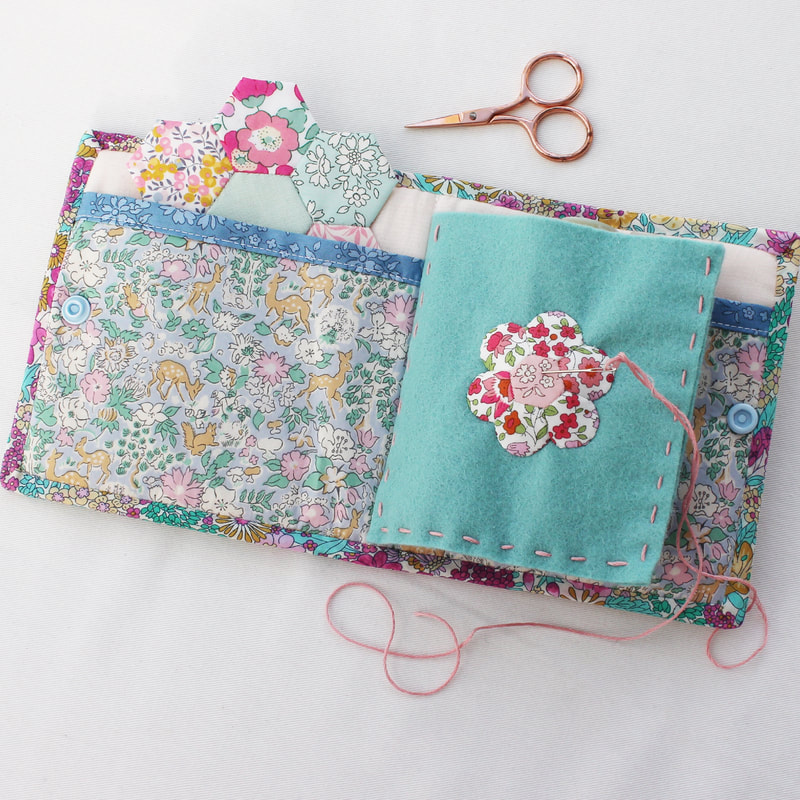 I hope you liked this little tutorial and I really hope you enjoy making the case if you do give it a go. I think I will definitely be making another one soon! They make lovely little gifts for sewing friends.
Take care, until next time, happy sewing!  Large basket Hello Friends, I hope you are really well. Today I am excited to share my new pattern release for the Hexagon Storage Basket! I've been working on this pattern for months now as the pattern writing and testing process is a long one. Also, the pandemic happening has affected my creativity and drive and I know this has happened to many people. Couple this with changes at home and it has led to me taking a long time to get the pattern finished so thank you so much to everyone who has been so patiently waiting for it. 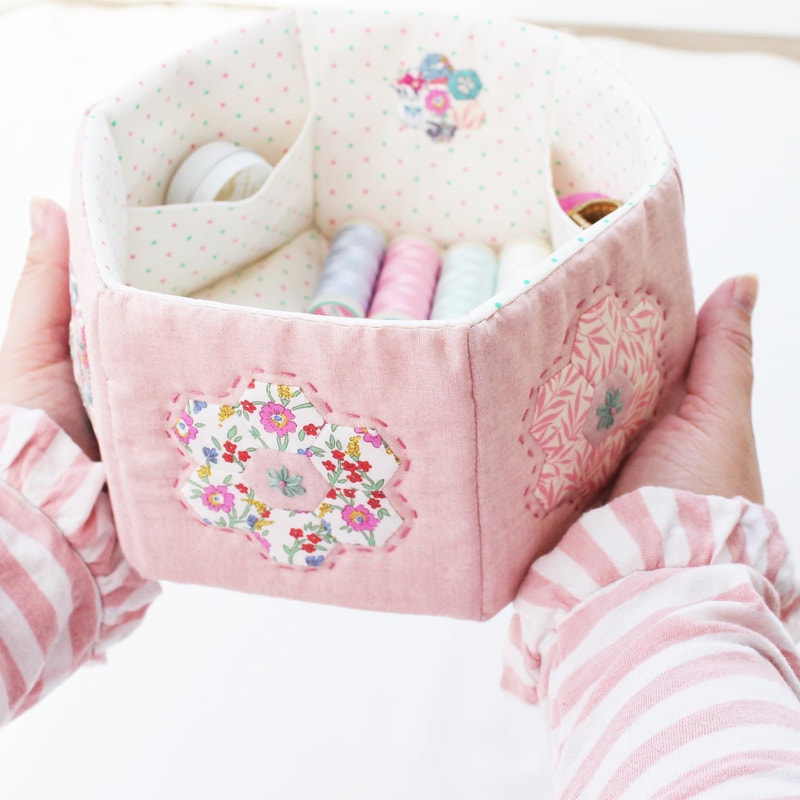 Small basket The pattern is a downloadable PDF file and it has a full instruction booklet with step by step photographs, along with templates. If you've bought my previous pattern, you'll know I like to make the instructions as detailed and clear as possible. The pattern has instructions to make two sizes of the basket, a small one which measures approximately 7 1/2" in diameter and has three internal pockets, and a large one which measures approximately 10" in diameter and in addition to three internal pockets, it also has special places to keep embroidery scissors and EPP glue pen refills! 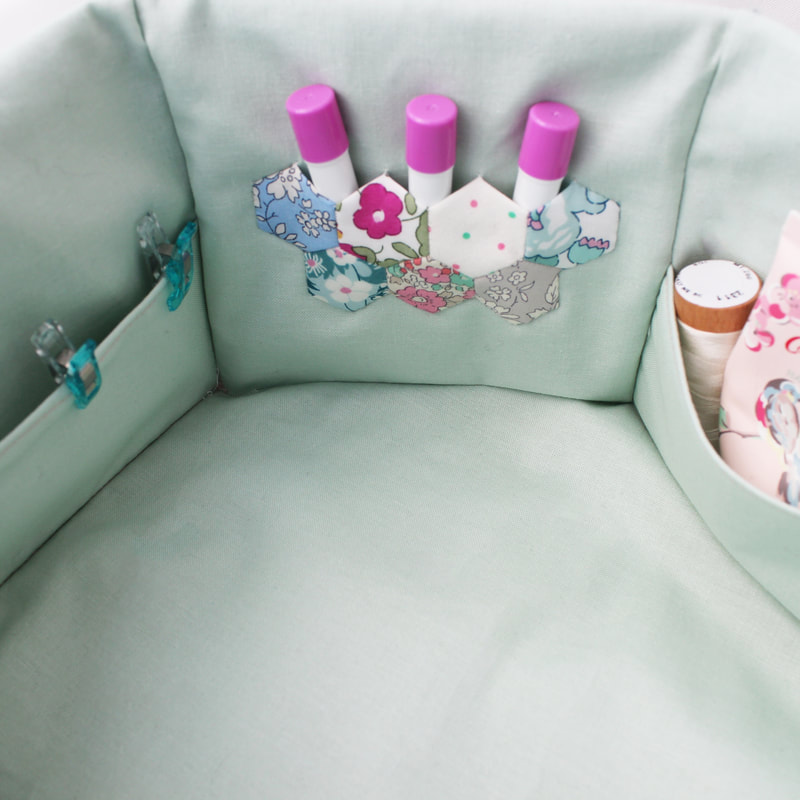 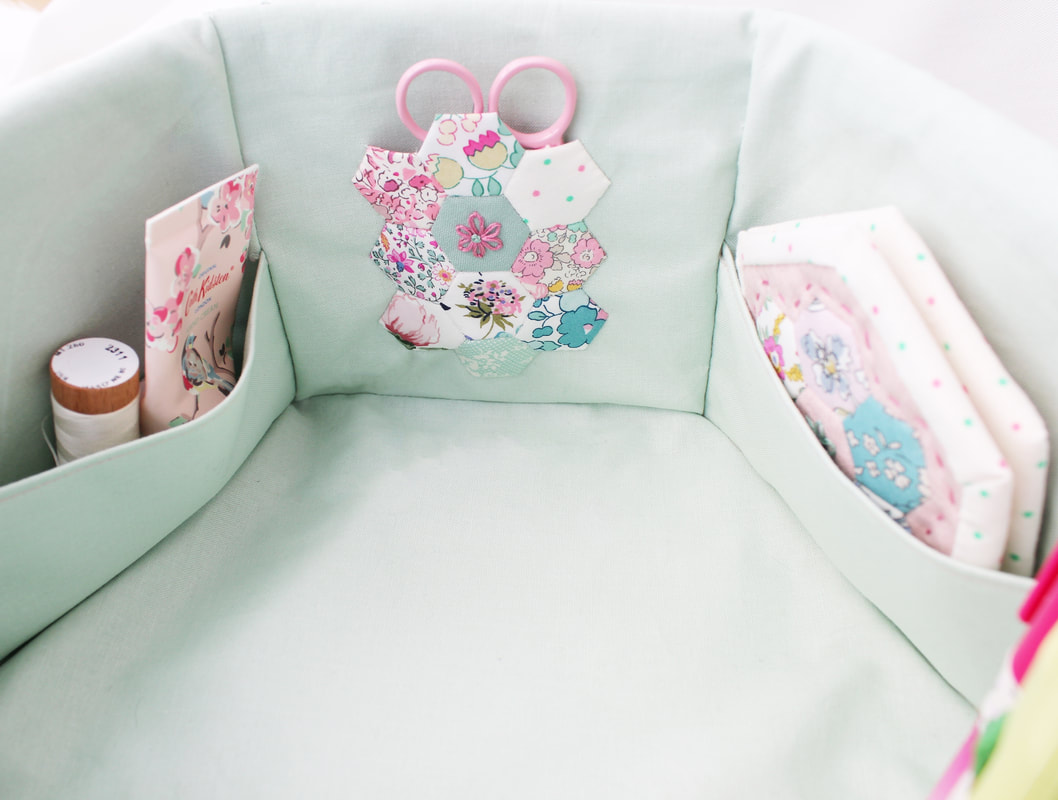 I have four finished baskets in my sewing room and I love them, they are so handy for keeping your current project in and I love that I can take everything I need in it from room to room. The hexagon needle book fits perfectly in the pockets of both sizes of basket and the hexagon sewing case fits into the large one by standing it upright or you can place it on top like a lid. 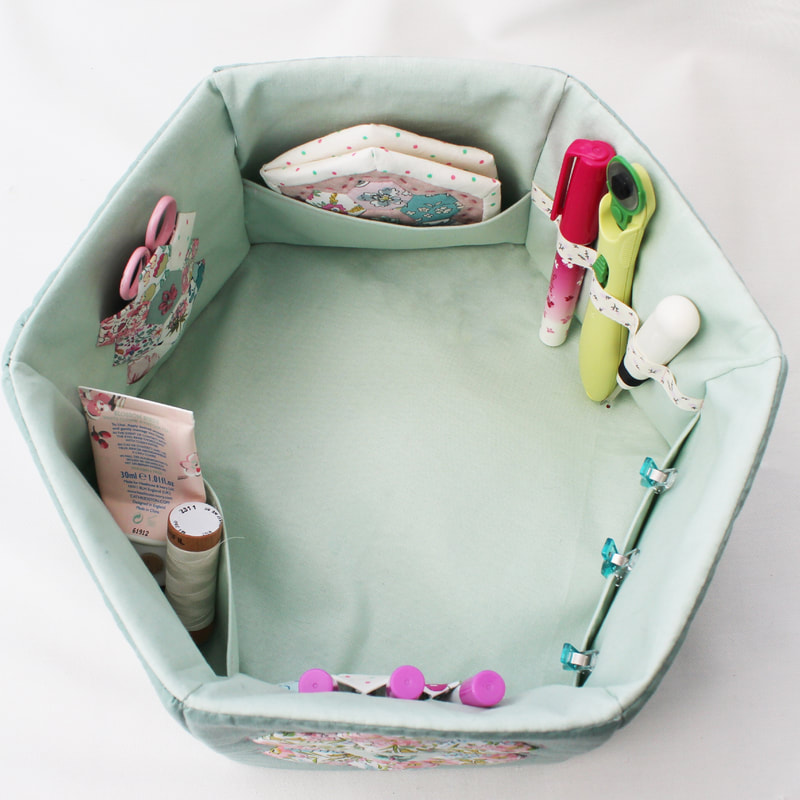 During lockdown in the UK, I was talking to my Dad over the phone and he told me that he was getting interested in sewing as he had been playing with an old sewing machine he had found. When I told him about my pattern, he offered to test it for me. This is the first time he has ever sewn anything and he did a brilliant job. I dropped the materials he needed at his back fence and then he completed the basket without any help from me at all. He has also been watching my Youtube videos and it has been so lovely to chat about sewing with him. 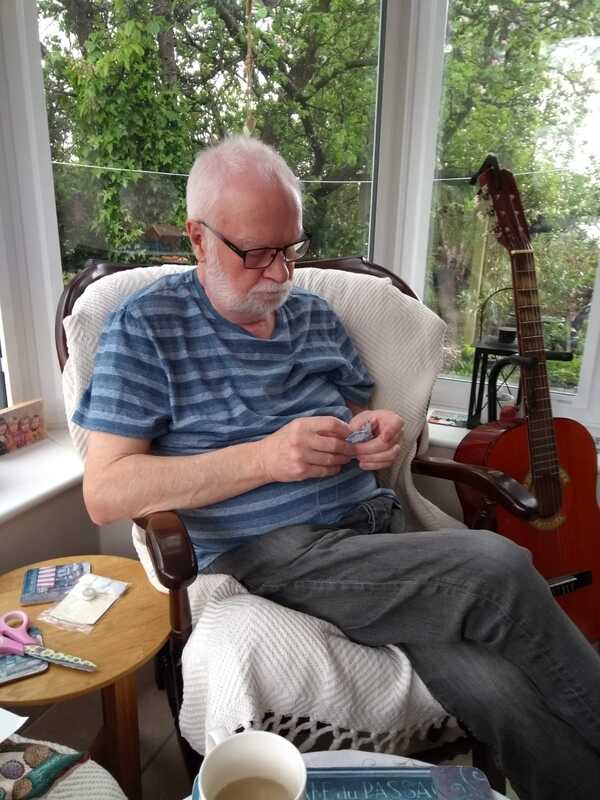 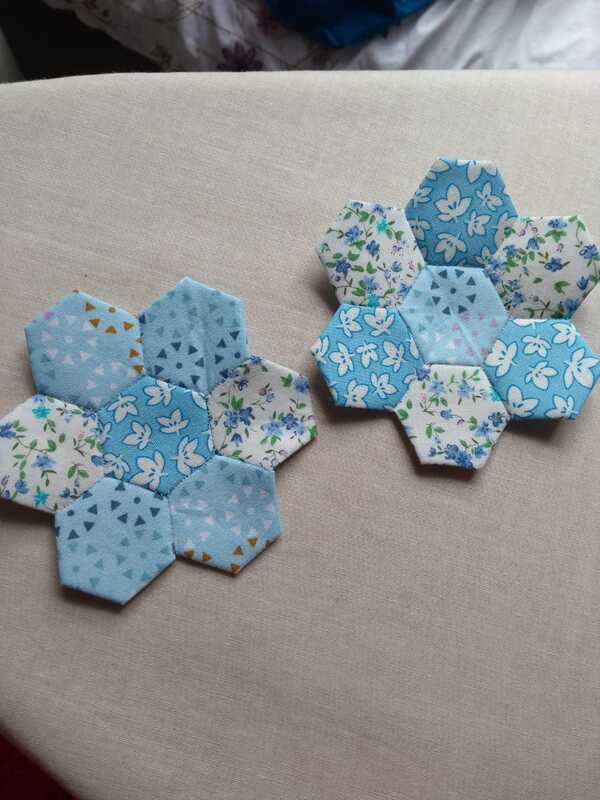 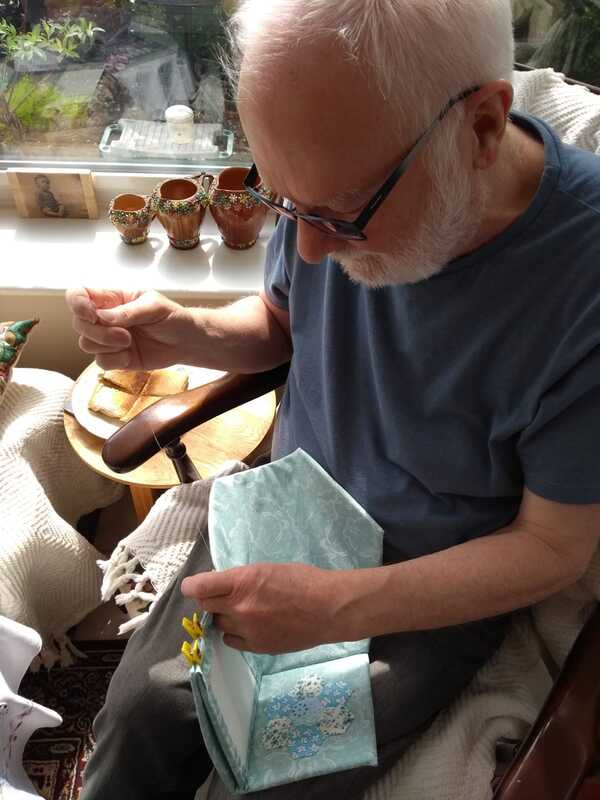 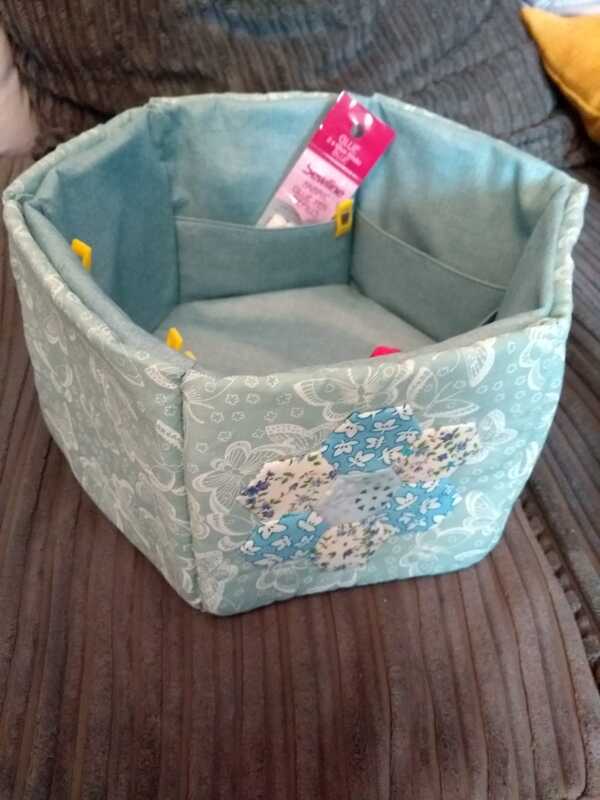 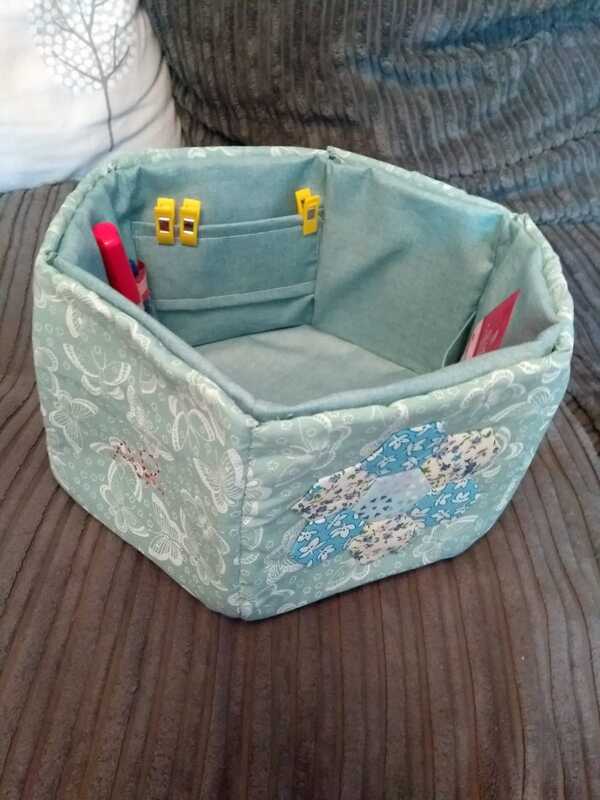 In addition to my Dad testing the pattern, I also had some help from some amazing Instagram friends. The super talented Zena @mycreativepottylife made such beautiful versions of the pattern using gorgeous Tilda fabrics and adding sweet details like she always does.  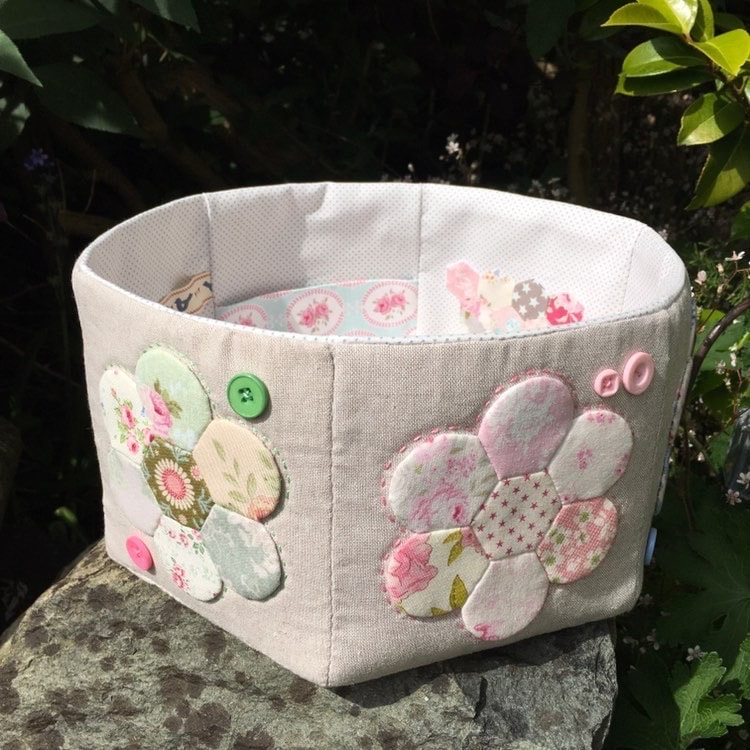  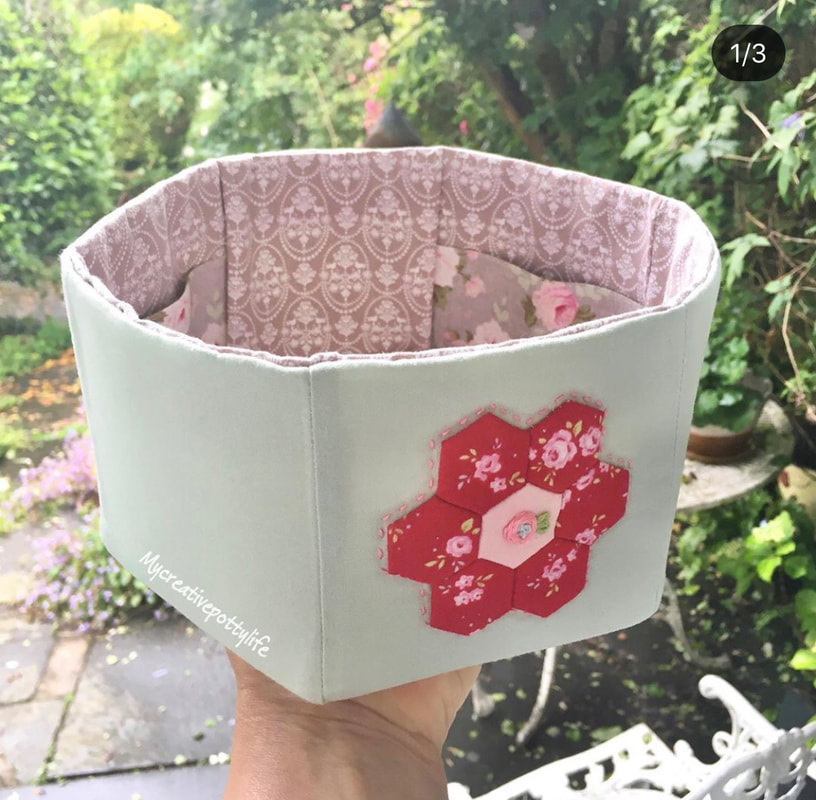 The lovely Sarah @Sarah.costello.10 made this really pretty version below and it matches the hexagon sewing case she made when she tested that pattern for me back in February. Sarah has fabulous sewing skills and I love the quilting details she added. 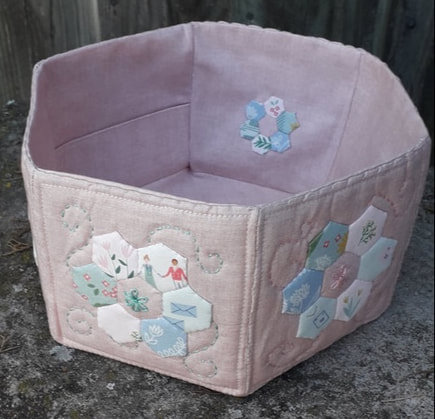 The very talented Brittany made a large and a small basket. Her skills are incredible and I love her fabric choices. Her stitching is perfection, she is such a wonderful maker and a brilliant pattern tester. 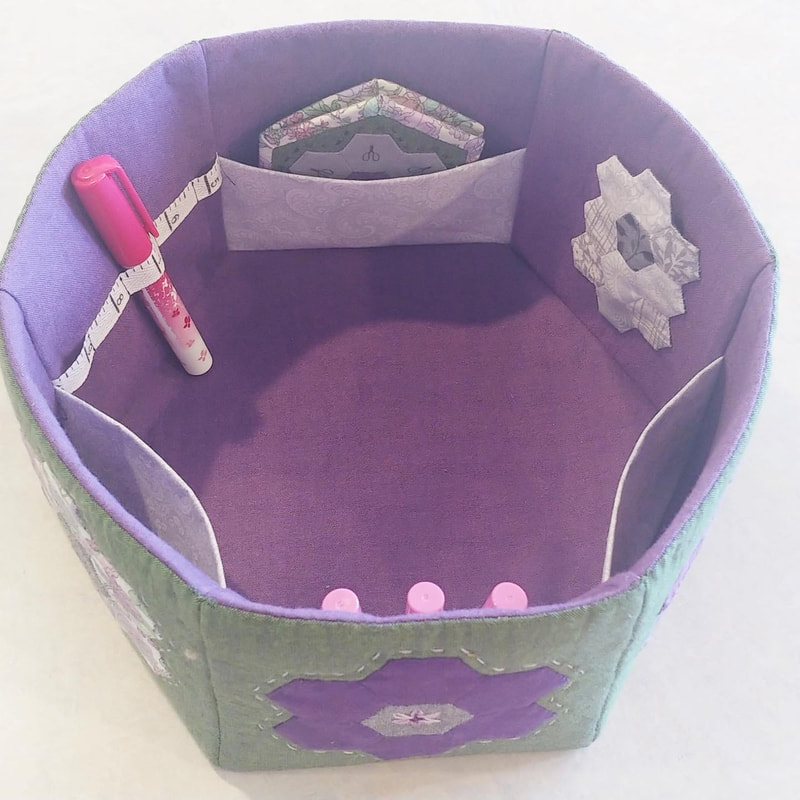 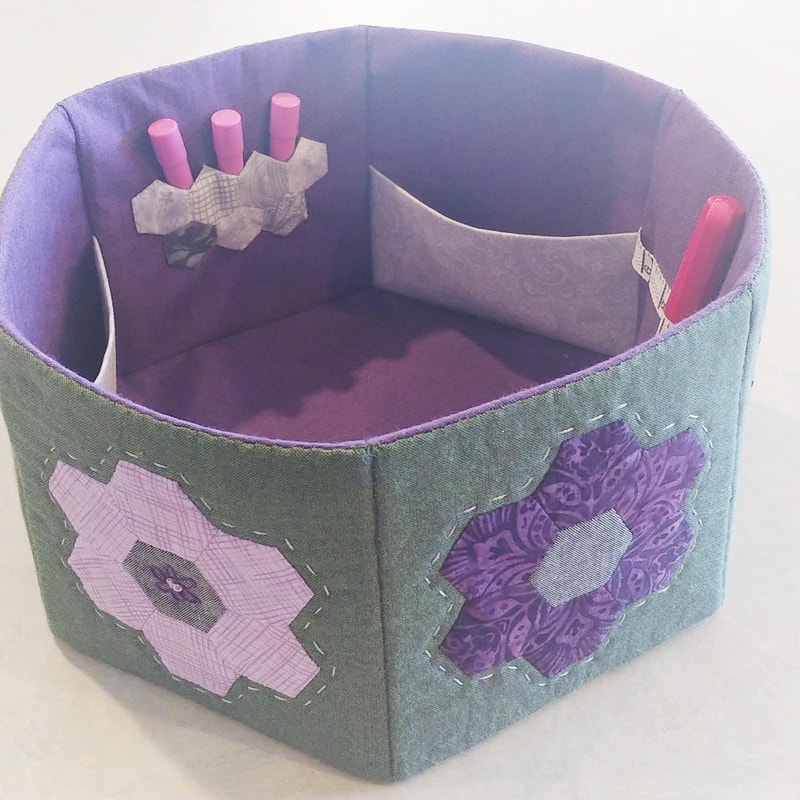 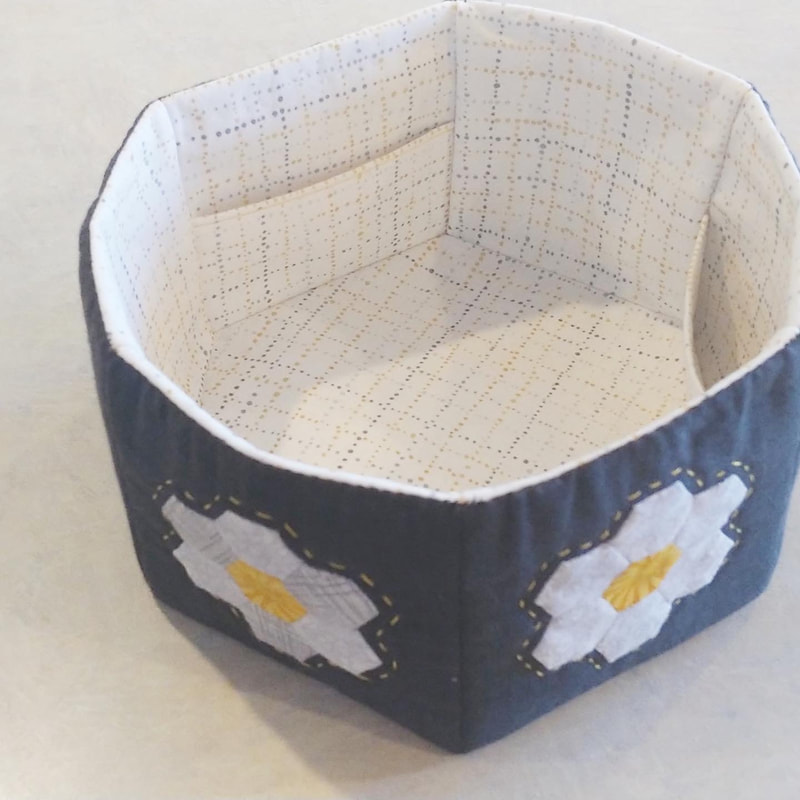 I feel so incredibly lucky to have had such fantastic support from such wonderful and talented makers. The pattern writing and developing process is a long one and I could not have got there without their help, so thank you so so much. If you would like to make a basket too, the pattern is now available in my shop. Thank you so so much, it really means a lot to me. I hope you love the pattern.
Take care, happy sewing! 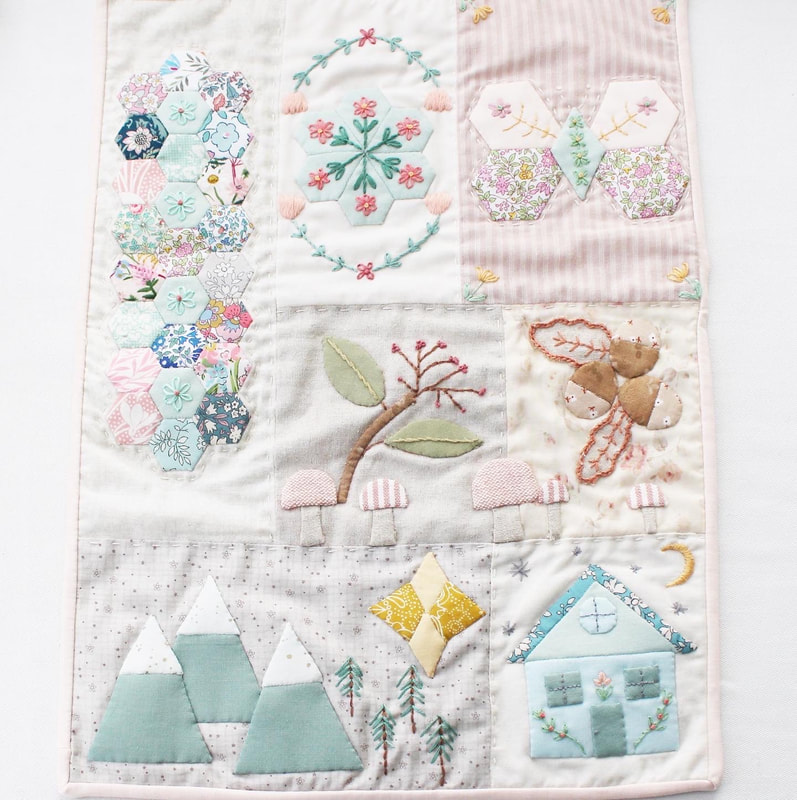 Hello friends, I hope you are all well. Today I am going to tell you about my seasonal sampler mini quilt. I've been making this lovely quilt for a few months and it's finally finished. I loved combining EPP, appliqué and embroidery, it was so fun and relaxing to make. Each of the blocks represents one of the seasons of the year and conjures up lots of lovely imagery of nature for me. I decided to make this a free pattern but I've decided to release it in parts over the next few weeks. Rather than written instructions, there will be video tutorials and guidance along with downloadable templates. You can find the videos on my Youtube channel and I will link to the playlist here. You can also find the downloadable templates and any brief written instructions here on my website, in the free patterns area. 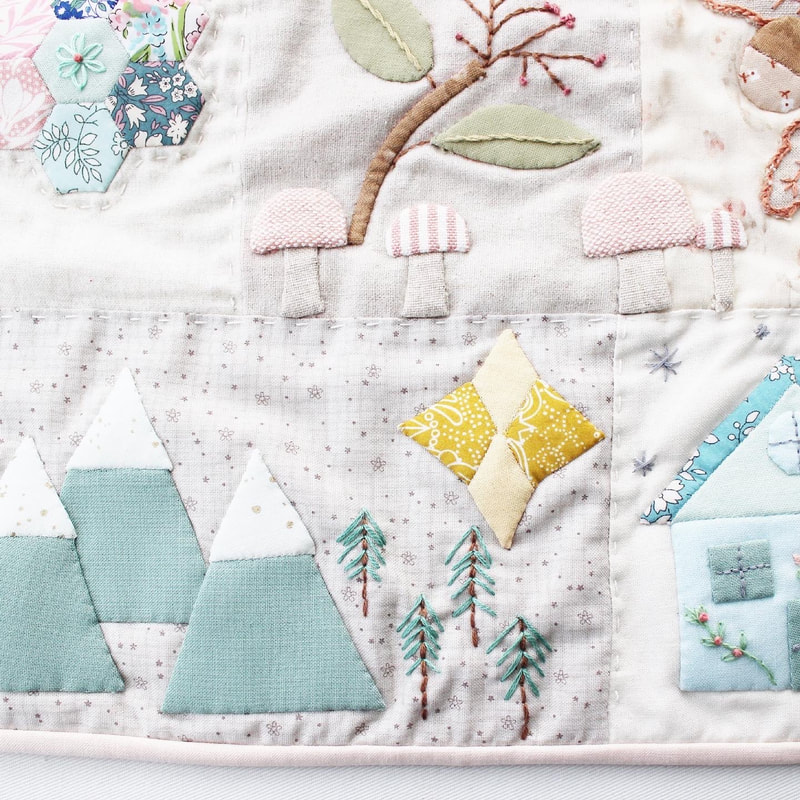 There's already a video showing how to do the butterfly block and the proper introduction video will go live on Youtube at 9pm on Monday 22nd June. I hope you will join me in making this lovely mini quilt, I'm so excited to be sharing this pattern with you all. Thank you to everyone who has left me lovely comments about my design, it really means a lot to me. 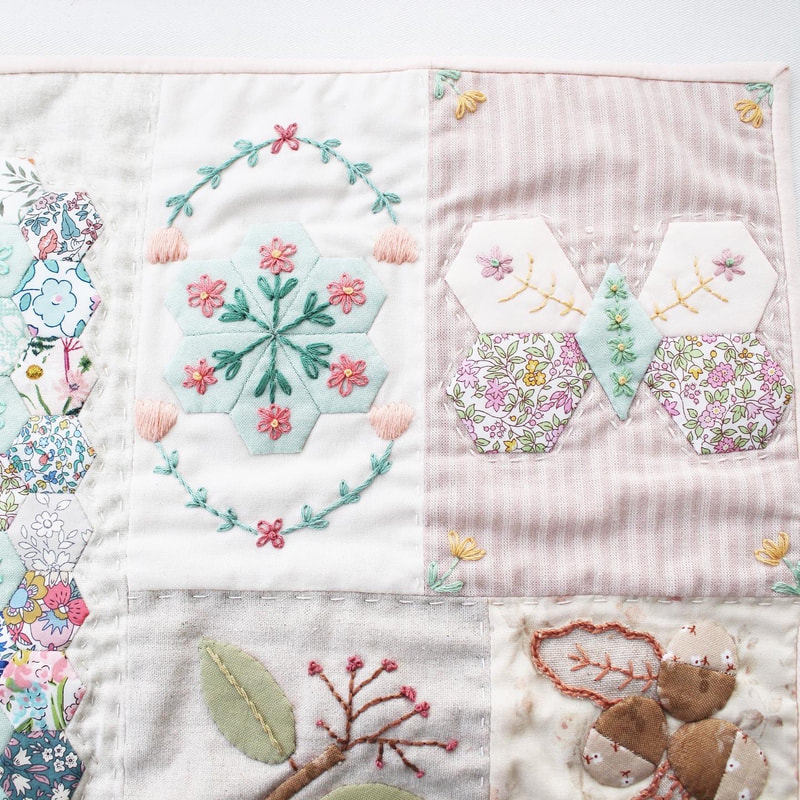
 I've been sewing since I was five years old, on and off of course, but it has always been a huge part of my life. Recently, I've been thinking a lot about how my sewing has evolved and changed and I've realised that at this point in my life, I am enjoying sewing more than ever before. And I think I've realised why. There have been three big changes in the way I go about my sewing and those three things have increased my enjoyment so much. So I thought I'd share these changes with you because maybe it will give you some ideas for getting more enjoyment out of your hobby. 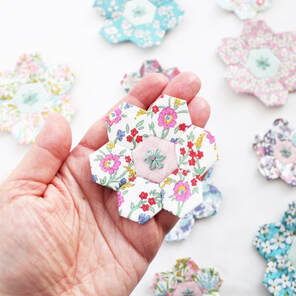 1. Let go of Perfectionism I used to undo my stitches all of the time when I wasn't happy with them. I used to feel frustrated that they didn't look perfect and get annoyed at myself when I felt I couldn't produce something how I thought it should look. But somehow, I've let go and realised I am human so I will never be perfect. I now see my embroidery stitches like handwriting, I am making my mark on the fabric and if it's not perfect that's ok because it is an extension of me. We don't constantly use tip-ex to correct our writing when it is a bit shaky and uneven, so why keep undoing stitches? Also, the same principle applies to choosing fabrics for a project. I used to overthink it all of the time. I'd go back and forth over choosing colours and fabrics, changing my mind and ending up frustrated. My early quilts were very calculated in terms of pattern and colour placement. I didn't think I could do random patchwork. But last year when I started doing tiny patchwork, I let go of that and started just going for it. Choosing fabrics without thinking and just putting together what feels right to me. The colours and patterns and how they are placed in what I make are an extension of me and represent my point of view. Once I started working in this way, sewing from the heart rather than the head, I started to love and enjoy what I was doing more. 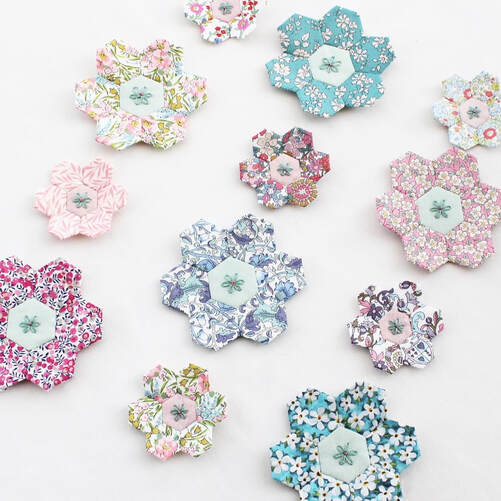 2. Slowing Down In the past, I would rush to finish a project because I was fixated on the end product. I was desperate to have a new quilt, cushion, dress, whatever it might be. I let the end goal overshadow the process and I would rush to get there. I don't work well in a hurry and rushing in this way caused mistakes which led to frustration. Last year, for some reason, I began to slow down. I think doing more EPP projects led me to this slow state but I now approach all projects, even those on machine, in a slow, methodical manner. Slowing down allows me to immerse myself in what I am doing, to notice every tiny detail in the fabric and to enjoy each and every stitch. It's taught me that although I love the end product, it is the process that I enjoy most of all. 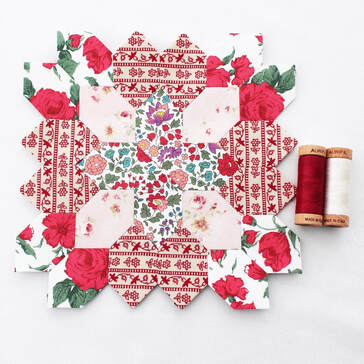 3. Allowing myself to make what I want, when I want Sewing is my hobby and therefore should always be enjoyable. It is also an important part of my wellbeing and intrinsic to my positive mental health. It's my creative output and my relaxation. So I decided a while back to let go of the guilt when it comes to how many half done projects I have because this was stopping me from starting new things. Now, If I want to start something new, I will. If I want to switch between projects, I will. And if somebody asks me to hem their trousers or fix a hole, I won't! Just kidding, I will of course. But first and foremost, I have thrown out the rule book of obligation. If I don't feel like making something that day, I won't force myself because that will take away the joy. I've found that by going with what I feel like doing, my enjoyment has increased and I am also finishing more projects than I usually would. 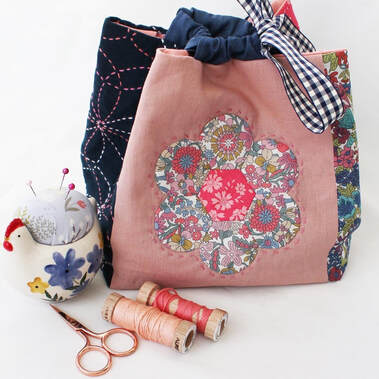 So what about you? Do you have any little rules or mantras when it comes to sewing? What do you do to ensure you are enjoying your stitching and not becoming frustrated? I'd love to know so please leave me a comment.
Take care and stay safe, Happy sewing x  Hello everybody, I hope you are all well and staying safe at home. I feel like life is a battle at the moment, trying to deal with what is happening and the constant worries about so many things. Keeping busy is my strategy so I have two new things to share with you. First up, I've started a YouTube channel. I get asked frequently if I have a YouTube channel and also told I should have one! I didn't have much confidence in my video making skills so I didn't pursue it but after some thought I've decided to give it a go. The thumbs down feature on YouTube has always put me off. I know that when I get a thumbs down on a video, I will be a bit hurt. I don't have thick skin but I think I need to work on that, I know I will never please everyone! Currently there are only a few short videos on there as I work on uploading videos I have already shared on other platforms but I have big plans and ideas for what I'd like to share. First of all, I want to bring clear, concise 'how to' style videos to show people how to do English Paper Piecing and embroidery. These will be a combination of short videos teaching one or two techniques, and also longer, more in depth videos. As well as techniques, I have some ideas for project tutorials that I want to teach through video. My other idea is to do some lifestyle videos showing how slow stitching can be a beneficial part of every day life. What I show on YouTube will be different from Instagram. Instagram will be more of a daily snapshot at what I'm making and Youtube will be more tutorial led. What are your thoughts? Would you like to see videos like these from me? Do you have any other ideas for videos you think I should make? If you'd like to subscribe to my channel, I would be truly honoured. It's completely free and it means that you will see my new videos when I make them. You can find my channel here. 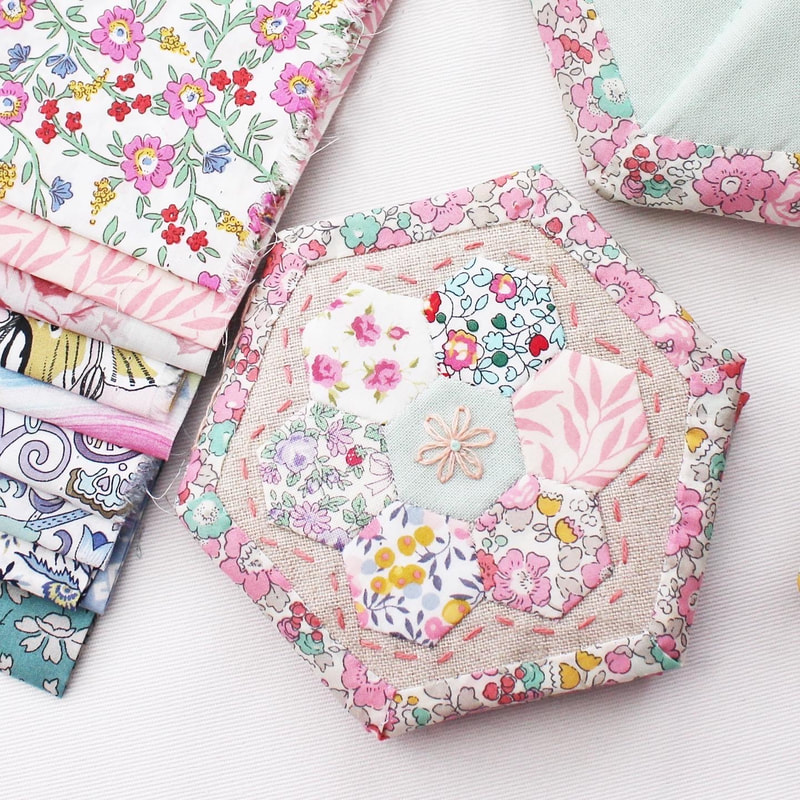 The other thing I have been working on is updating my Hexagon Needle Book tutorial and putting it into PDF format. It's still available as a blog post but I thought it would be easier for people to download the PDF and save it to their computers rather than having to search for my tutorial. The PDF download is of course free and can be found here. Thank you to everyone who has made one so far, it's so exciting to see them popping up on Instagram. If you do make one and share it on Instagram, please tag me so I can see it.
Take care, until next time, happy sewing! |
Follow me on InstagramAbout the Author
My name is Emma and I love all things sewing, especially EPP. My little blog is the place where I document what I'm making. I hope you enjoy reading what I'm up to! All opinions are my own and I only share things that I think you will love. Thank you for taking the time to stop by. Archives
September 2023
Categories
All
|
 RSS Feed
|
Copyright Vintage Sewing Box 2024
|
| ||||||