 In this week's video I am sharing some tips for how to improve your English paper piecing technique. I am definitely not an expert, but I've learnt a few things along the way, through making my own mistakes. I firmly believe there is no right and wrong to do things, but making some little changes here and there will hopefully help a little. Basting 1. Make sure you have accurately cut paper shapes 2.Take care when glue basting, don't use too much 3. Don't put the glue too close to the edge 4.Try not to wrap the fabric too tightly around the shape 5. Use a seam allowance of at least 1/4" Sewing 1. Use a fine, long needle, for example, a size 9 milliners needle 2. Use a strong, fine thread. I like polyester thread such as Invisifil by Wonderfil 3. Use a colour that blends with your fabric 4. Pull the thread tight when you sew, making sure there aren't any gaps 5.Use a locking knot at every junction 6. Carry your thread at the back of the work
0 Comments
 Hello lovely friends. It seems that the world has changed dramatically since my last blog post which was only a couple of weeks ago. So I thought I'd pop on here just to let you know what my plans are for my blog and little shop going forward. First of all, thank you to everyone who bought the Hexagon Sewing Case pattern or if you bought a kit. I was blown away by the response I had to this and I can't express in words how grateful I am for the support I've received. I know there were some people who wanted a kit but missed out and I'm so sorry about that. I was planning to make a few more but with the current situation as it is, I won't be going to the post office. So for now, just the PDF pattern will be available. 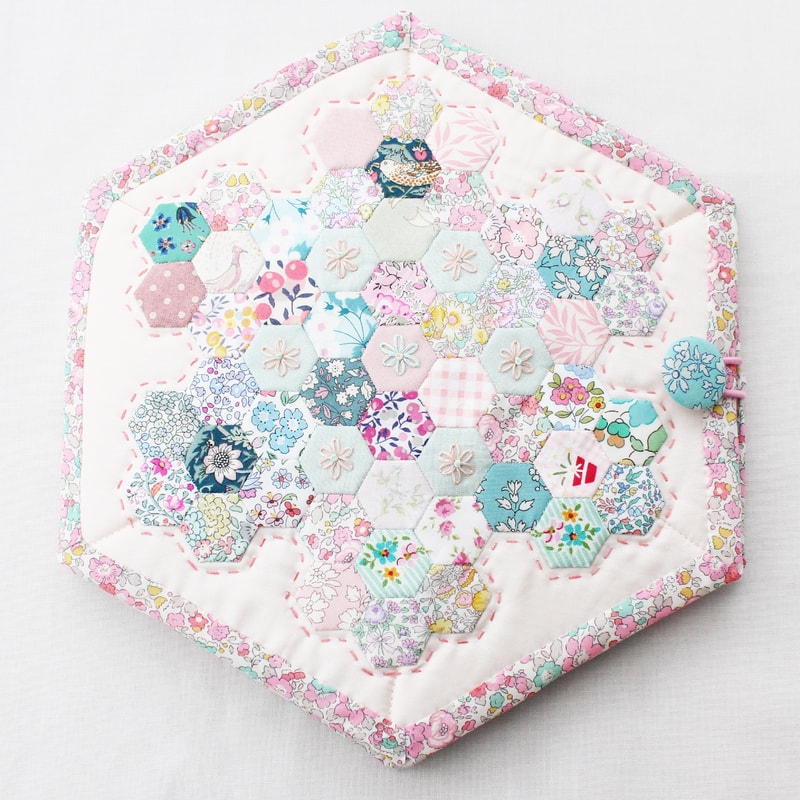 I have lots of plans for things I want to do such as free patterns and videos and maybe even going live on Instagram to sew together! I'm hoping the current situation we find ourselves in will allow me the time to create these. I very much want my blog, website and Instagram to be a positive place where we can escape into a world of sewing to relax and detach from the stressful situation around us. So that will be my primary focus going forward. The previous plans I had for this year in terms of in person workshops are unlikely to go ahead now.  Since I started this website, I've always had a contact form on the website homepage just in case anybody would like to get in touch. Thank you to everyone who has used that and asked me to send them emails. I've had a big think and I've decided to create 'lovely letters' each month that will be delivered to your inbox. I'm excited to start this and I hope you all love them. If you'd like to sign up then please head to the homepage and leave your details. I'm hoping my first proper email will go out this week.  I must admit that I've felt frozen over the last two weeks and I haven't done much stitching at all. I know sewing helps me so much through times of anxiety but there are also those times when things feel so difficult everything grinds to a halt. I wish that wasn't happening to me now, particularly during the Slow Stitch Along. I'd like to say a massive thank you to everyone who has been keeping it going whilst I've felt like I've been absent from it (although I've read every single post). This is due to a series of things happening all at the same time which has completely thrown me. I'm hoping that once my little boy is better I will feel more focused to sew and share again and I am excited to work on the things I've mentioned above too.
Look after yourselves during this time and I hope that together we can support each other in this wonderful and creative online community. 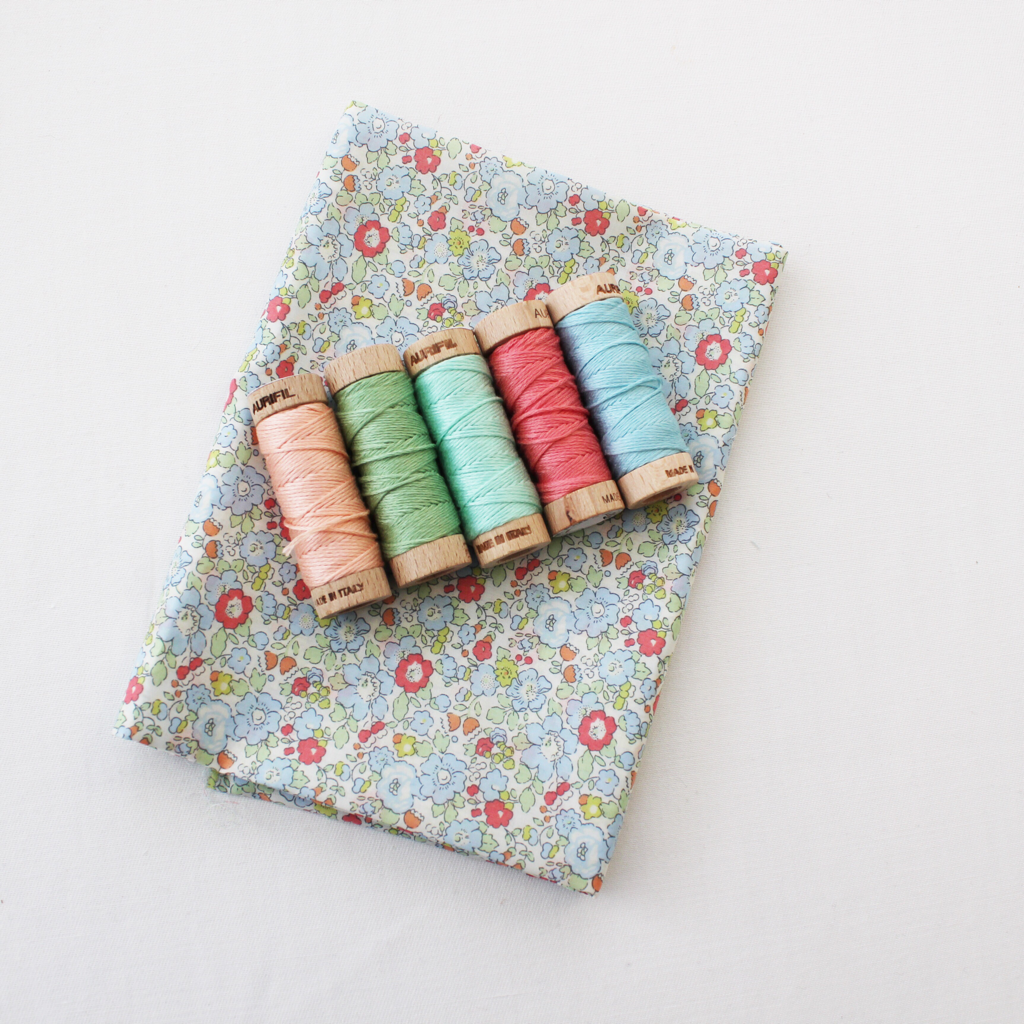 I’ve recently made a few changes to how I sew on my machine to combat two issues I was having. The first issue I was having was some trouble when sewing with Liberty tana lawn on my machine. The needle was dragging the corners into the machine because the hole in the stitch plate was so large (see left stitch plate below). This meant they were getting tangled in thread and the corners weren’t crisp or they would become jammed. So I invested in a straight stitch plate which has a much smaller hole (see right below). It cost me £20 which is quite a lot of money but I know I won’t be changing my sewing machine so I was happy to buy it. I’m so pleased with the results too! It has completely alleviated the issue I was having and now I can sew tana lawn with no problems. It’s actually really nice for all patchwork and it adds more stability when starting off at the corners when joining shapes so I’m really happy I finally purchased it. 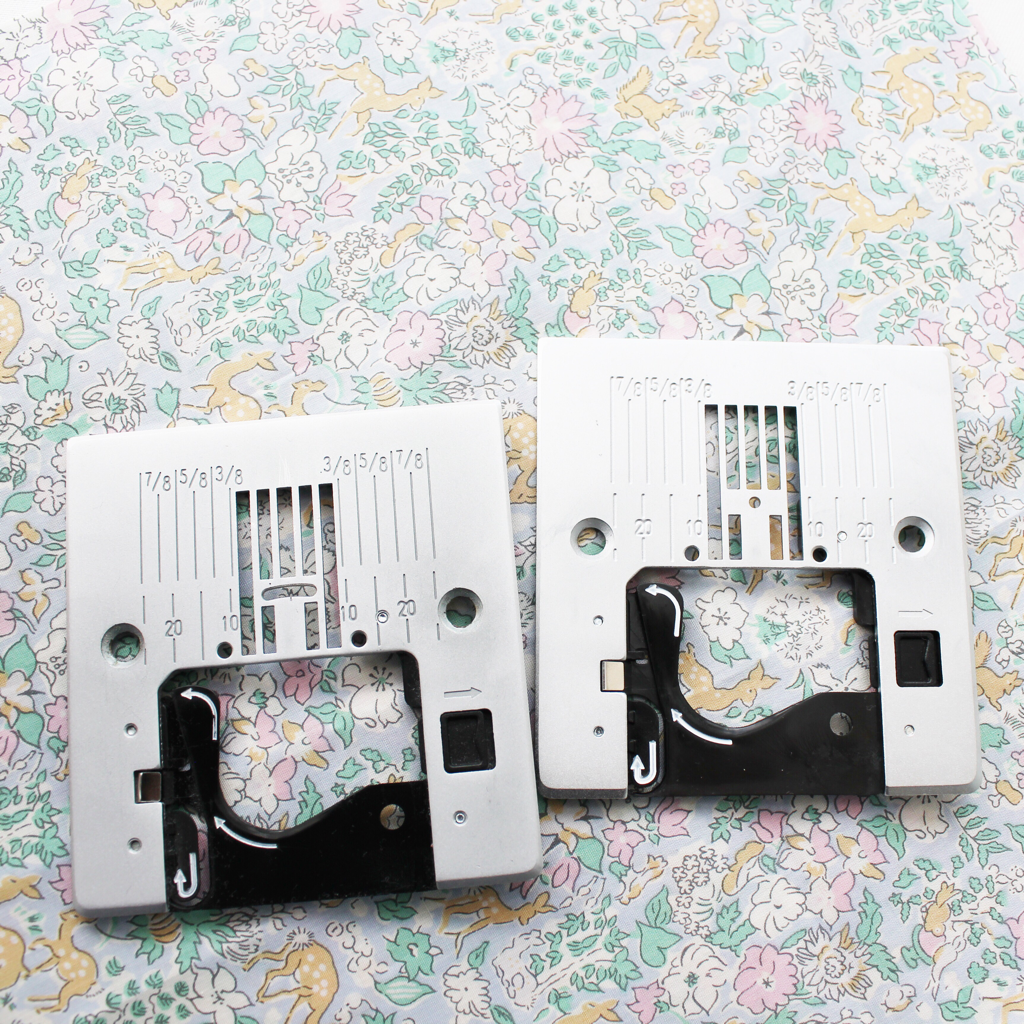 The next problem I’ve been having was generally inaccuracy when piecing seams. I feel fairly confident when hand sewing but when it comes to my machine, I was consistently disappointed with the results I was having. So I decided it was time to buy a quarter inch foot! I should have bought one a long time ago but I always try to make do with what I have.  The foot has a guide on it that makes it really easy to line it up with the fabric and repeatedly create accurate quarter inch seams. 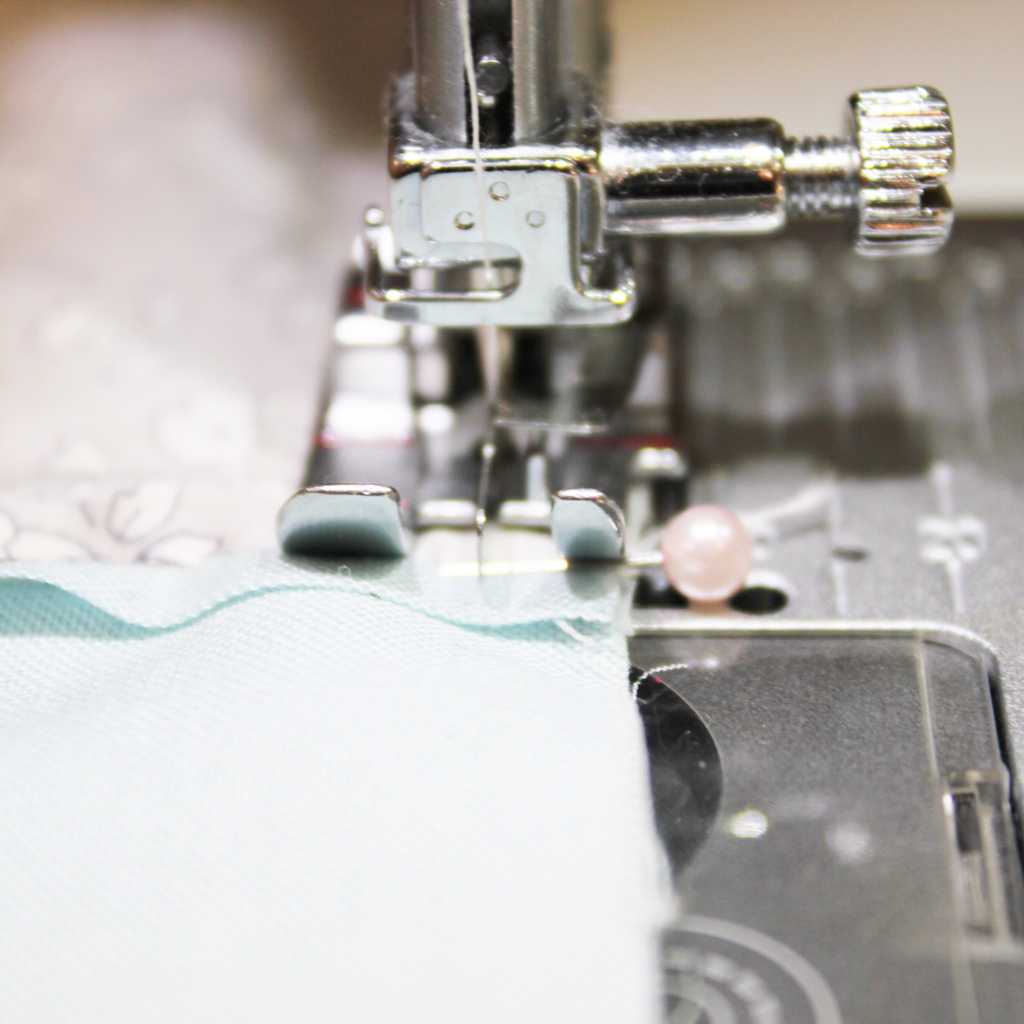 Its also important to pin properly to ensure seams line up when joining rows. I press seams open and line them up, pushing a pin through the seam line on both sides. 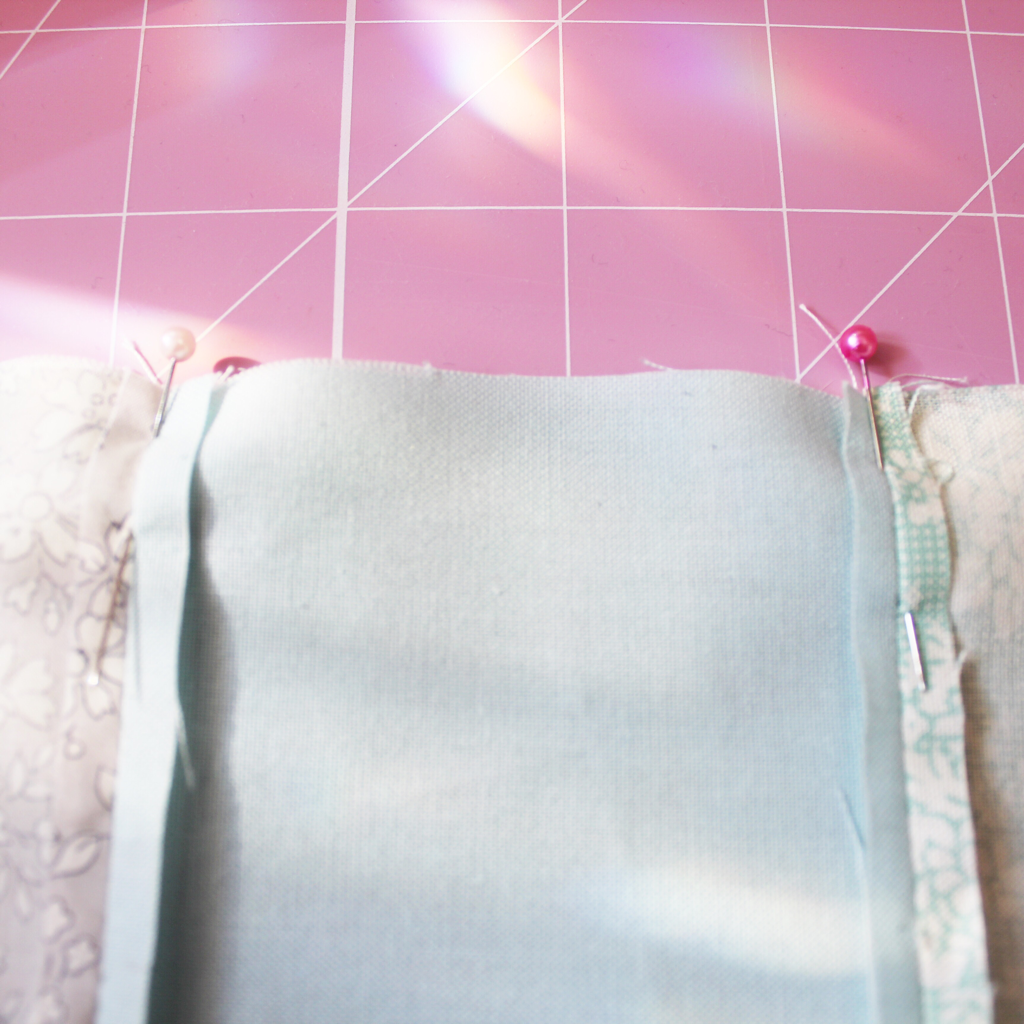 Making these little changes has definitely improved my accuracy. My seams aren’t perfect but I’m much happier with the results. Have you got any top tips for accurate sewing? Please share any you have in the comments below.    There are so many interesting and imaginative ways to cut your fabric for epp and this is called fussy cutting. Fussy cutting is essentially choosing a particular part of the fabric to use, for each shape. This could be a motif, a section of a pattern or maybe just lining up dots or stripes. The results of fussy cutting can be spectacular, creating kaleidoscopic designs or even turning the motif into something different entirely. Today I am going to show you my technique for simple fussy cutting which creates very pleasing results. I am yet to try anything more complex but I really want to, so I will be sure to share that journey with you when I do! 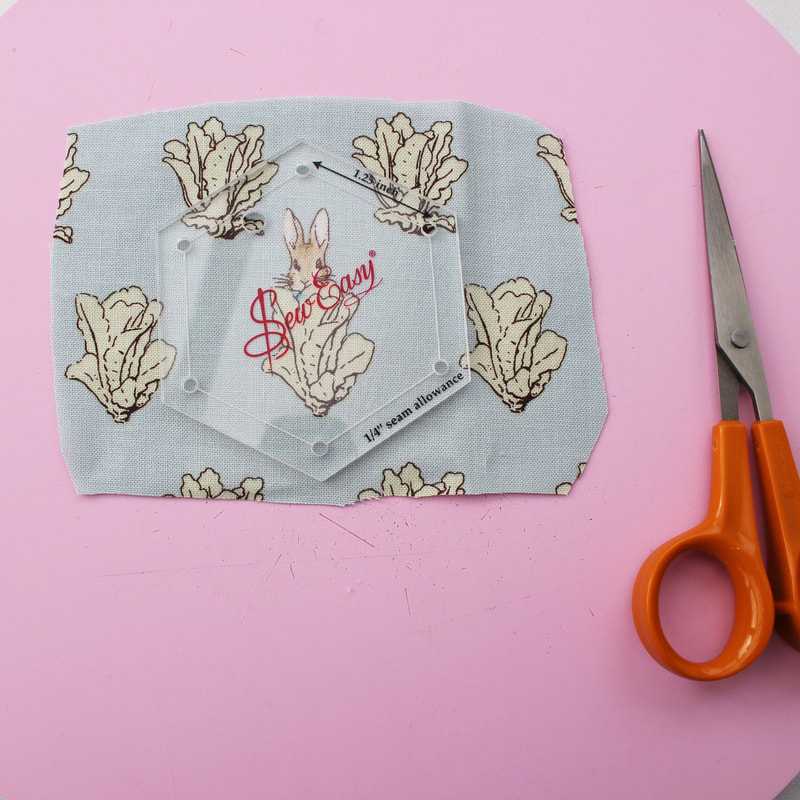 The first thing I do is to decide which motif I want to centre in my shape. In this case I've chosen to centre Peter Rabbit in a hexagon. I am using an acrylic hexagon template here, which makes this process nice and simple. It enables you to see the design easily and this means you can position it perfectly. The template has holes at each corner so I use them as reference points. I've lined the bottom point of the lettuce up with one of the corners, and I've centred the corner at the top in between his ears. Then you can either draw around it and then cut it out with scissors, or use a rotary cutter. The acrylic template includes a quarter inch seam allowance. 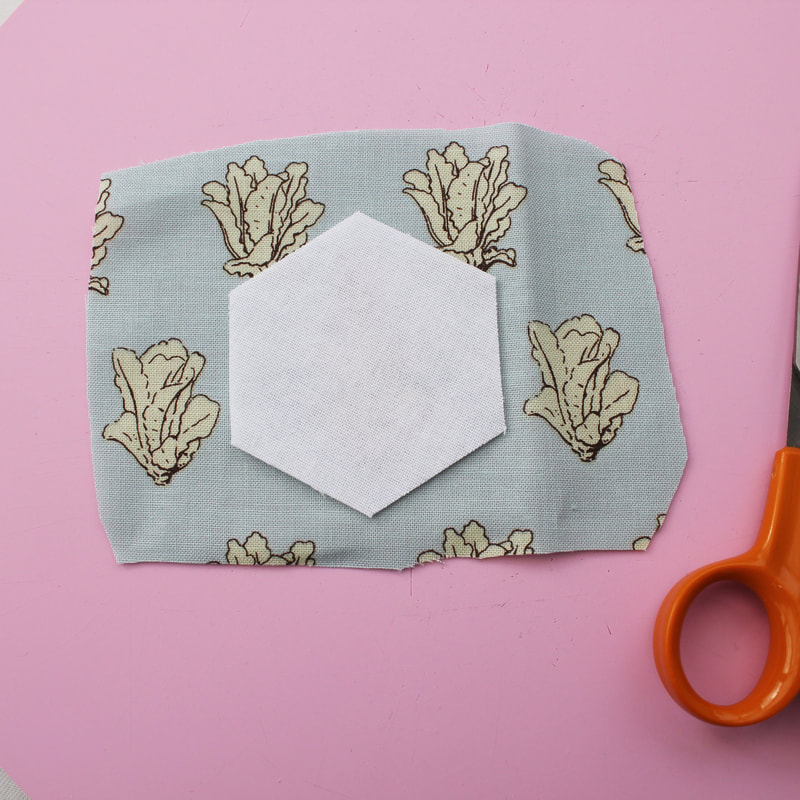 If you don't have an acrylic template then it is still possible to fussy cut your design, you just have to use your eye a bit more. I find it easier to position the paper template on top of the motif and hold it up to the light to judge where it is positioned. When I am happy with its position, I will cut around it using an add a quarter inch ruler. 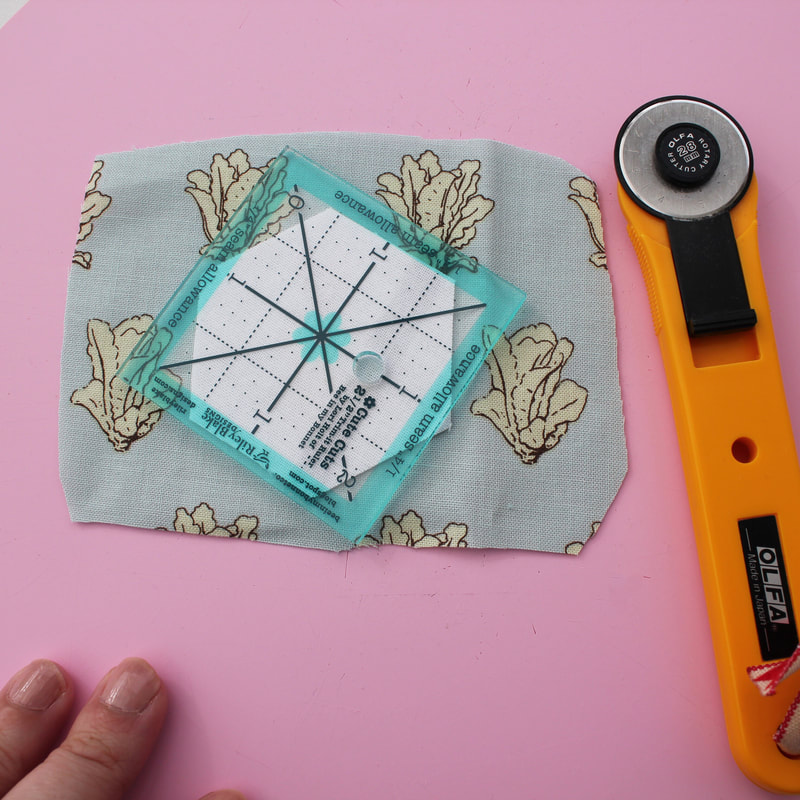 You could, of course, draw around it first before cutting, to ensure you have positioned it correctly, and you could do this on the reverse of the fabric if you prefer. I like doing it on the right side of the fabric as I feel I can see what I am doing properly. 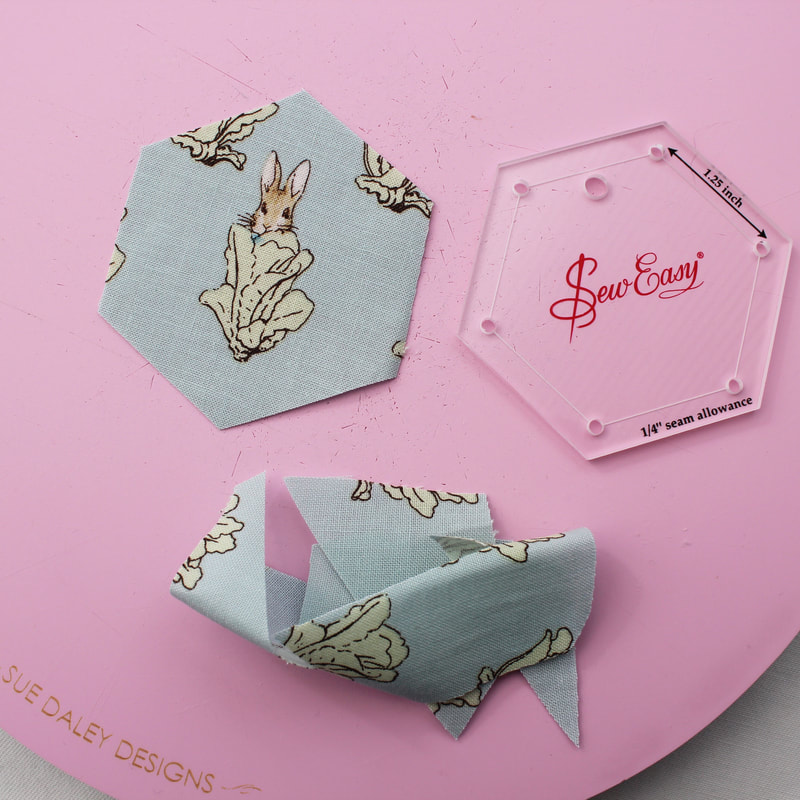 Once you have cut your fabric, you need to transfer your paper template to the back of your fabric, centre it correctly then baste your shape as usual. The accurately cut seam allowance will help you to do this.  And that's all there is too it! As well as acrylic templates there are fussy cutting templates on the market which are like little windows but I don't own any of them. I find acrylic templates to be really useful and I like having them. I have a couple of sets of the shapes and sizes that I use most often. However, it can be costly to invest in lots of templates if you find you use many different shapes and sizes. So in my next post on this topic, I will show you how you can make your own for a fraction of the cost!
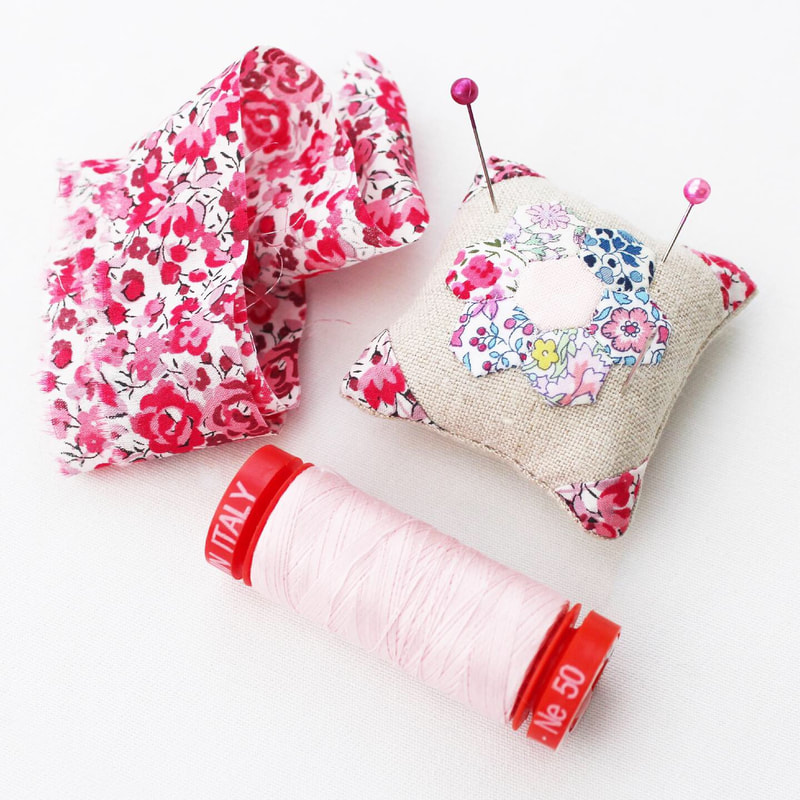
Happy sewing! P.S Thank you to everyone who entered my little giveaway on my last post. I put all of the names into a cup and pulled out a winner which was ... Liz! Congratulations Liz. Please contact me either through the contact form on this website or send me a DM on instagram and I will send your prize out to you. 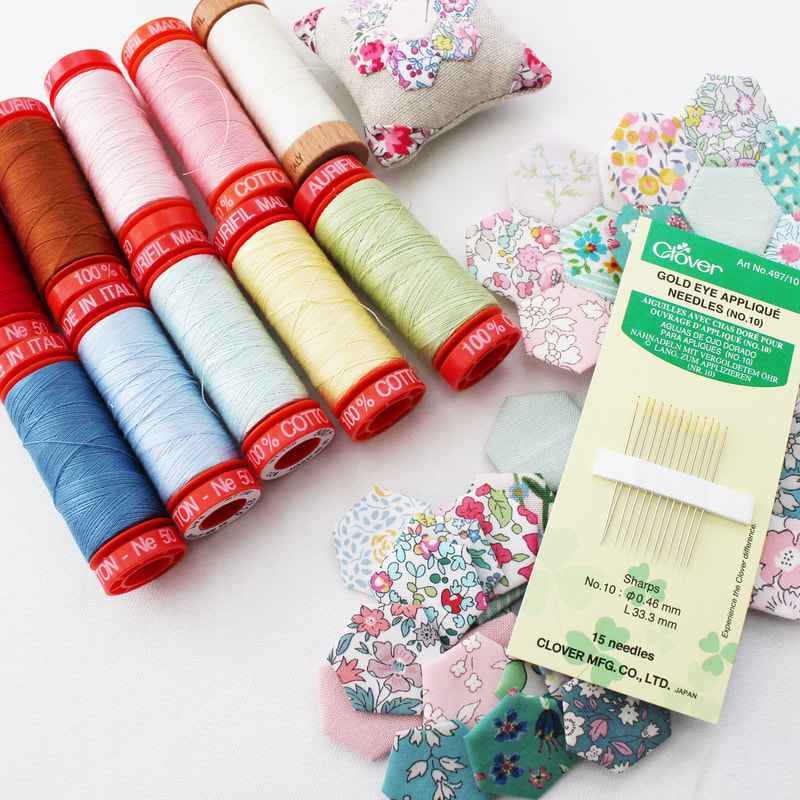 For a while now, I've been on a search for my favourite needle and thread for epp. I often get asked what I like best, and I haven't been able to give a proper answer because I've been undecided. I've tried a lot of needles over the last six months and I've finally settled on these Clover Gold Eye Appliqué No 10 sharps needles. Needles are such a personal preference. I remember getting a few comments on Instagram from people saying my needles were too big and looked like tree trunks! But I find tiny needles cause me to grip tighter and give me hand and wrist pain. I also didn't like long thin needles as they can be too flexible and bend. So I've been looking for a needle that isn't too long or too short, is sharp and thin but not too flexible and I think I've found it. I do a lot of appliqué so these needles are great for that but they are brilliant for epp too. You might like these needles but again, it is personal preference and what feels comfortable to you. These needles are relatively inexpensive and a packet of 15 is around £1.65. I also really love the John James brand of needles and I use them for embroidery and general sewing. 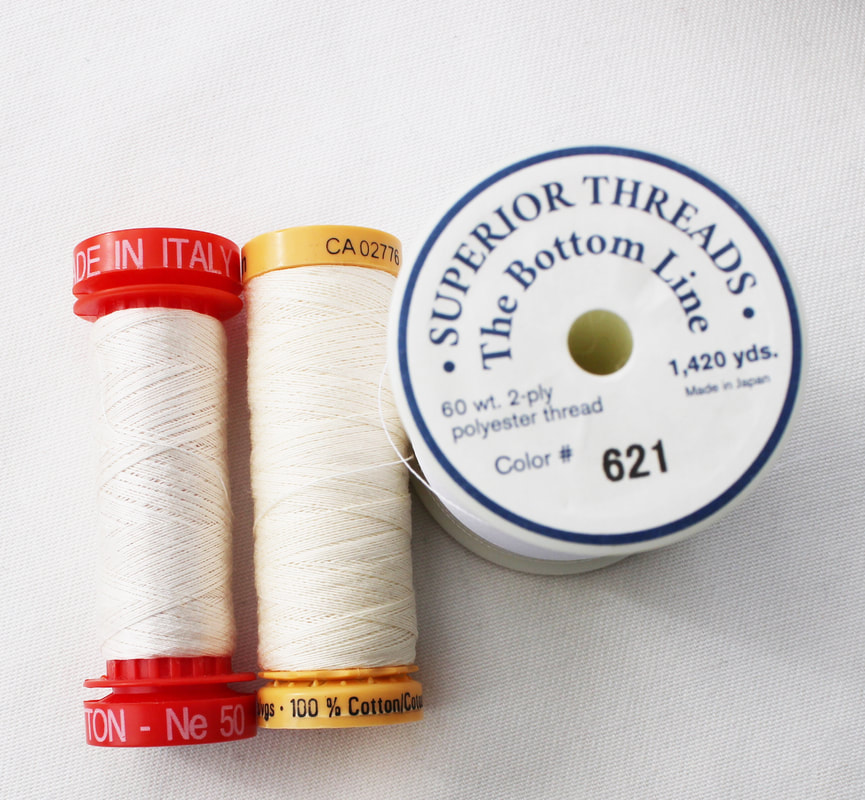 I've also been testing threads over the last few months so I thought I would share what I've found here. Again, it's all about personal preference and the result you are after. I mostly use Aurifil 50wt or 80wt. I love the Aurifil colours but the one I use the most is 2311 muslin. Aurifil is strong, fine and glides through the fabric. The 80wt thread is finer but can snap so I tend to use 50wt the most these days. I was having lots of thread breakage problems a while back and discovered that it wasn't the fault of the thread, but it was my needle. The eye of that particular needle was so sharp is was breaking the thread and stabbing my fingers. So I'm really happy I've found the Clover ones. Pictured below is the results of stitching two half inch hexies with Aurifil 50wt. The stitches are hardly visible. Aurifil 50wt is around £3.50 for a 200 metre spool. 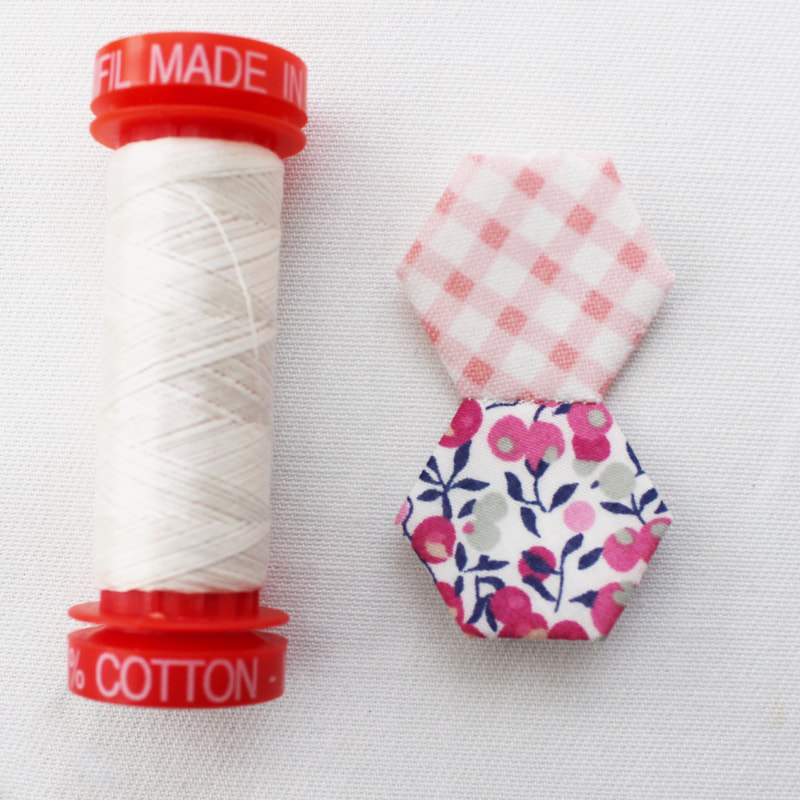 Next I tried Gutermann 100% cotton thread colour 919 which cost £2 for 100 metres. Again this thread was strong and fine and had excellent results, see below. 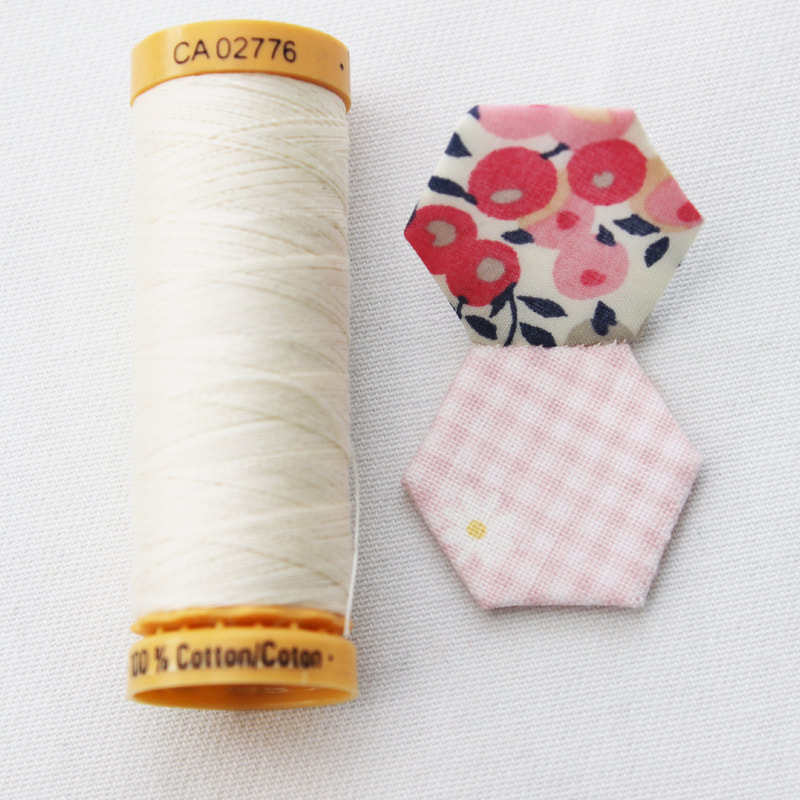 Finally I've been using Superior Threads The Bottom Line polyester thread which is 60wt in colour 621 and this cost me £6.95 for 1298 metres. The results were excellent, the stitches were almost invisible but as this is polyester and not cotton, it is slippy to use and sometimes the needle slides off. This has resulted in me gripping more tightly and causing me hand and wrist pain. (I am susceptible to this pain as I've suffered from carpel tunnel syndrome and RSI so please don't let this put you off this thread, the issue is my body not the thread!) 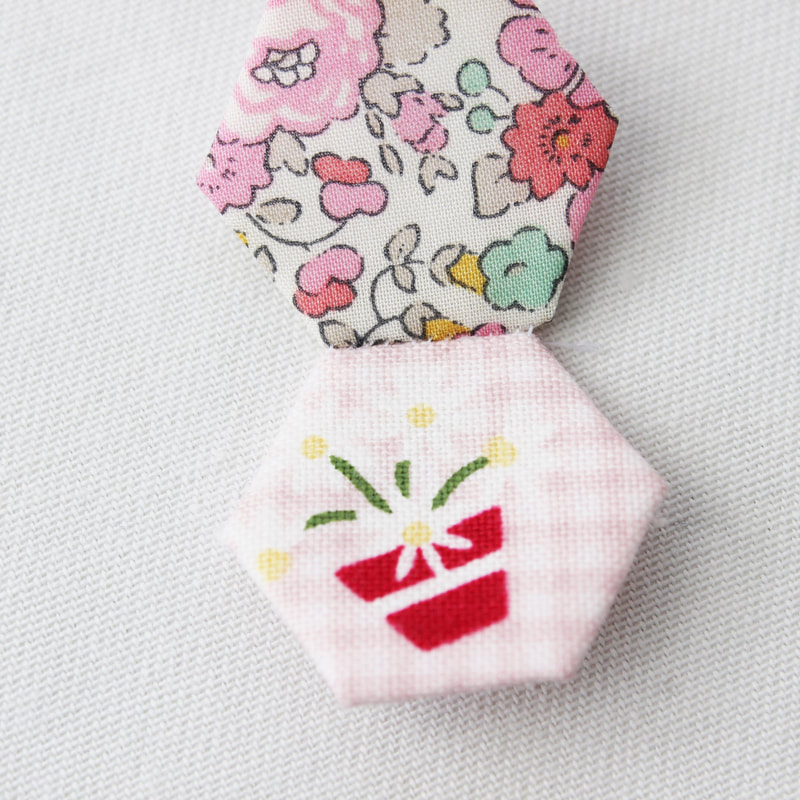 Overall, I've decided the Superior Threads is great for quarter inch hexies as my stitches can seem really big in comparison to the size of the hexies so I like that this thread minimises that and I will continue to use it for that. I love cotton thread and will use that for everything else. 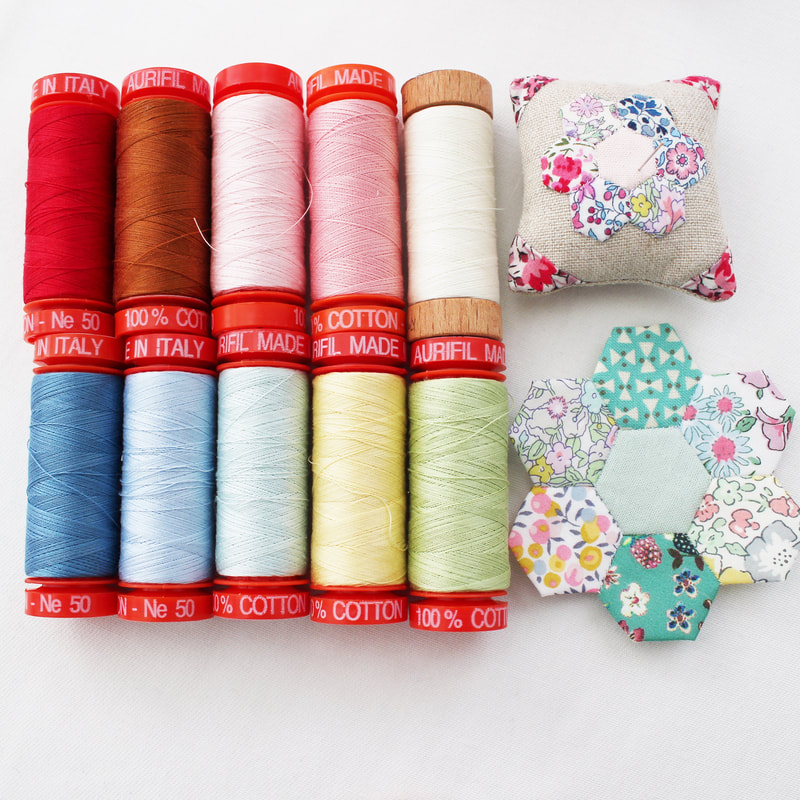 All this being said, you don't need to have this thread or these needles to do epp, just use what you have to get started. I recently saw an epp starter kit on Etsy that was over £40 and it didn't include any fabric or paper templates and this got me thinking, what does a beginner need to start out for epp? How much does it need to cost? EPP is a simple craft that requires simple tools and materials and therefore shouldn't cost a lot of money and you shouldn't need to invest a lot of money into it to start out. As a thank you for the support I've received on Instagram and over here on my blog, I've decided to host a little giveaway. All you have to do is leave me a comment on this blog post telling me what your favourite needle and thread is. I will leave the giveaway open for a week and then I will pick a winner randomly and it will be announced on Instagram and on this blog. You will win an epp starter kit designed by me that contains a few of my favourite things such as needles, thread, a Sewline glue pen, paper templates and some pretty fabric. This giveaway isn't sponsored by anybody and it's open worldwide but please just one entry per person. If you follow me on Instagram and on Bloglovin then it will be easy for you to see when I announce the winner. Thank you and good luck!
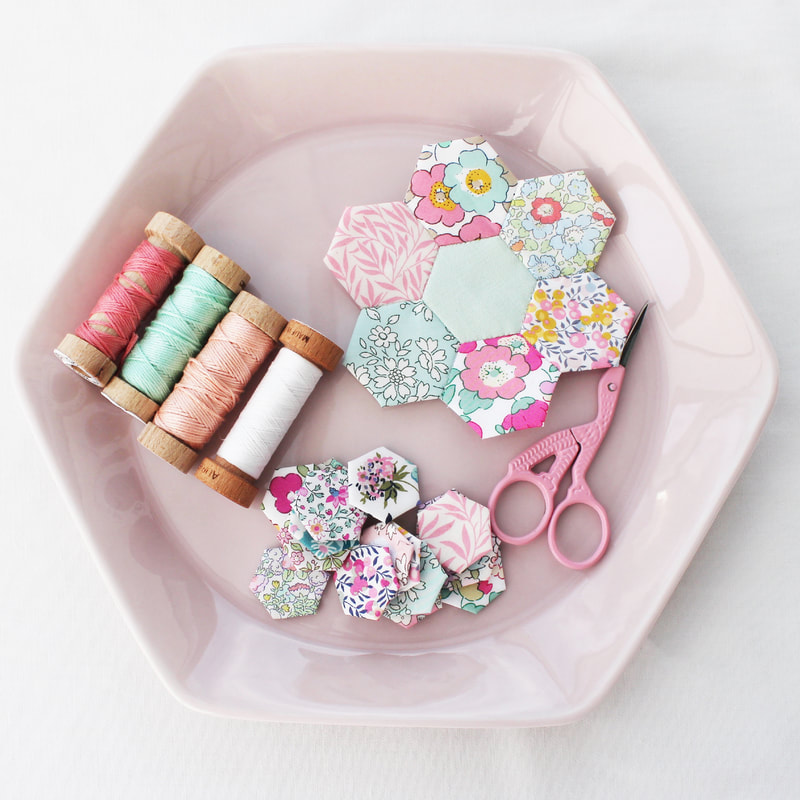
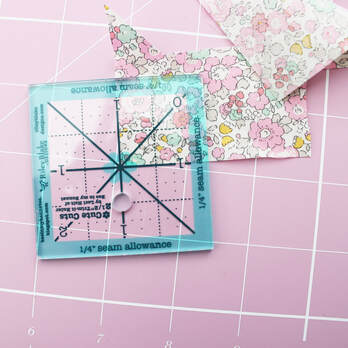
 I made these super cute tiny pincushions to take part in the teeny tiny pinnie parade that is taking place on Instagram at the moment. It is being hosted by Cheri @tinkerellen and I thought I'd share how I made them here just in case there's anybody out there who was curious or who would like to have a go too. They are perfect for using tiny scraps and the finished result is two inches square! I've linked to some products I've used but all links are just for your information and are not sponsored or affiliate in any way. If you have any questions you can always ask me on Instagram, in the comments here or through the contact form on the home page. I hope you like this tutorial! 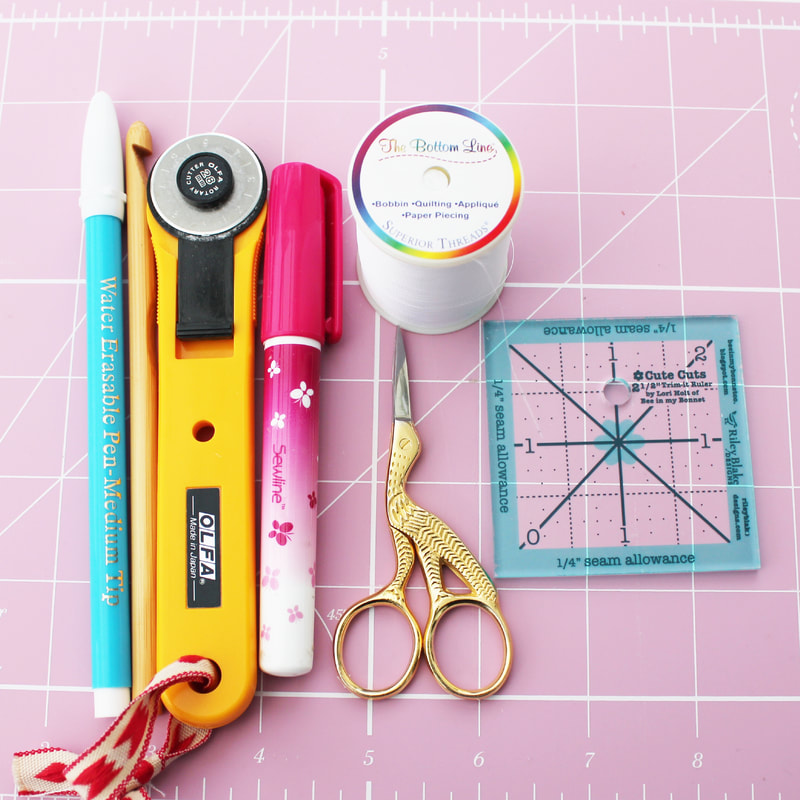 Tools To make this pincushion you will need the usual sewing supplies, needle, thread, sewing machine, rotary cutter, scissors, cutting mat, ruler, Sewline glue pen, erasable pen, point turner (I use a crochet hook). I'm a big believer in use what you have and in that you don't need fancy things to create beautiful projects, but I am going to recommend two things for this pincushion which are not in any way 'must have' items but they do make life easier. Firstly the little two and a half inch ruler pictured above. It is called Cute Cuts and I bought mine from Sew and Quilt. This is one of my most used tools for sewing as I find it to be the perfect size for most of the things I make and I use it daily. The other thing I am going to recommend is Superior Threads The Bottom Line thread. It is a polyester thread and it has been said that polyester thread can damage cotton fabrics over time (which I have no experience of) and whilst I do prefer using cotton thread, this thread is perfect for this project as it is strong and hardly visible. When making tiny things, your stitches can seem really big, so using this thread reduces this. Again, this can be bought from Sew and Quilt. You will also need seven, quarter inch hexagon templates. You can use paper or I use hexiform from Ashmead Designs. The hexiform doesn't need to be removed so this makes the process even easier. If you want to use paper, I have free printable templates here. Materials You will need:
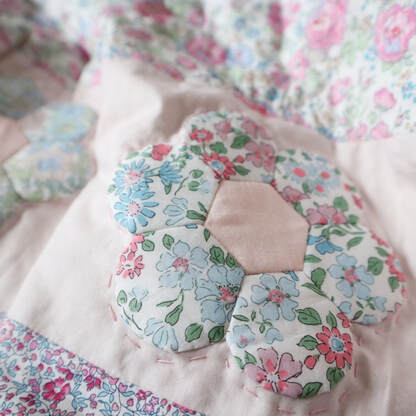
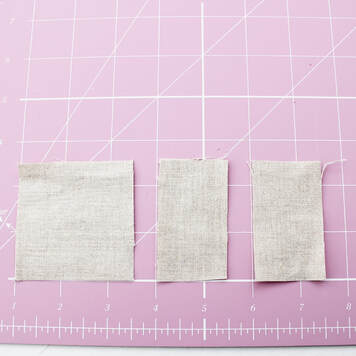  1. First make your English paper pieced hexagon flower. I have a video tutorial here showing how to make a larger hexagon flower. To make a small one the principals are the same, but I don't cut the thread after each seam, I carry it across the back, you can't see it so nobody will know! If using paper templates, you will need to press your flower, spray with spray starch and press again before removing the papers and then appliqué it onto your two and a half inch backing fabric. Again, the little ruler is so useful here as it helps you centre the hexie flower. 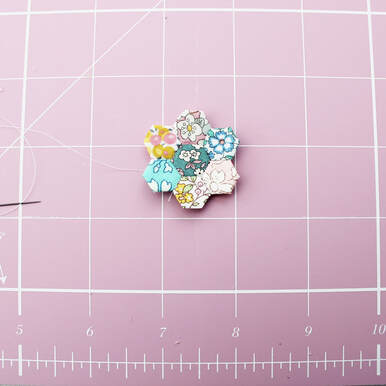 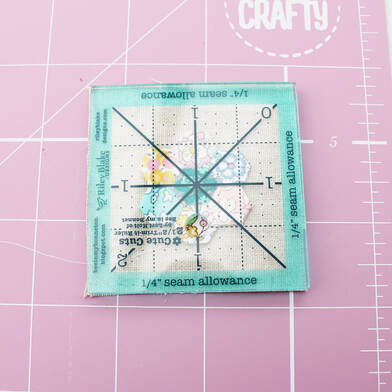 2. Next you need to mark where you will add the corners. On the top edge, I measured one inch in towards the centre from each corner and marked it with a water erasable pen. I then marked one inch down from each corner and marked it. I repeated this with the bottom corners, measuring and marking one inch in along the bottom edge and one inch up. 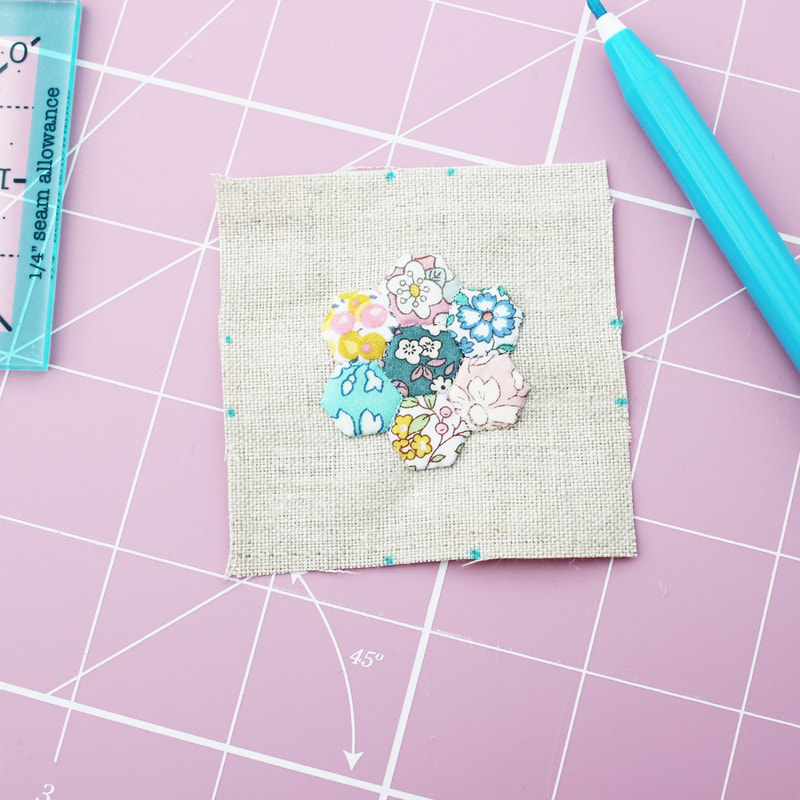 If it helps, you can draw a line across these points to mark the corners and show where you will stitch. 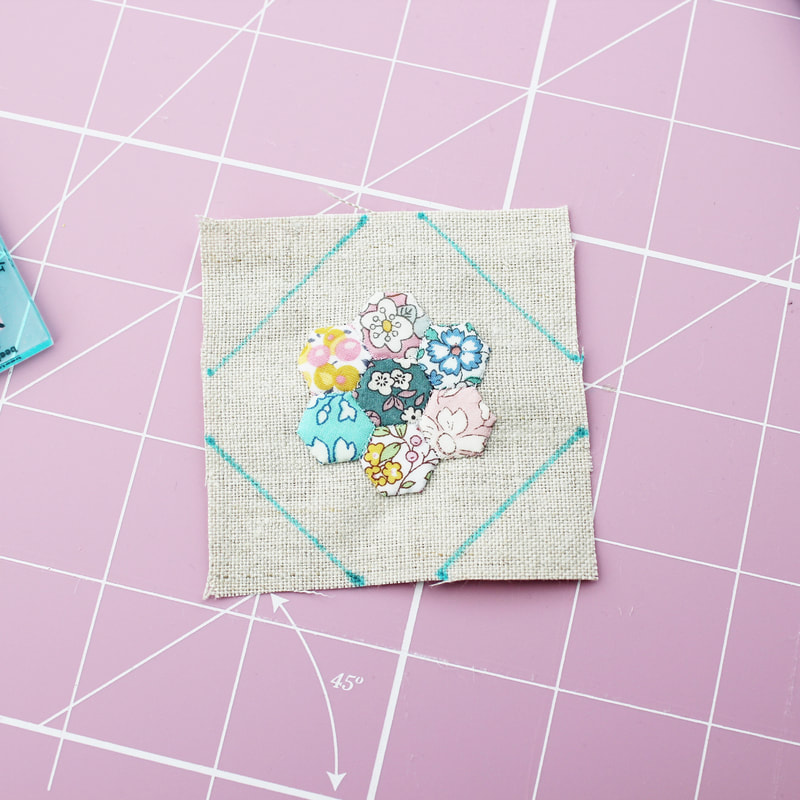 3. Next take your one inch squares and fold them in half. Finger press to get a visible crease across the square but take care not to stretch them out. If it helps, you could draw a line across the squares instead. 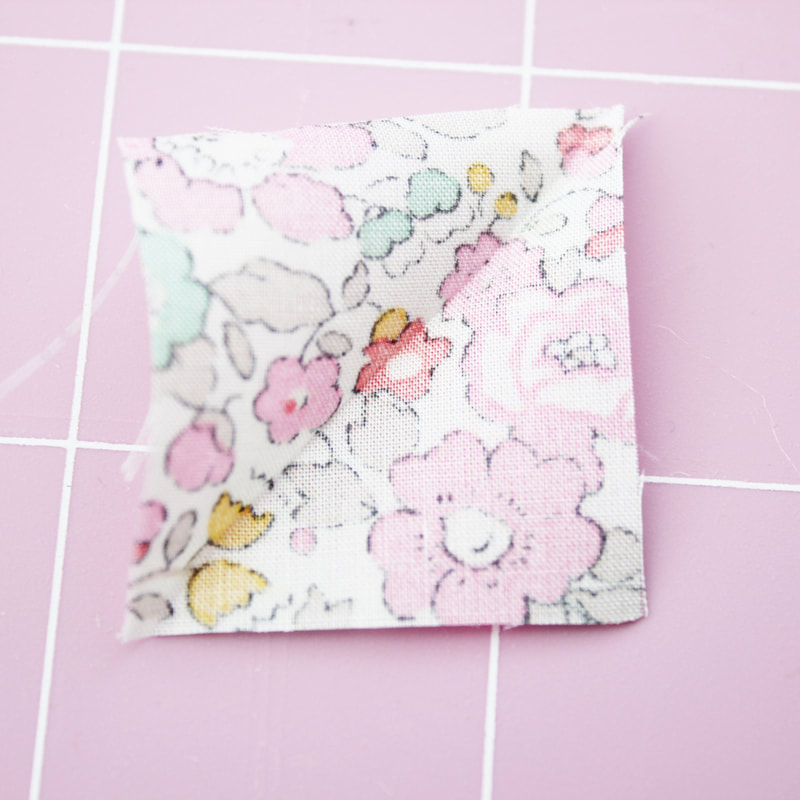 4. Place your fabric square on the corner of your pincushion top, right side facing down, lining up the diagonal lines. Your fabric square is slightly larger than the corner of your pincushion so it will overlap the edge. This will be trimmed off afterwards. I use a dab of Sewline glue to hold it in place as this works better than pins. Stitch across the diagonal line with your sewing machine and repeat for the remaining corners. 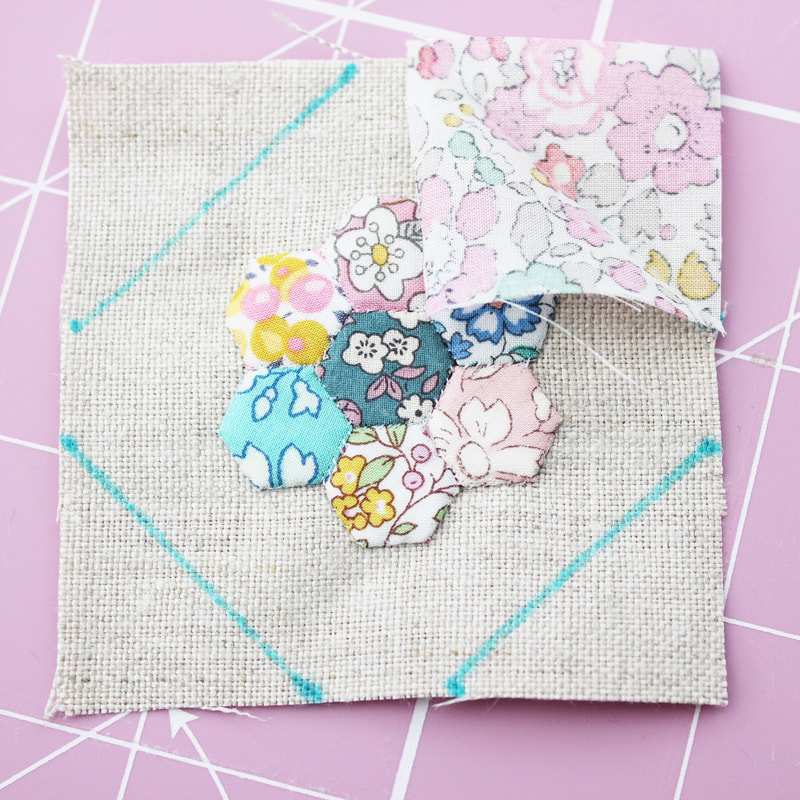 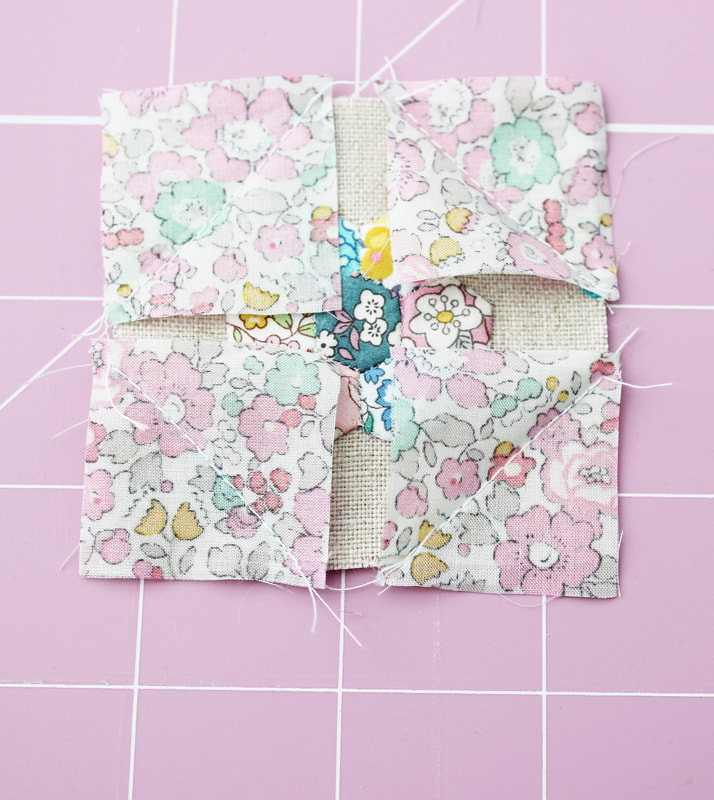 5. Trim the seam allowance at the corners back to a quarter inch and turn your corners out. Remove your water erasable pen marks and then press with an iron. Take care not to use the iron on the erasable ink as this can make it difficult to wash out. This is also the time to add any hand stitching details. I added a tiny running stitch around the edge of the hexie flower. 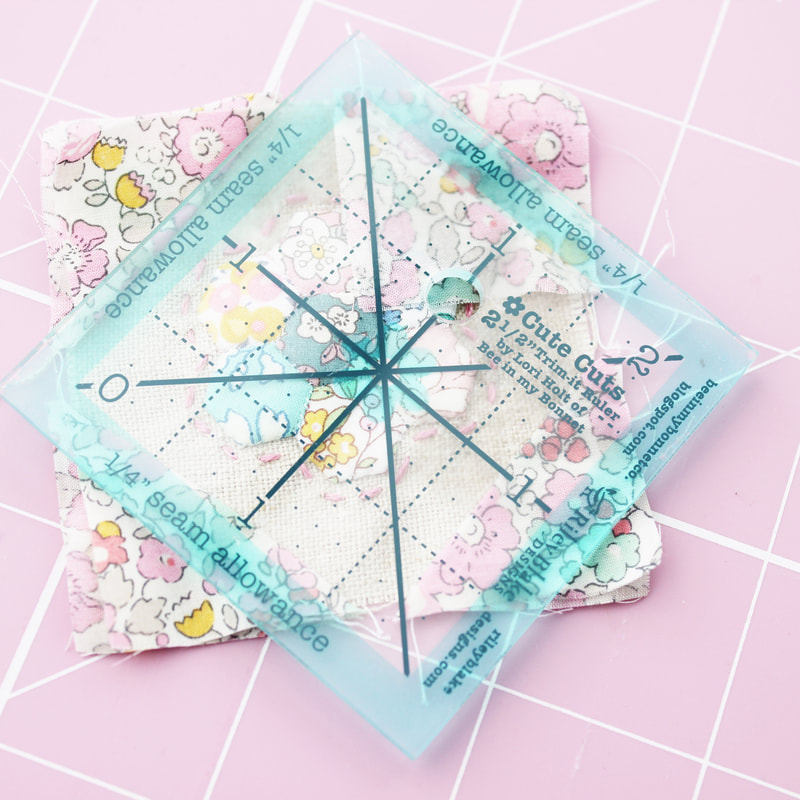 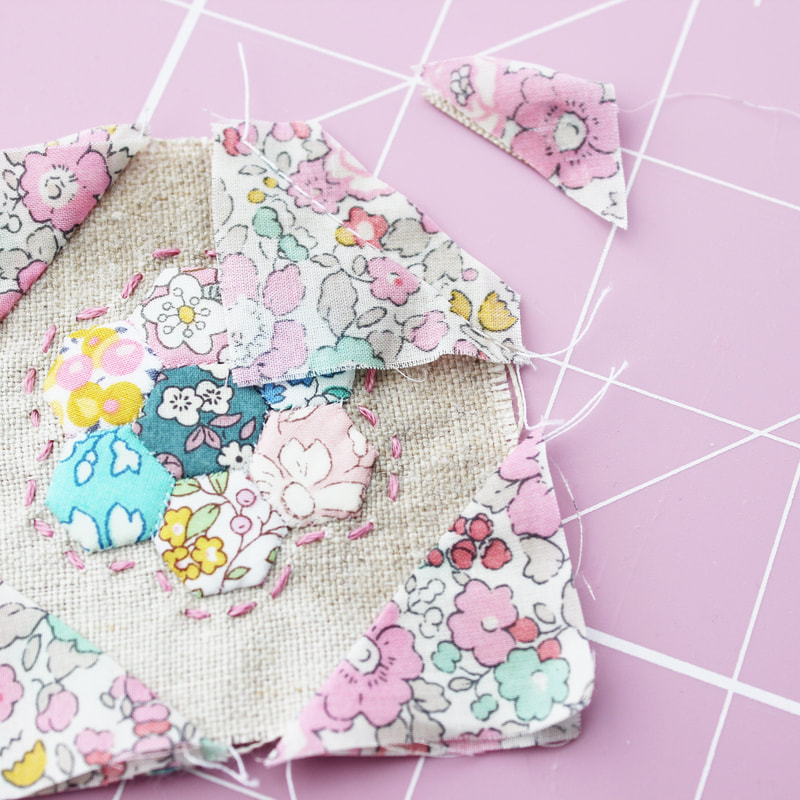 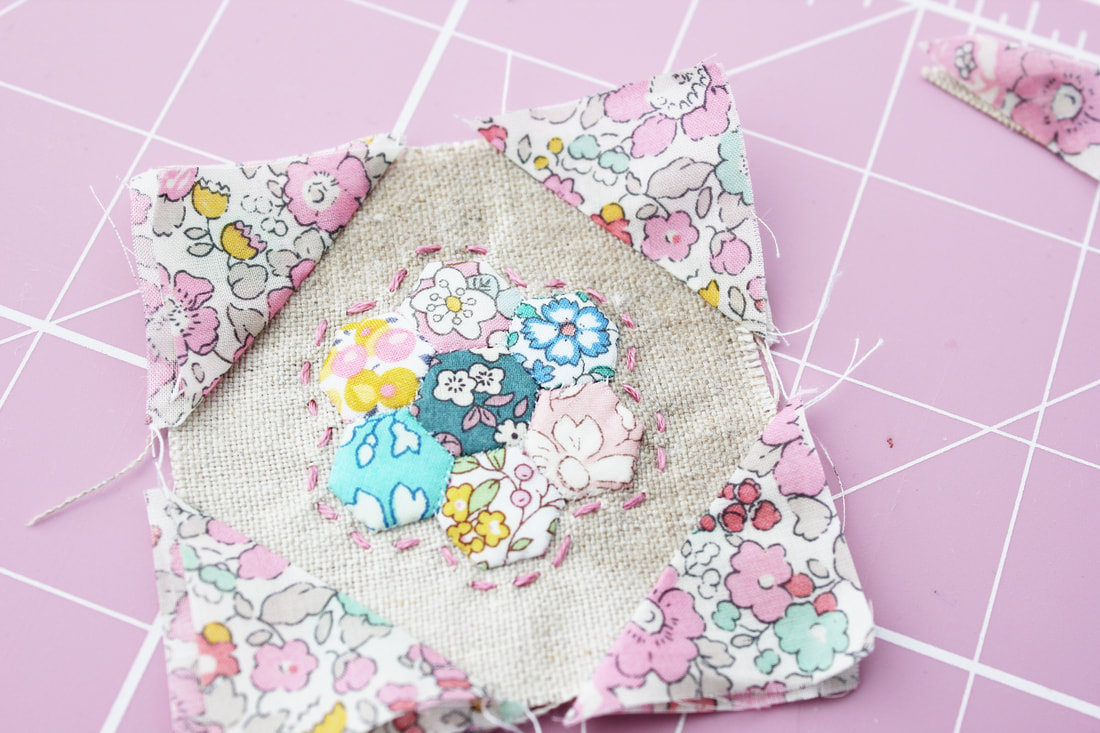 6. Using the little ruler, trim your block to make sure it is two and a half inches square. The two pictures below show before and after being trimmed, so it does make a difference. 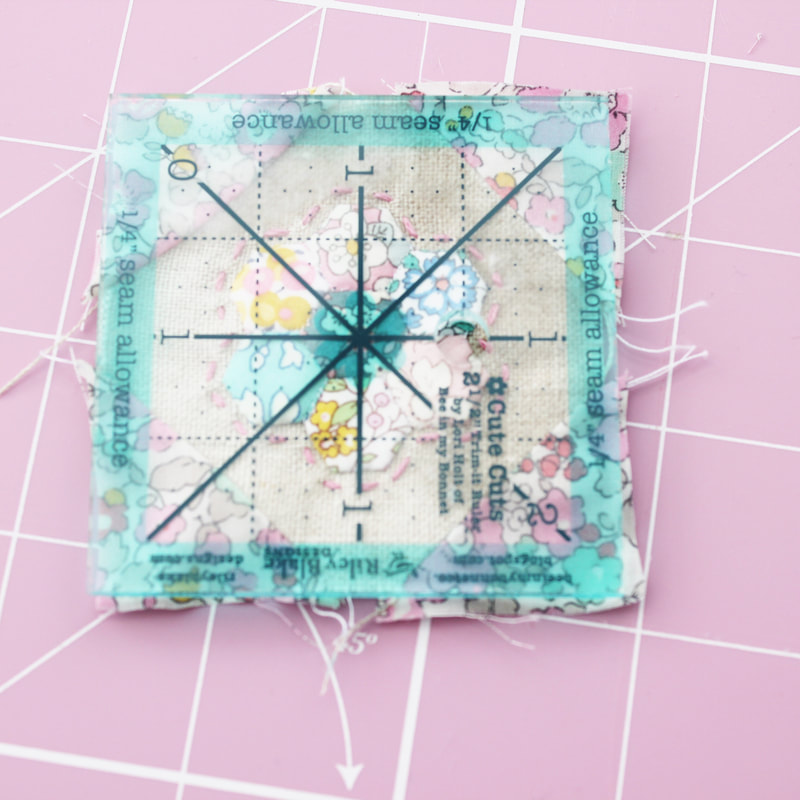 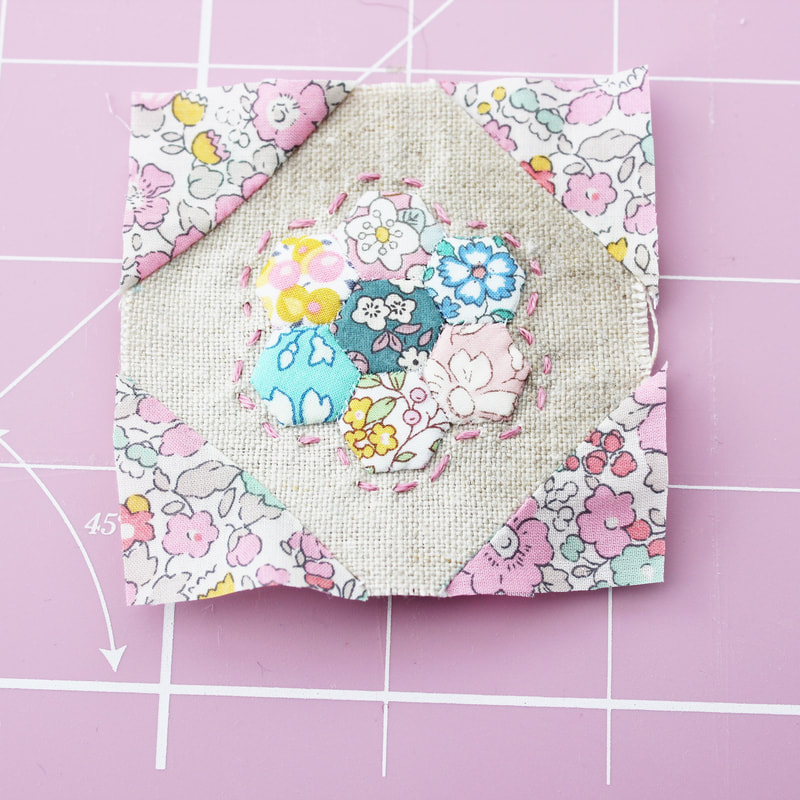 7. Now it's time to make the back. Take one of your rectangle pieces and fold over one of the long edges a quarter inch and finger press in place. Place it right sides together on top of one side of your pincushion top, making sure the folded edge in in the middle. 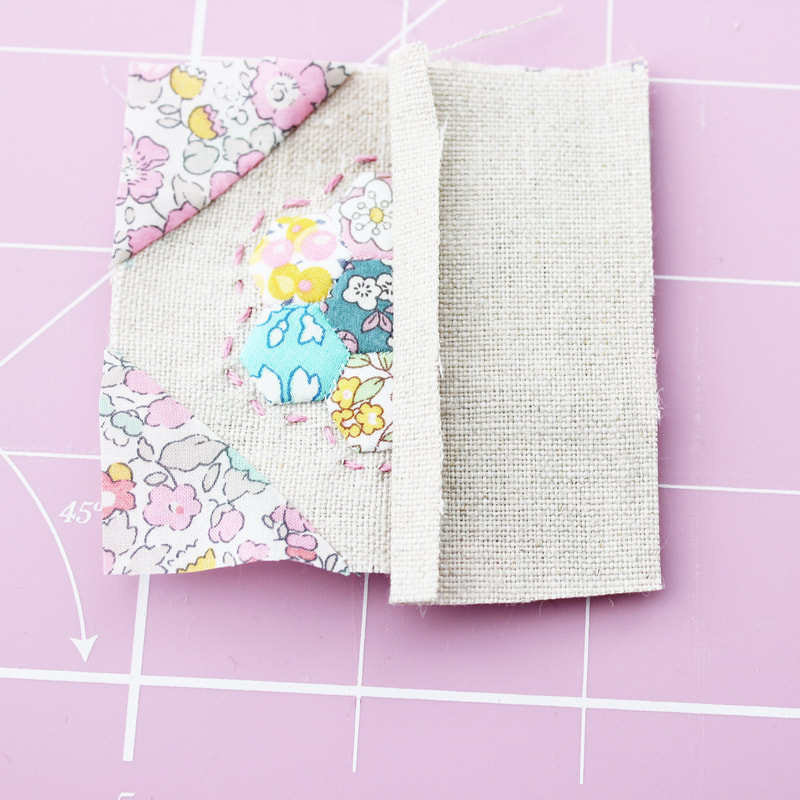 8. Stitch this in place along three sides, leaving the folded edge free. I started my stitching after the fold and finished it before the fold at the bottom. I used just less than a quarter inch seam allowance when sewing this together to allow for turning it right side out. Repeat for the other side with the other rectangle piece in exactly the same way. 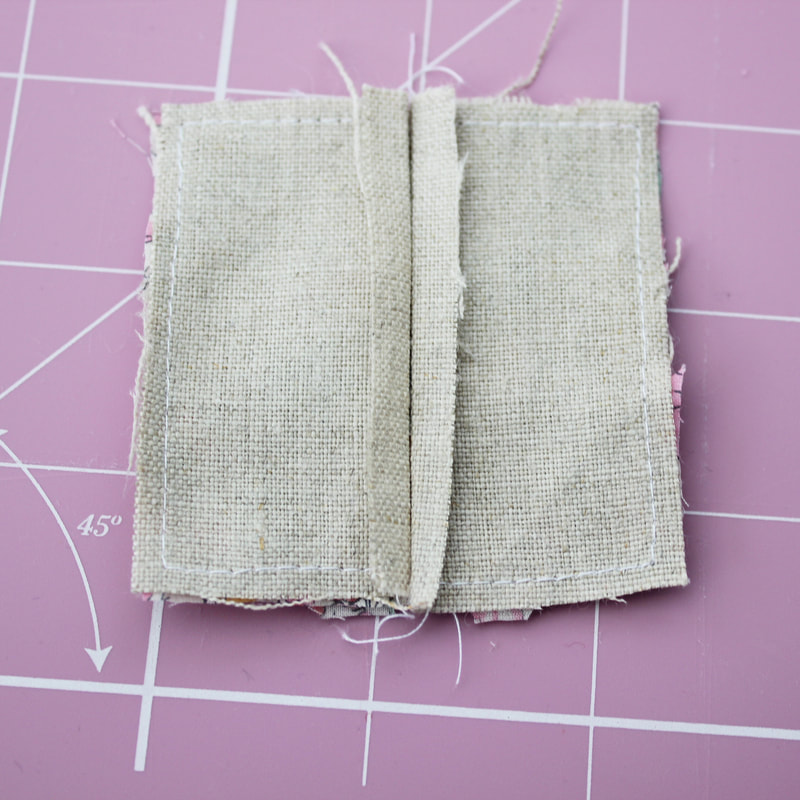 9. Now gently turn your pincushion right side out. I used a wooden crochet hook to help push out the corners. Press with your iron. 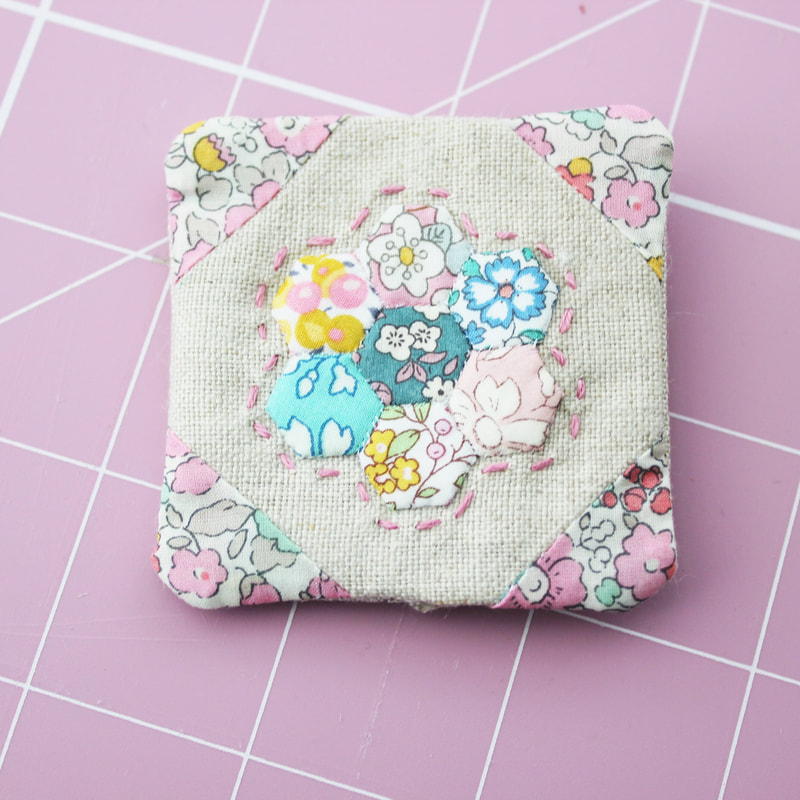 10. Now it's time to stuff your pincushion. I used toy stuffing but you can use crushed walnuts for a really nice pincushion feel. Take care not to overfill it as this will make sewing up the opening tricky.  11. Now stitch the opening closed. I used a ladder stitch for this which is another reason why polyester thread is good for this project as when you pull the opening closed, your thread won't snap. 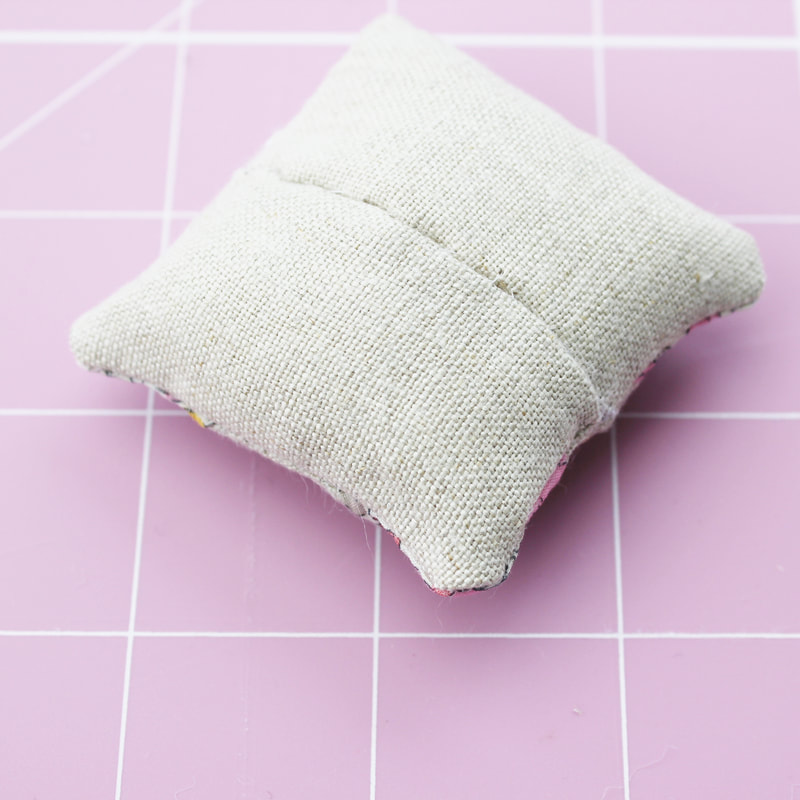 And that's it, your pincushion is complete! Such a fun little project and a great way to use teeny tiny scraps. 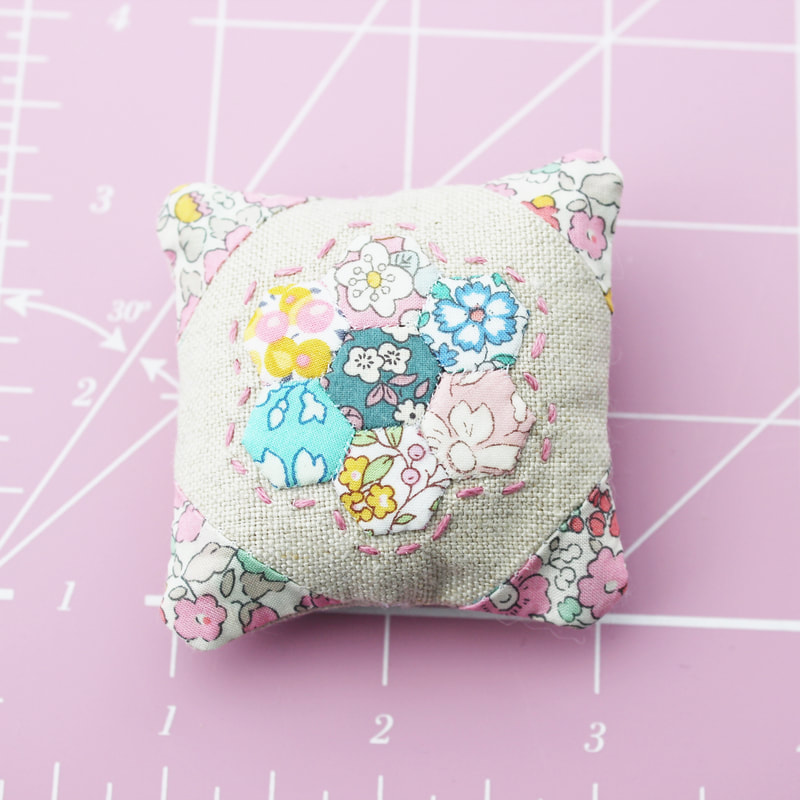 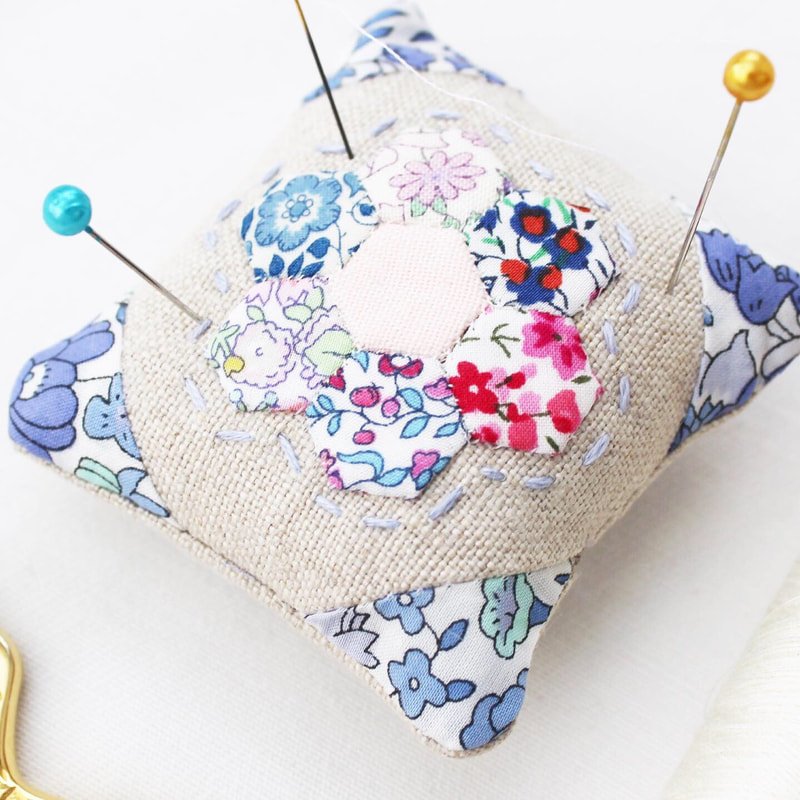 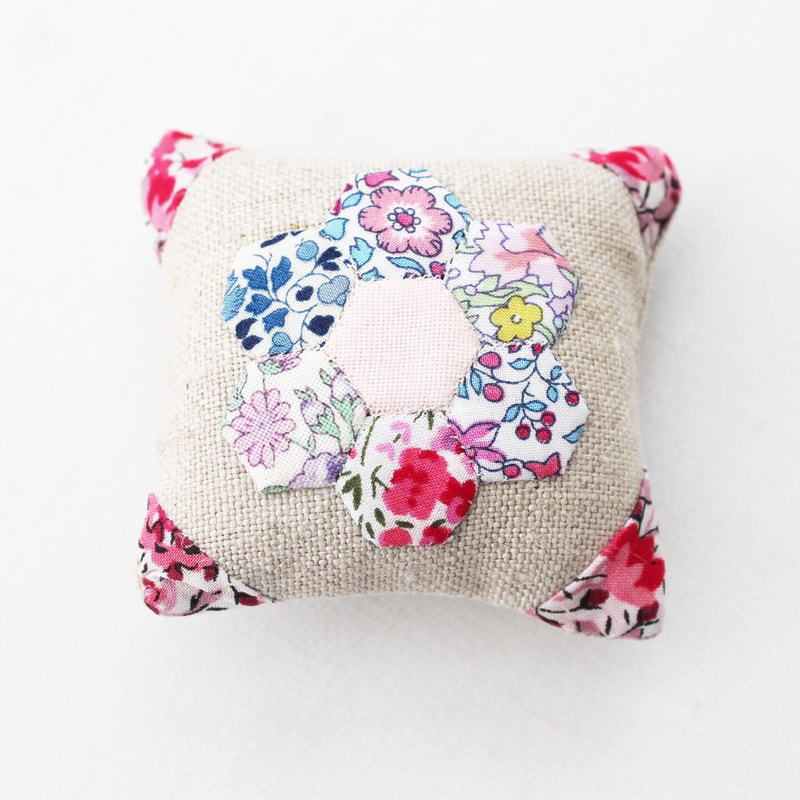 I hope you enjoyed this little tutorial and if you give it a try, I hope you love making your teeny tiny pincushion!
Happy sewing! 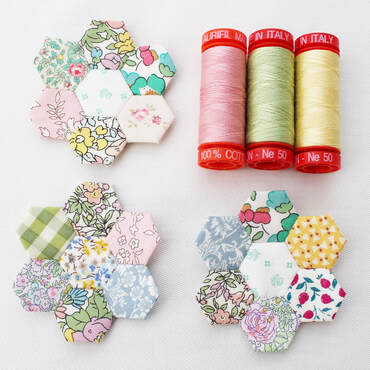 I love English Paper Piecing so much, but I love tiny EPP the most! I'm currently working on a half inch hexagon project which will become a wall hanging. I love half inch hexagons and I think they might be my favourite size. I absolutely love combining embroidery and EPP and as I often use hexiform shapes rather than paper (which I buy from Ashmead Designs) embroidering into them is even easier! I'm really passionate about sewing being an accessible craft/hobby to all people, which is something I will talk about more in depth in another post. But for now I will say that EPP is a great hobby and anyone can do it. It's inexpensive, only requires a few tools (needle, thread, paper, fabric, scissors and maybe a glue pen if you don't want to thread baste) and is so portable. 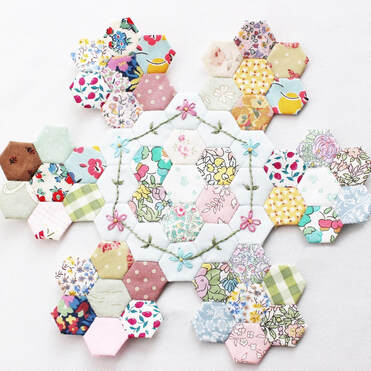 Recently I started a quarter inch hexagon project and I got lots of questions about it on Instagram. There was a lot of interest surrounding how I make the hexagons and sew them together. So I've made a little video tutorial that shows all of the steps and also how I made them into a little pincushion. I wanted a small pincushion to take around with me as when I'm stitching on the go I always need somewhere to park my needle in between stitches. I admit I was very tempted to make this little pincushion into a bracelet to wear whilst stitching, but maybe I will make another one for that. 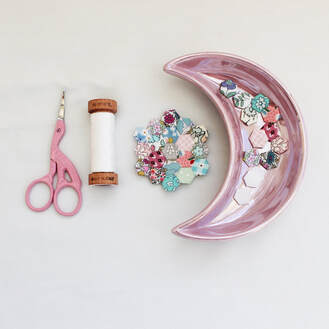 The beauty of half inch and quarter inch projects is that they use up the teeny tiniest of scraps which I think is brilliant. I don't have a lot of money to buy fabric so I like to use up what I have and also, this is better for our environment. 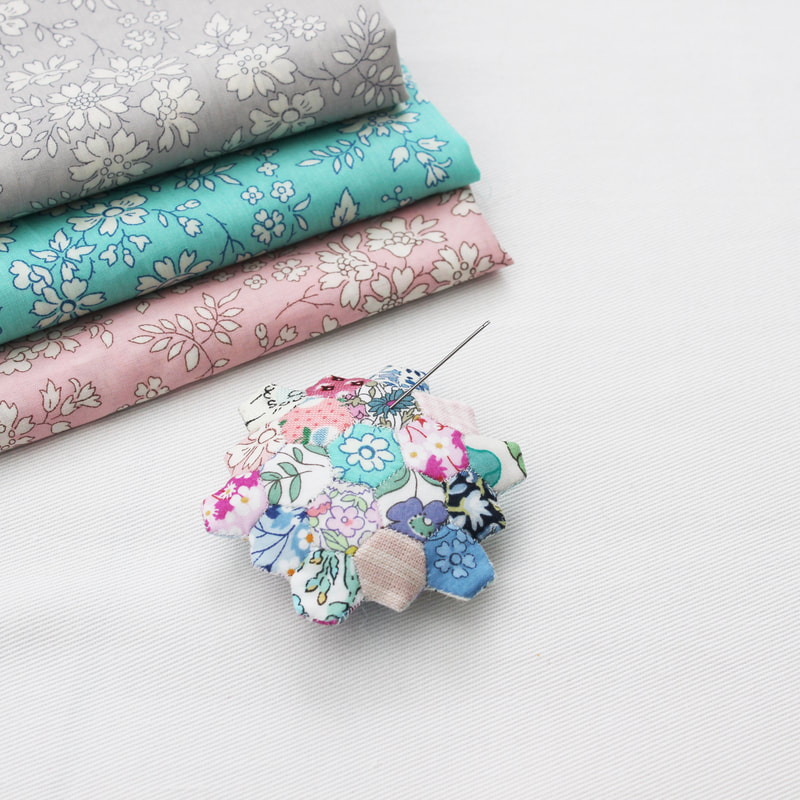 I hope you like my video tutorial and that you find it useful, especially if you are a beginner. You can find it on the video tutorials tab under quilting tutorials or click on one of the links in this post. There are, of course, many ways to make things, I am just showing you my way. The two halves of the pincushion could be stitched with a ladder stitch whereas I have used a whip stitch. Please feel free to use my video as inspiration and to make the project your own in any way you like by changing stitches or adding your own twist. If you have any comments or questions, please leave them below. Happy sewing!
I am a complete newbie when it comes to Foundation Paper Piecing (FPP) and I must admit, it's taken some brain power to get my head around it! I'm loving this journey so far but I want to share what I've learnt in the hope it will help anyone else who is new to this magical technique. The first thing I did was look at some Youtube video tutorials. I'm a visual learner so I find this to be a great way to learn. This tutorial by Mister Domestic is a good introduction to the basic FPP technique. But I quickly realised that FPP was going to mean that I would have to print and cut out lots of paper templates which I found slightly off-putting because I prefer the sewing part. Then I discovered @sugaridoo and on youtube she has a tutorial for how to use freezer paper. This method means you only need to print and cut out one freezer paper template because it can be reused over and over again. You can watch her excellent tutorial here. This method just made sense to me and it's the method I've been using to sew all of my blocks, and it works brilliantly! Irene's tutorial is definitely the best explanation of this technique, but here is my step by step guide just in case you'd like to see how I do it. 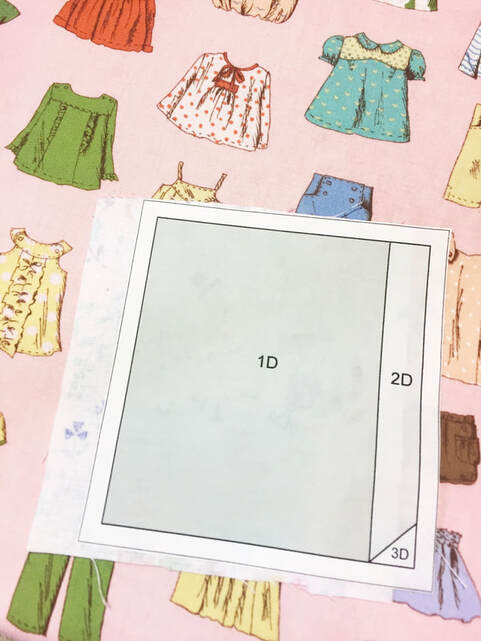 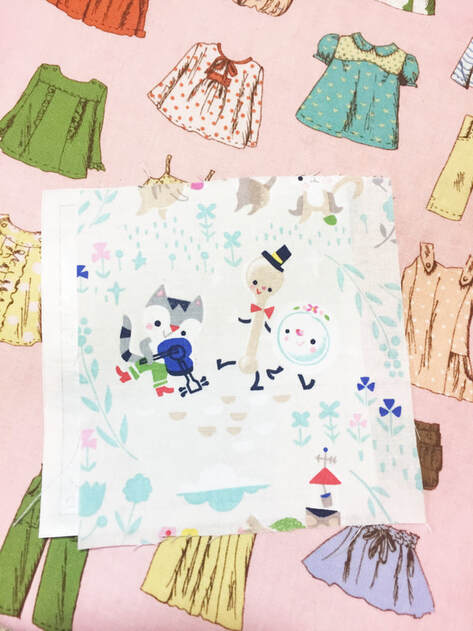 1. Cut a piece of freezer paper the same size as an A4 piece of paper. Iron it onto the A4 printer paper, waxy side face down. Put it into the printer and print the FPP pattern onto it. Remove the printer paper and cut out the freezer paper templates. 2. Iron the first pattern piece onto the wrong side of the fabric. 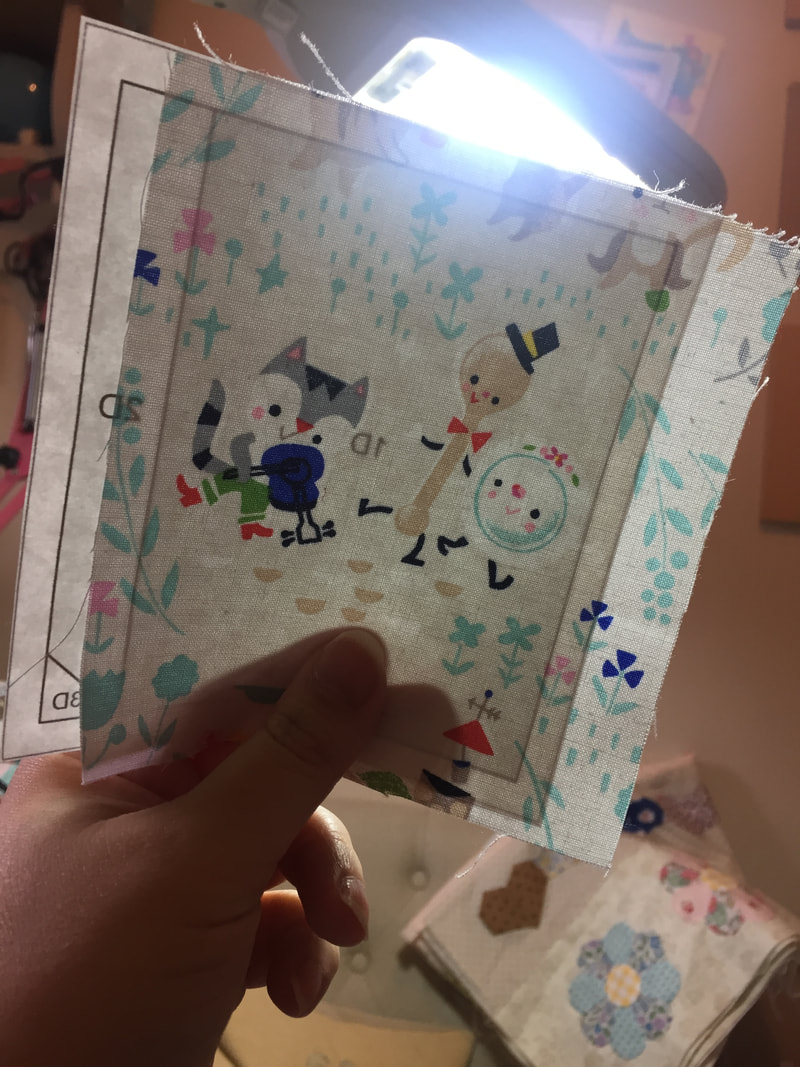 3. Hold it up to the light to ensure the design is positioned on the fabric correctly and that the fabric will cover the seam allowance. 4. Next fold back the next part of the template along the seam line and place the next piece of fabric on top of the first piece of fabric, right sides together. Hold it up to the light to check that the fabric covers the pattern piece and seam allowance. 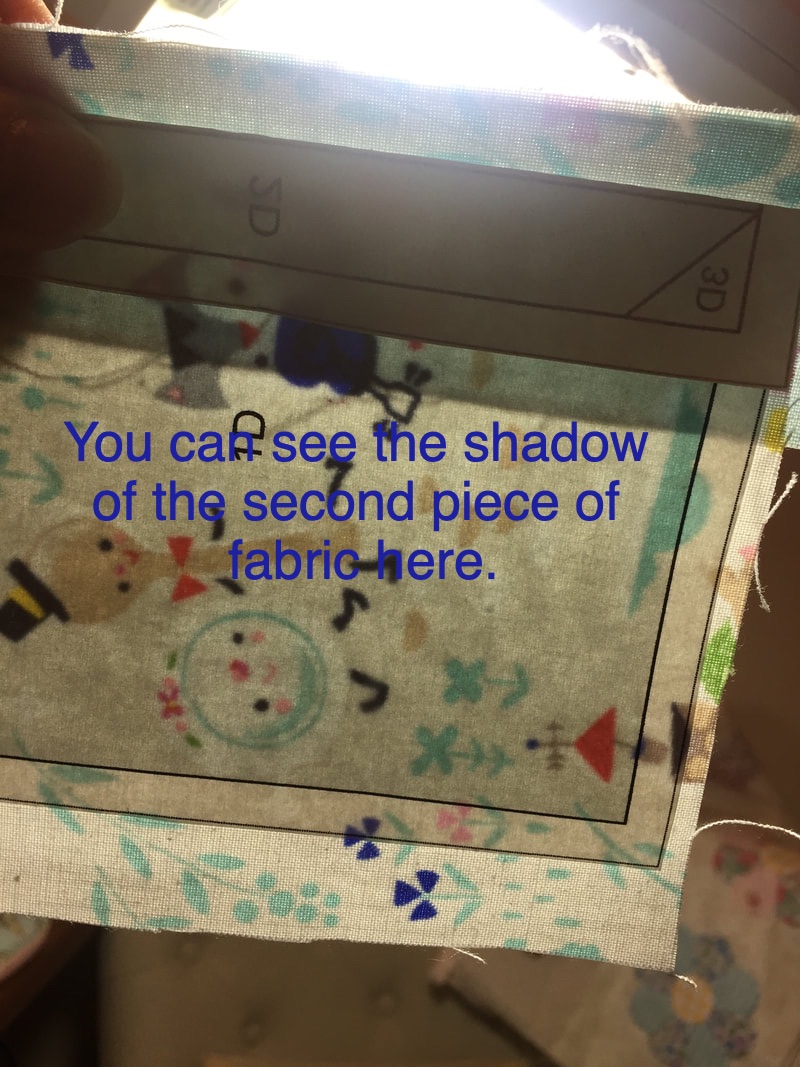 5. Next I take it to the sewing machine and stitch carefully along the folded edge, not into the paper but up close to it. 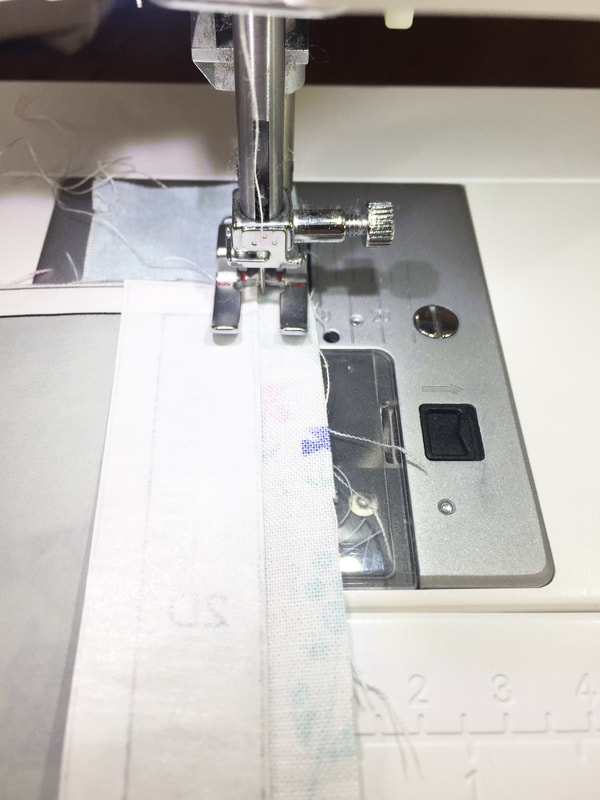 6. Before unfolding the paper, now is the time to use your add a quarter inch ruler. I got mine free with a magazine. Place your ruler so that the quarter inch comes after the stitched line and trim.  7. Now you can unfold the paper and trim the whole piece to be the same size.   8. It is a good idea to give your piece another press with the iron to ensure the seams are pressed and that the freezer paper is stuck on properly. 9. Repeat these steps for the rest of your pattern, pressing the freezer paper when needed to keep things in place. I don't remove the freezer paper until the very end when the block is complete. 10. When it comes to joining two already pieced sections together, I fold down the paper seam allowance on both pieces, line them up right sides together and sew.  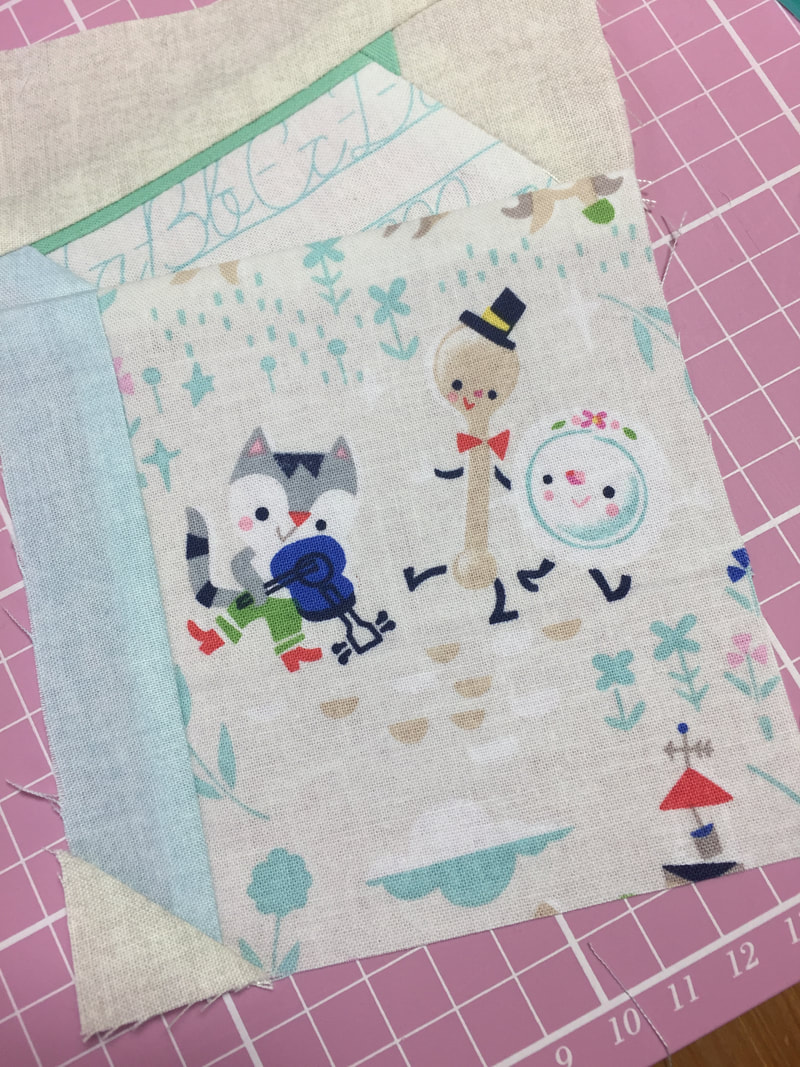 I reached out on Instagram to see if anybody had some tips and I received some excellent advice so I thought I would share here. I will link to the Instagram accounts of each person who gave me advice so credit is given to the very talented makers who helped me out. I hope the tips help you get started with FPP if you are finding it tricky.
1. Nim @gingernim said when sewing a crucial point that needs to meet, pin it first and sew it with a longer stitch length, that way you can check it meets and unpick more easily. If it is ok then sew the seam again with a shorter stitch length. 2. Meegan @nanas_needle said to not be frugal with your fabric, so cut your pieces bigger than you need them and trim them down afterwards. She also said to think about the type of paper you use, thinner paper like vellum works better. 3. Donna @donnalyn18 recommends folding the paper on the seam lines and using an add a quarter inch ruler. 4. Irina @nordiccrafter gave quite a few excellent tips. She explained how FPP is like working in reverse and that you place the wrong side of the fabric against the paper. She suggested holding your paper and fabric up towards a light source to ensure you can see that you have enough fabric to cover the area. Irina also said it is important to reduce your stitch length so that you can remove the paper with ease and that locking your stitches at the beginning and end of a seam will help to stop them from coming undone. 5. Victoria @wonkystitches recommended using a glue pen to help keep things in place whilst stitching which is an excellent tip. 6. Lee @quarteracreblock pointed me in the direction of @quietplay who has some excellent tips on her website here. She also told me about the practice tree that @thecraftynomadfleet has here. Lee also told me about @teresadownunder who has amazing videos on her page. These tutorials have all been very useful indeed. 7. Cari @muddle_and_grace suggested checking out youtube videos about FPP and there are some brilliant tutorials on there. So I hope all of the advice, hints and tips are useful if you are getting started. A massive thank you to everyone who offered me help, it's great to be able to share it here. If you have any questions or other tips to share, please leave them in the comments. Happy sewing!  Even though I've been sewing for as long as I can remember, I've recently stumbled across a new technique that I've never tried before, foundation paper piecing. It differs from English paper piecing because foundation paper piecing involves sewing through the paper and then removing it at the end. English paper piecing involves wrapping fabric around the paper shape whereas foundation paper piecing blocks are constructed flat. EPP involves hand sewing and FPP uses a sewing machine. FPP is completely new to me and I am by no means an expert, I have a lot to learn and I love that! I'm using my brain and I'm finding it a challenge and that's a good thing, I like to be continually learning. I thought I would document my FPP journey here and tell you about what I've learnt and made. 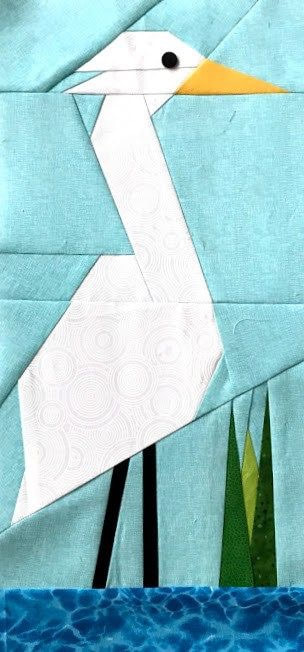 So first for some inspiration. I've been searching Pinterest for inspiring FPP patterns and there are so many. Here are some of my favourites to give you an idea of what FPP is if it's new to you too. All images are linked back to the source. 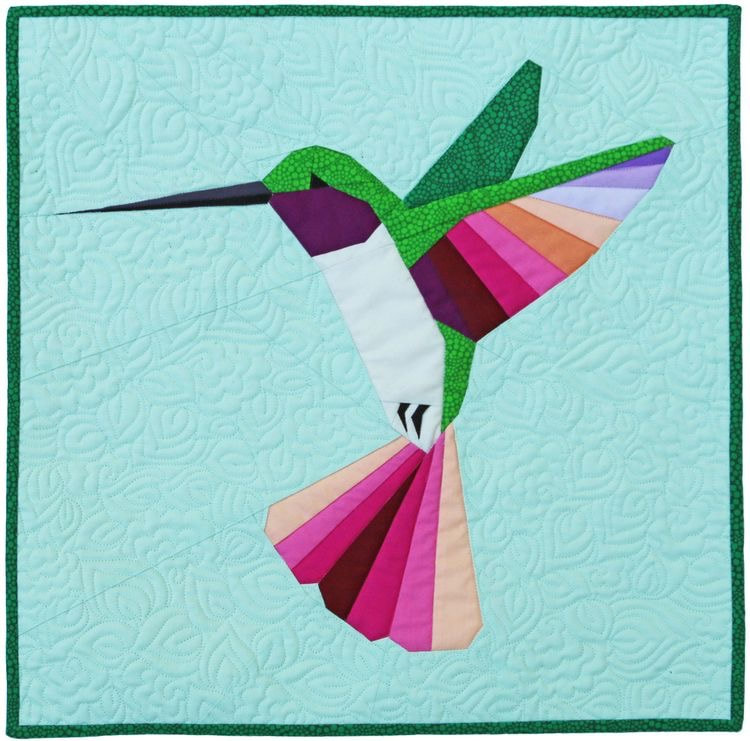 FPP blocks usually create pictures whereas EPP blocks create motifs. I find FPP to be magical. Tiny pieces of fabric are sewn together to create amazing pictures. I can't wait to get better at this technique so that I can make some of these fantastic designs. FPP is also used for none pictorial blocks like log cabin and this is because the technique of sewing through the paper gives greater accuracy for matching up seams. 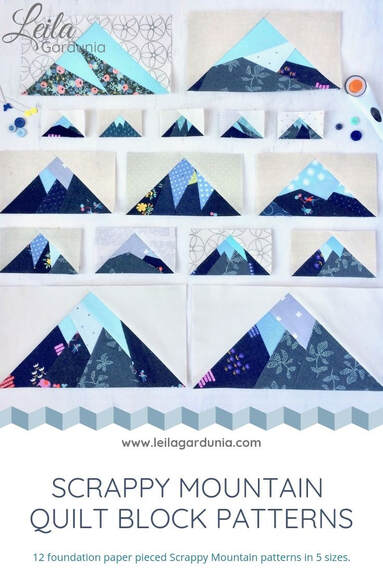 Have you tried FPP before? What have you made? In my next post I will show you my first attempt at FPP and share the tips I've learnt thus far. Happy sewing!
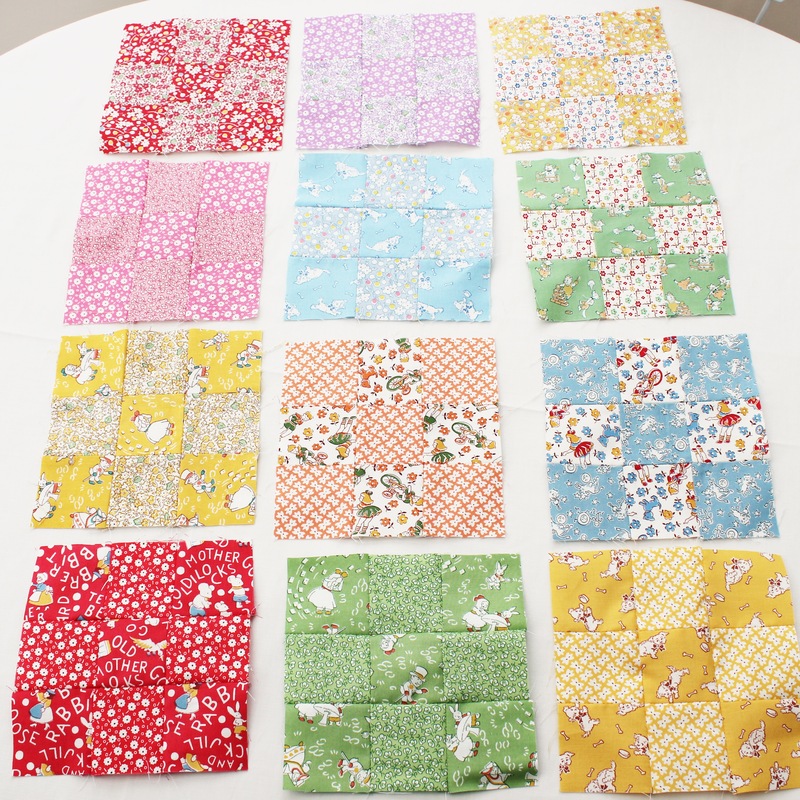 Continuing from my last post, you should now have all 12 blocks finished and ready to turn into a quilt. Play around with your blocks and decide on how you would like them to be arranged. You may also want to trim you blocks at this point to ensure they are all 6 inch squares. Now it's time to add the sashing. We will start with the vertical sashing between the blocks. 1. Cut 16 strips of fabric that are 6 inches long and 2.5 inches wide. 2. Take the first block of your quilt and lay a strip of sashing on top of it right sides together, lining up the raw edges on the left side as they face you. Sew together using a quarter inch seam allowance, open out and press the seam open. Repeat this to sew the sashing on the right side of the block. 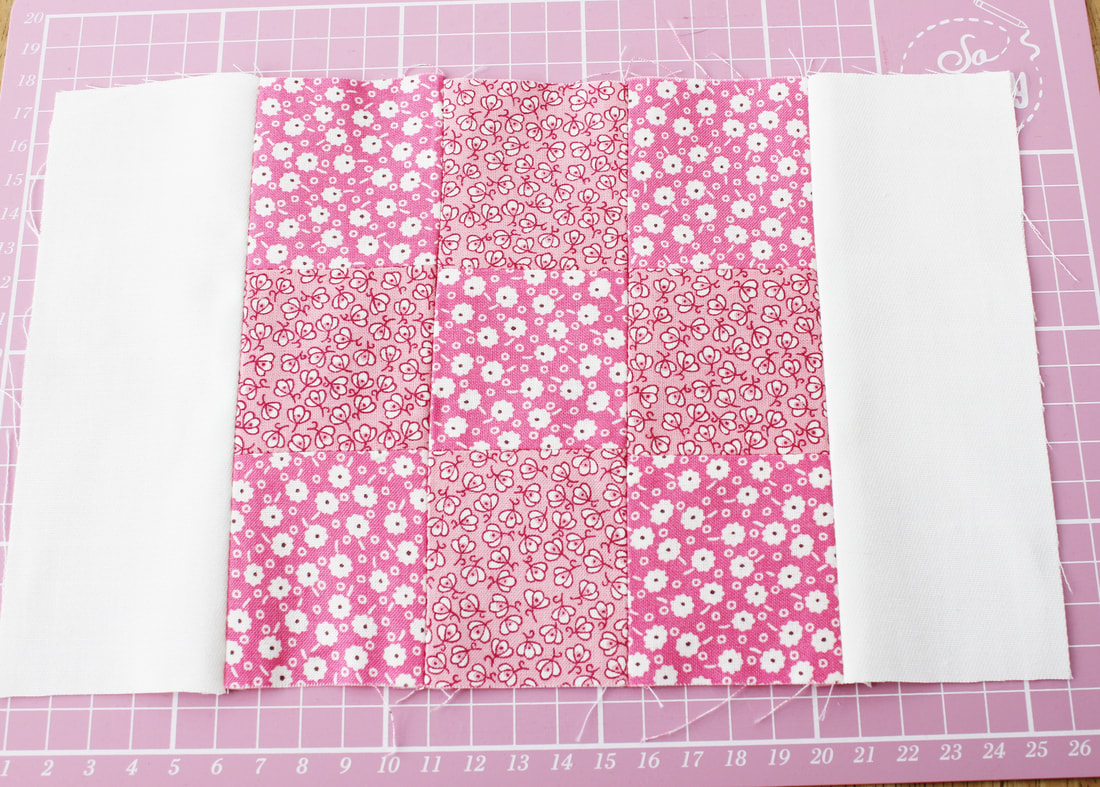 3. Take the next block in the row and place it on top of the righthand piece of sashing, right sides together. Line up the raw edges on the right side and sew together with a quarter inch seam allowance. Flip open and press the seam open.  4. Next add the another piece of sashing to the right side of block two, in the same way as you did in step 2. 5. Continuing in this way, add the third block in the row and the final piece of sashing. 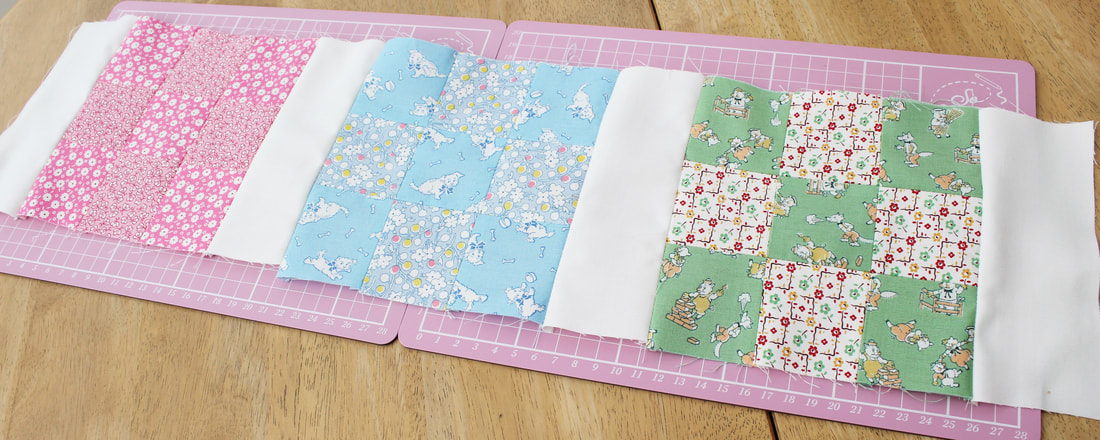 6. Repeat these steps for the remaining three rows of your quilt. 7. Next add the long, horizontal sashing strips to join the rows together. Take your first row and place a sashing strip along the top, right sides together. Sew with a quarter inch seam allowance and flip open and press the seam open. 8. Repeat this for the sashing on the bottom on the top row. 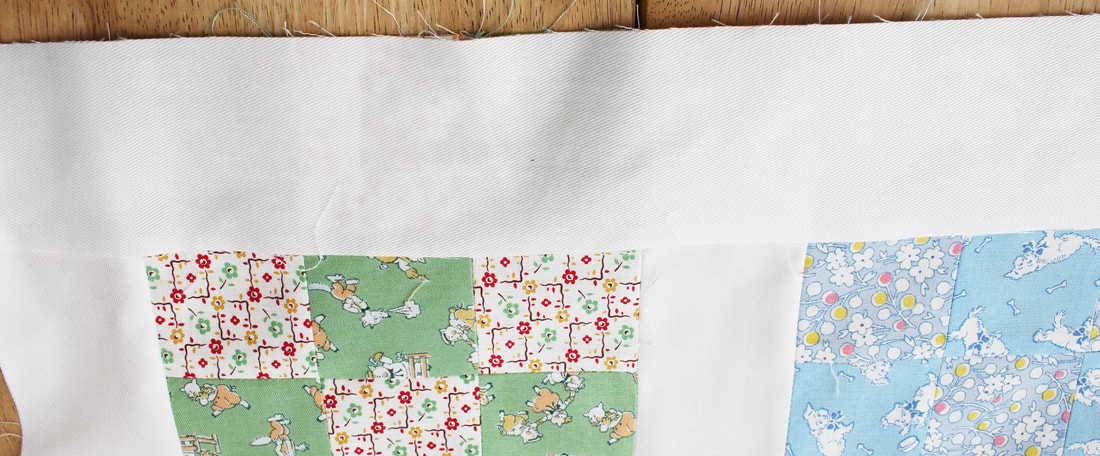 9. Now add the next row to that piece of sashing by placing the row, right sides together, on top of the sashing, lining up the raw edges. Flip open and press the seams open. Continue in this way to add each row with sashing in between. Now your quilt top is done! It's time to quilt. 10. I don't have a huge table for creating my quilt layers, so I use the floor. Spread out your backing fabric with the wrong side facing up and secure to the floor with masking tape. 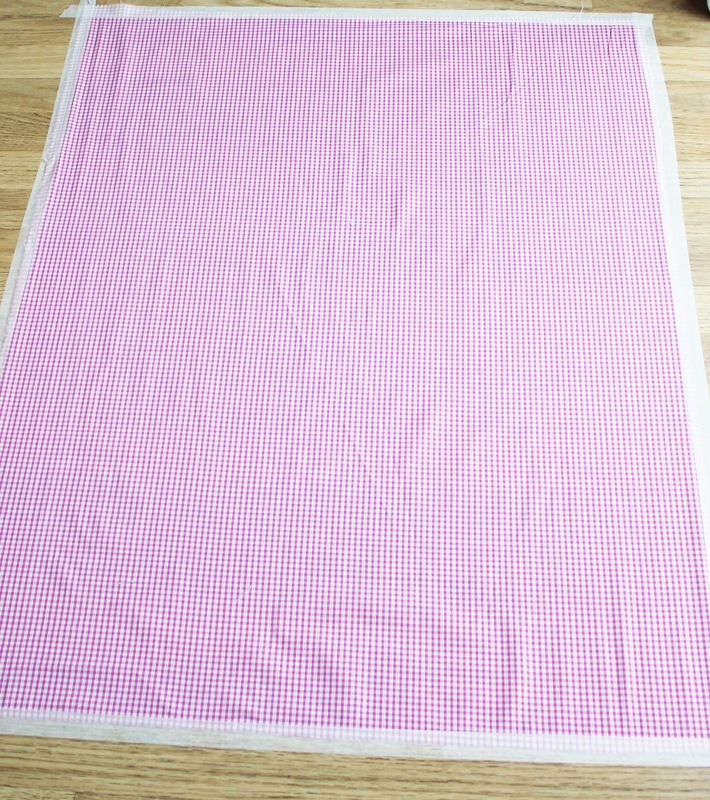 11. Next lay the wadding on top and the quilt top on top of that. 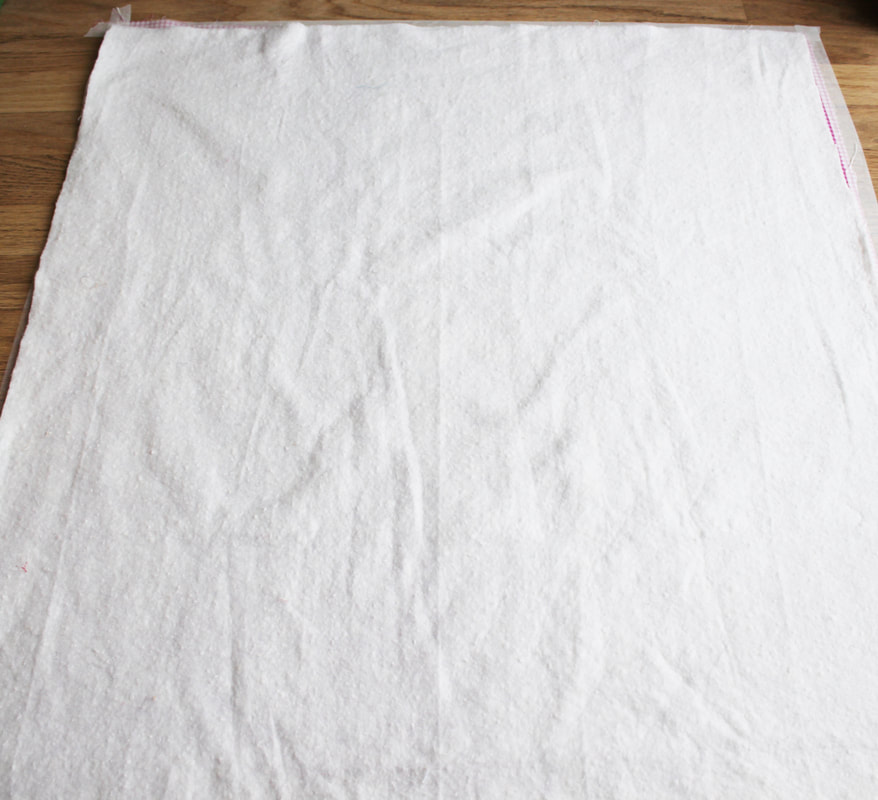 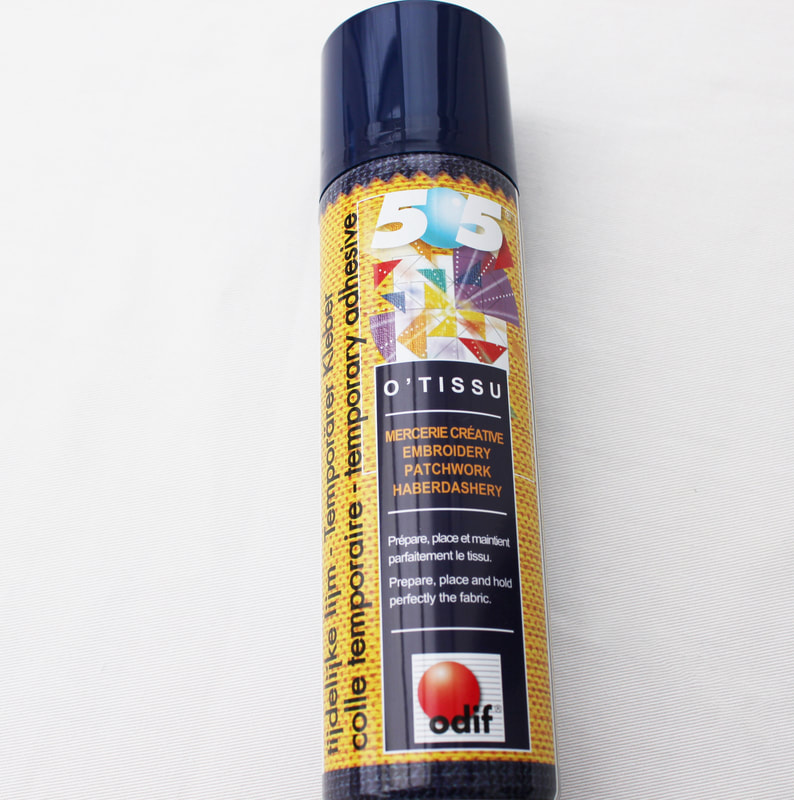 12. Pin the layers together using quilters pins, making sure your pin goes through all layers. I put a pin every few inches apart as I also sprayed some quilters basting glue on my layers to keep them together. If you don't use the glue, make sure you use more pins. 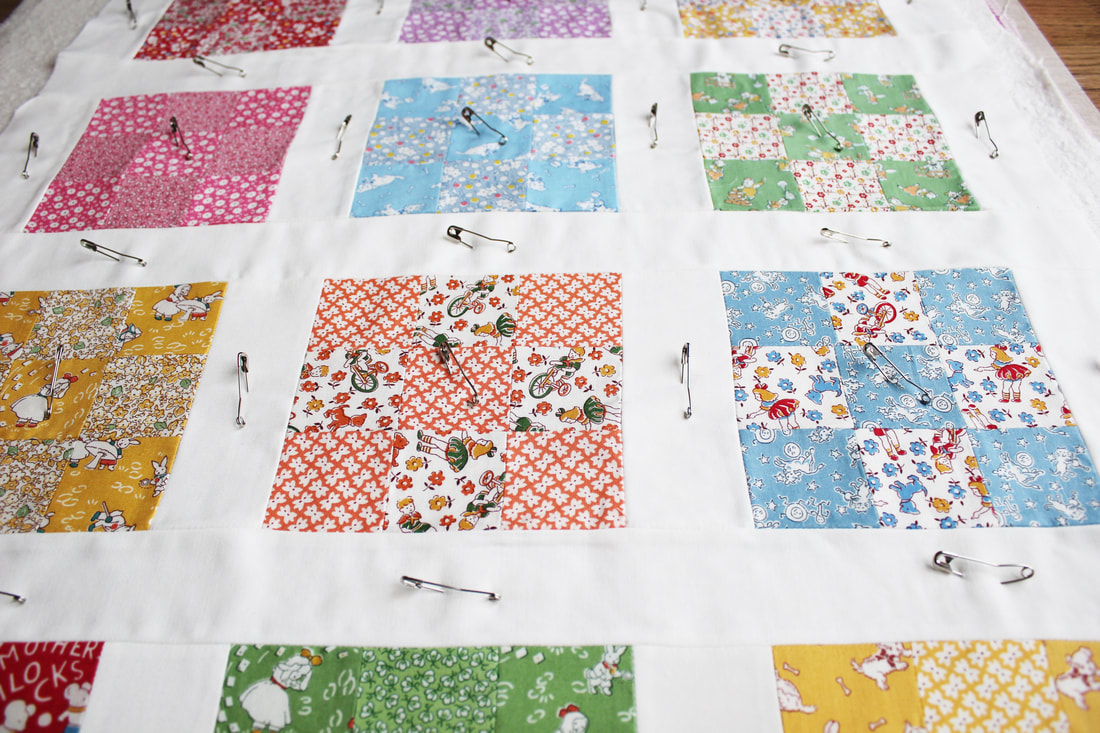 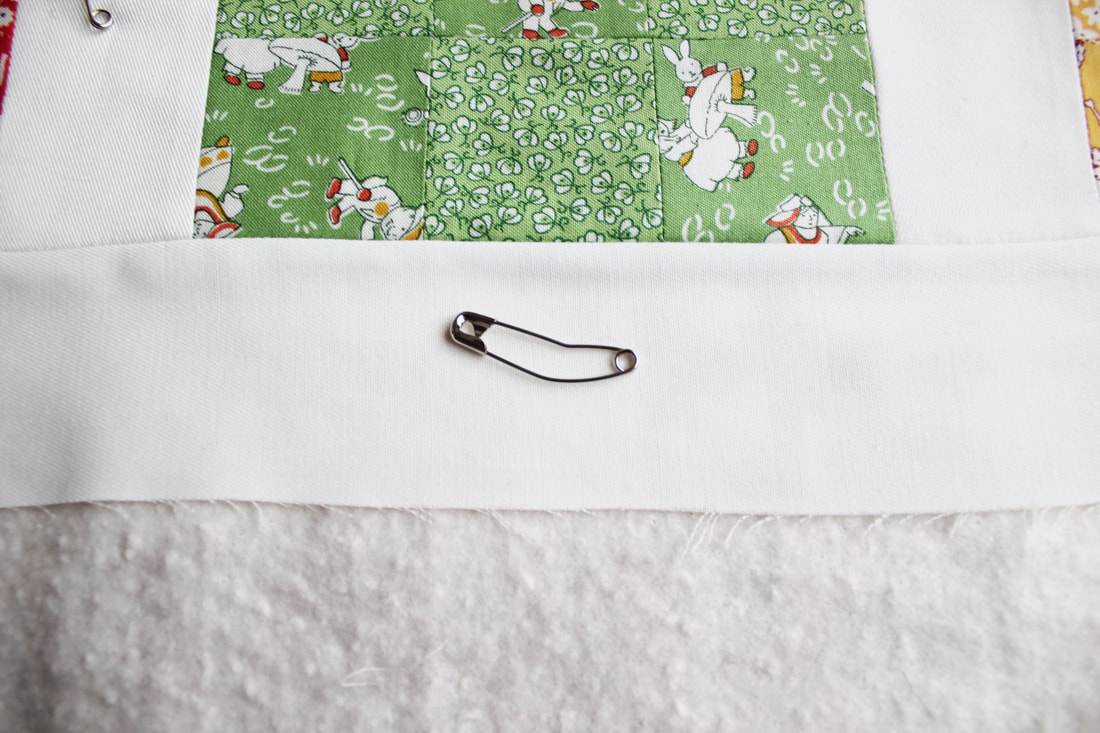 13. Now remove the masking tape and begin to quilt. I stitched in the ditch (sewing along each seam on the right side) and I quilted my squares diagonally but you can choose however you wish to quilt them. 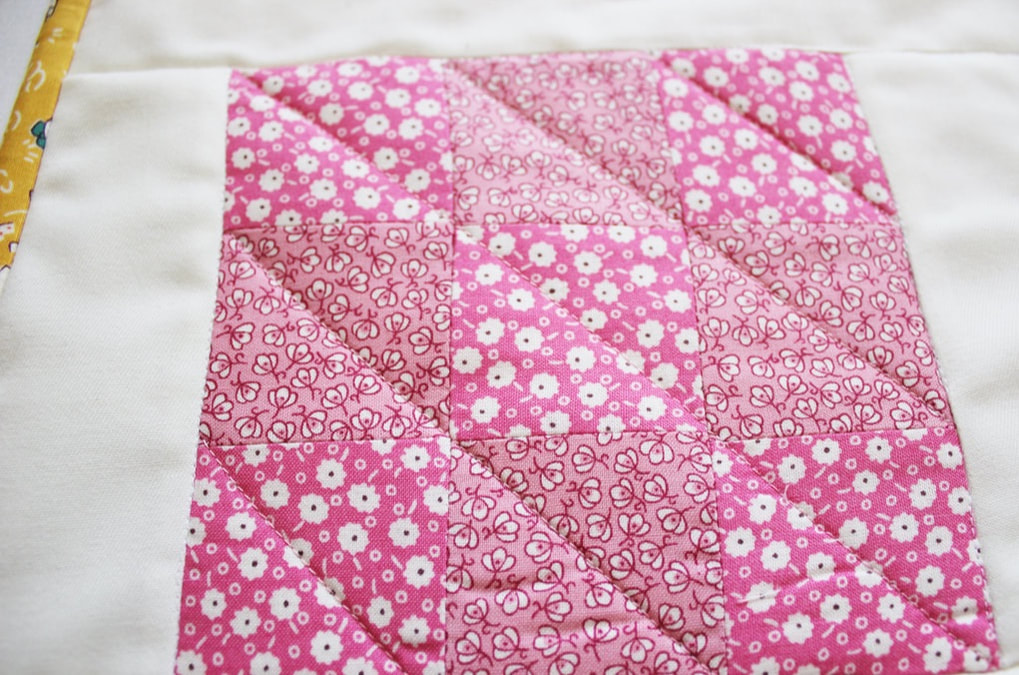 14. Once the quilting is done, trim your backing fabric and wadding to be the same size as your quilt top and remove your pins. 15. Now it's time to add the binding. Press your binding in half and pin in place on the quilt top, lining up the raw edges. 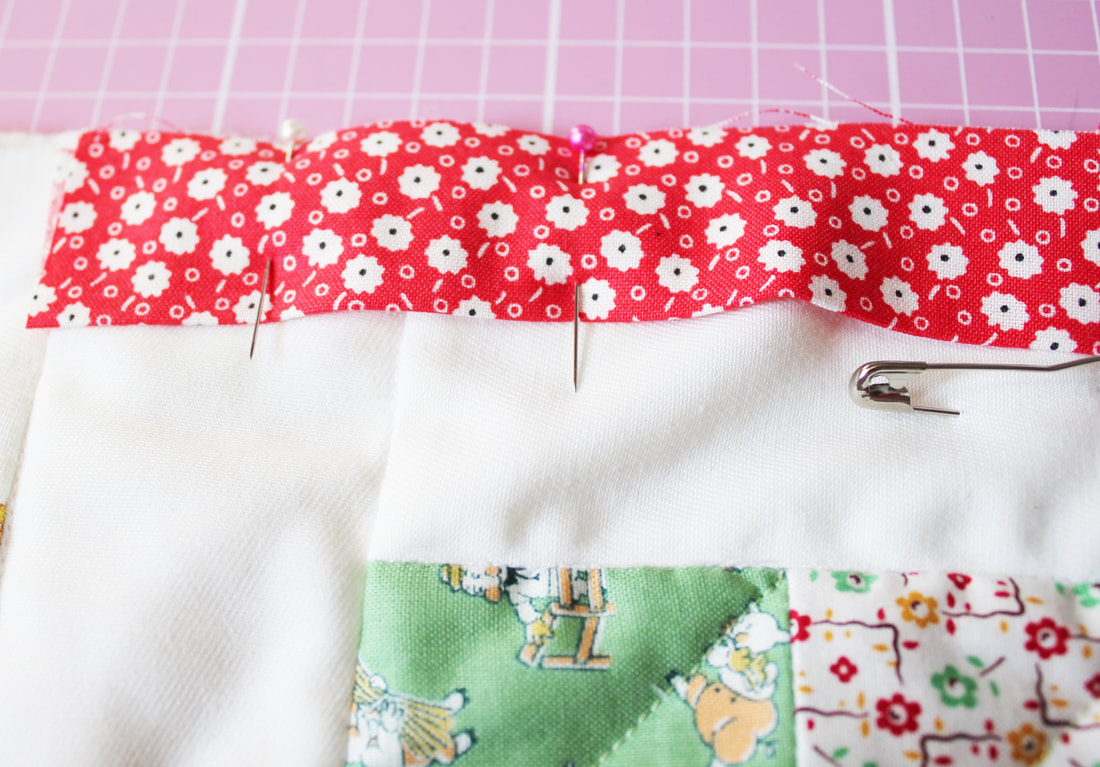 16. I turn the raw edge at the start in on itself to encase it. Sew in place with a quarter inch seam allowance. 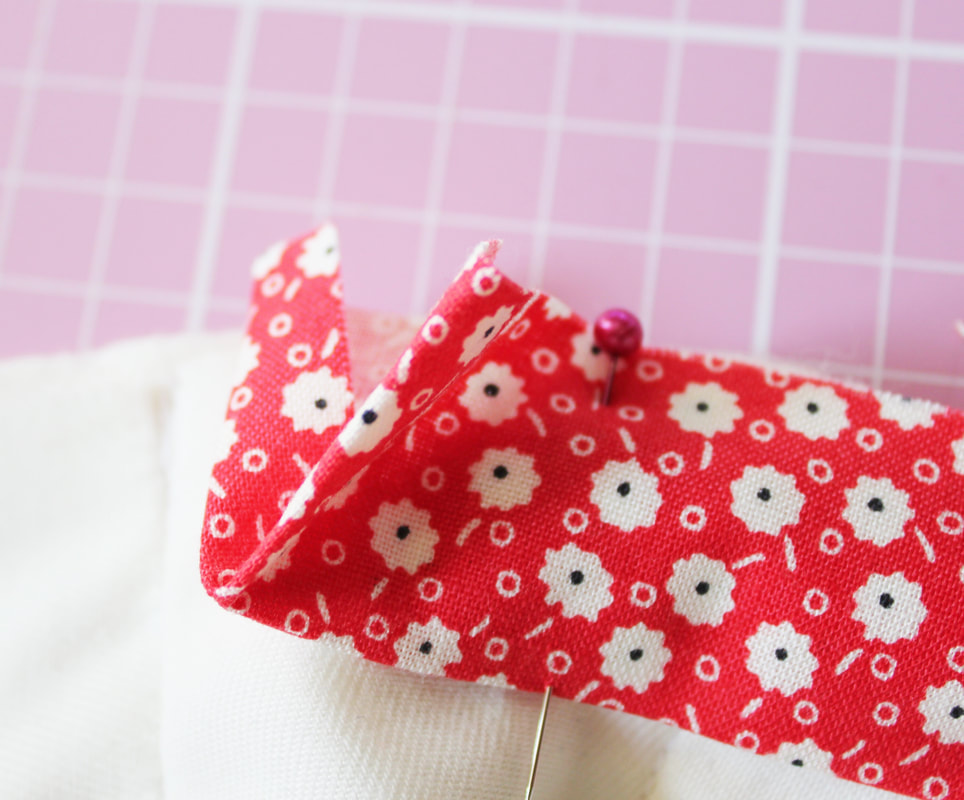 17. At each corner, I sew off the edge at the corner, lift the presser foot and readjust the angle of the binding so that it is a right angle. I then continue to sew along. This will give you a mitred corner. 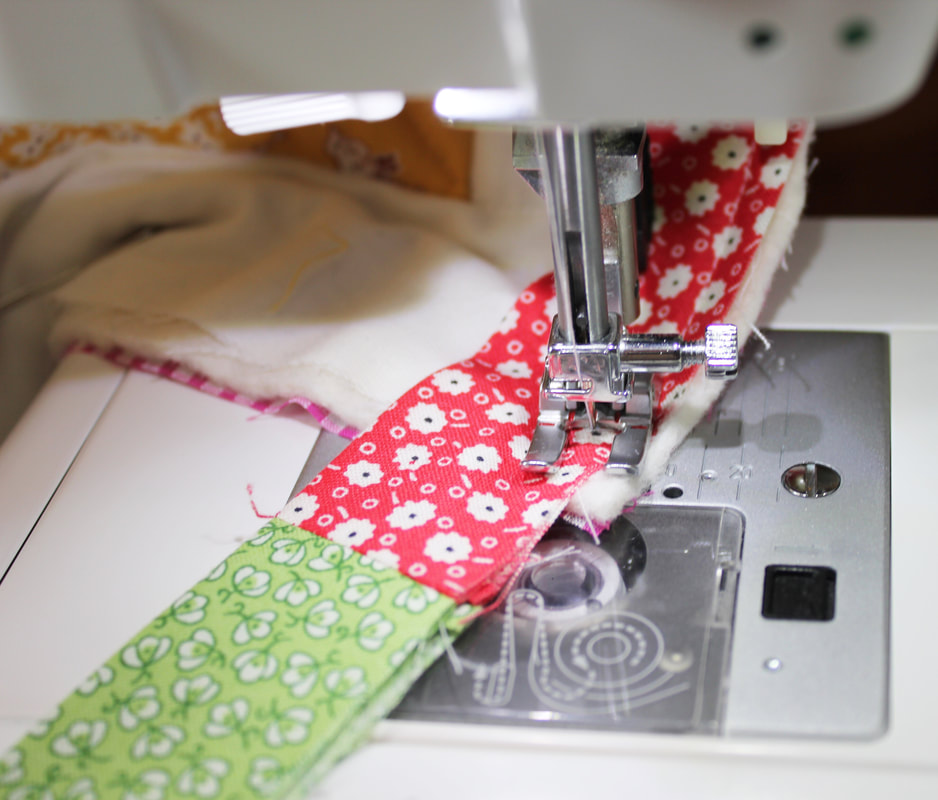 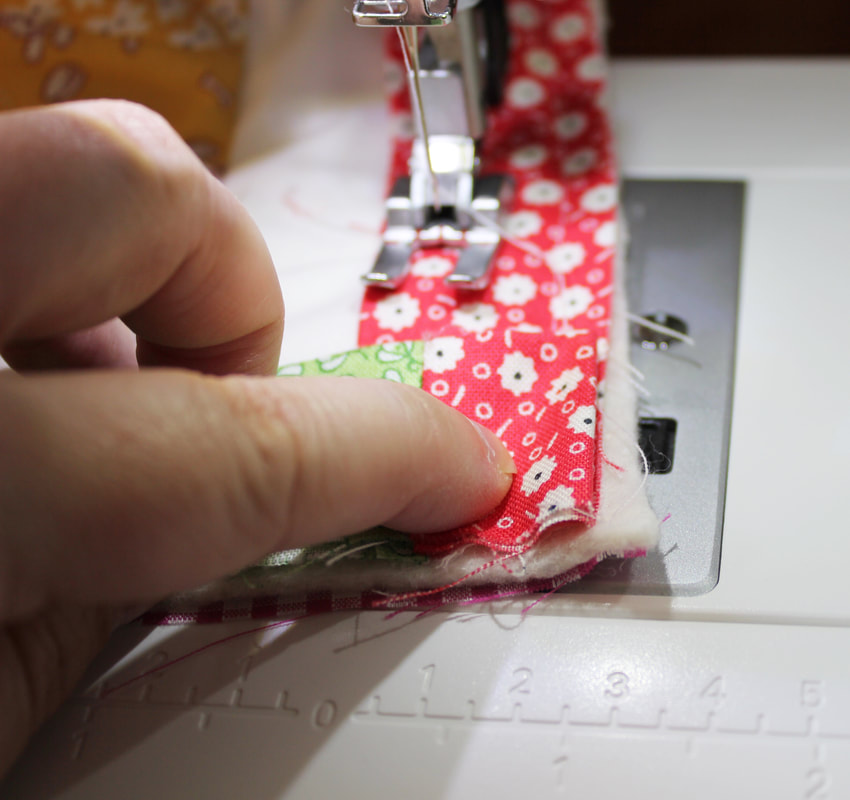 18. When you get back to the beginning, put the end of your binding inside the beginning of your binding to encase it. 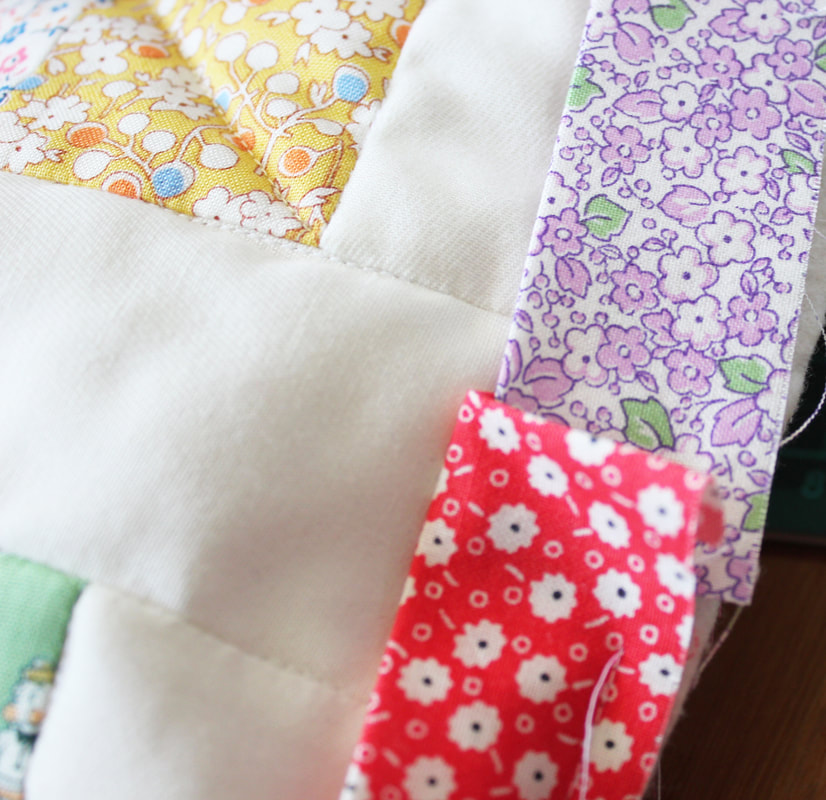 19. Now flip your binding round to the back of the quilt and stitch in place by hand with an invisible appliqué stitch. Your quilt is done! I hope you enjoy this tutorial. If you have any questions please contact me. Happy sewing! 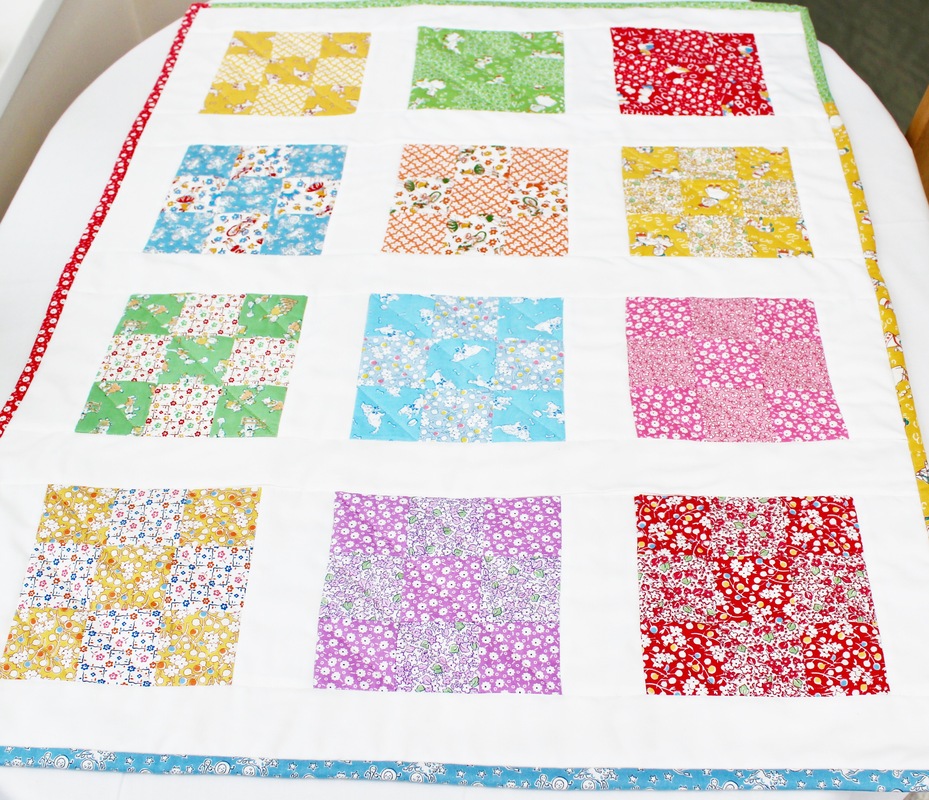  |
Follow me on InstagramAbout the Author
My name is Emma and I love all things sewing, especially EPP. My little blog is the place where I document what I'm making. I hope you enjoy reading what I'm up to! All opinions are my own and I only share things that I think you will love. Thank you for taking the time to stop by. Archives
September 2023
Categories
All
|
 RSS Feed
|
Copyright Vintage Sewing Box 2024
|
| ||||||